Rank Tracker User Manual
 WebSite Auditor User Manual
 SEO SpyGlass User Manual
 LinkAssistant User Manual
- Rank Tracker User Manual
- WebSite Auditor User Manual
- SEO SpyGlass User Manual
- LinkAssistant User Manual
Application Layout
The Title Bar
When you launch LinkAssistant, you will see the Title bar in the upper-left corner. Here's the information the title bar carries:
- Domain name of the currently open project (if applicable);
- Name, extension (.xch), and location of the file on your computer (for saved projects);
- Application name and version number.


The Menu Bar
The Menu bar offers a set of drop-down menus that give access to LinkAssistant settings and project preferences:
- File: (basic commands related to project files: opening, closing, saving etc.).
- Preferences: access to the general project and global software settings. There you may manage prospects, search engines, configure mail settings, connect third-party services and accounts, set up a scheduled task etc.
- Window: list of supported software shortcuts and key combinations to switch between sections or quickly access some menus.
- Help: contains your LinkAssistant license info, links to Help resources.
- Projects: a drop-down to switch between currently open projects.
- New: create a new project.
- Open: load an existing project from your hard drive or from SEO PowerSuite Cloud.
- Save: save currently open projects.
- Close: close currently open projects.
- Log In: log in to your SEO PowerSuite Cloud account

The Side Menu
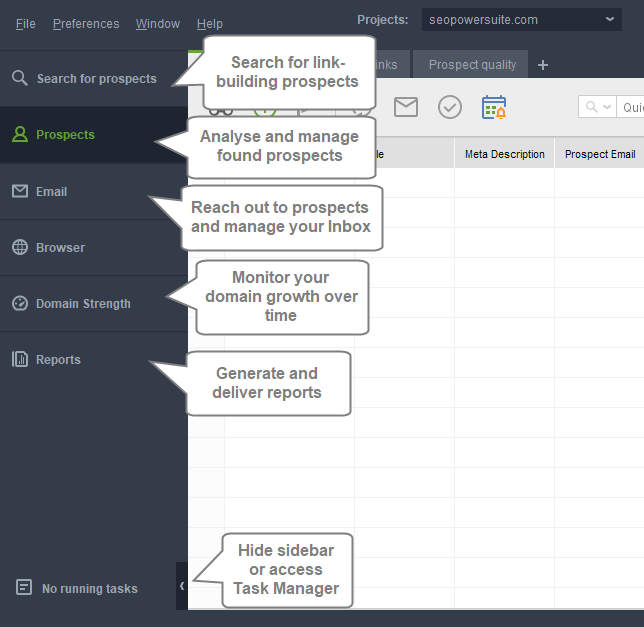
The Side menu allows you to quickly navigate between different modules:
- Prospects: here you can identify prospects - pick a method, enter your keywords, indicate the type of data you'd like to acquire, and find new link building opportunities.
- Email: allows you to configure mail settings and manage your incoming and outgoing emails, including with the help of predefined templates.
- Browser: an internal browser with a selection of search engines.
- Domain Strength: a general domain report that shows how your website’s “strength” grows over time.
- Reports: generate and share reports.

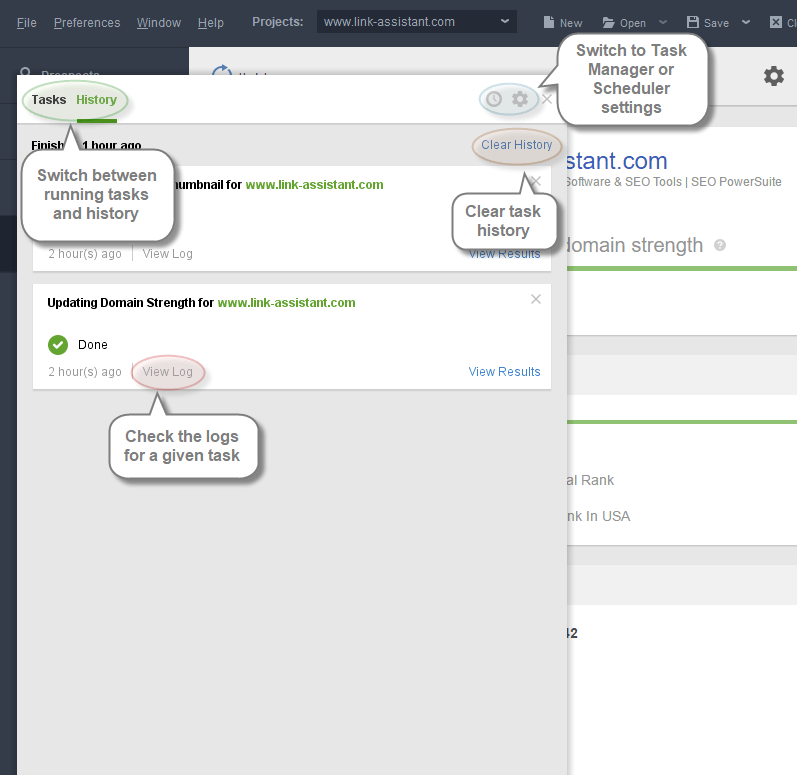
Task Manager
Task Manager can be accessed from the bottom left corner of the program window. The Tasks section will show the currently running or queued tasks, which can be paused, stopped, or removed from the queue.
- Pause/Stop the current task, resume it after a pause.
- Progress bar and Elapsed / Estimated time show the progress of the current task.
- Task queue shows the list of added tasks to be run.
- Cancel All button allows to cancel all upcoming tasks, the X icon next to each allows to cancel individual tasks.

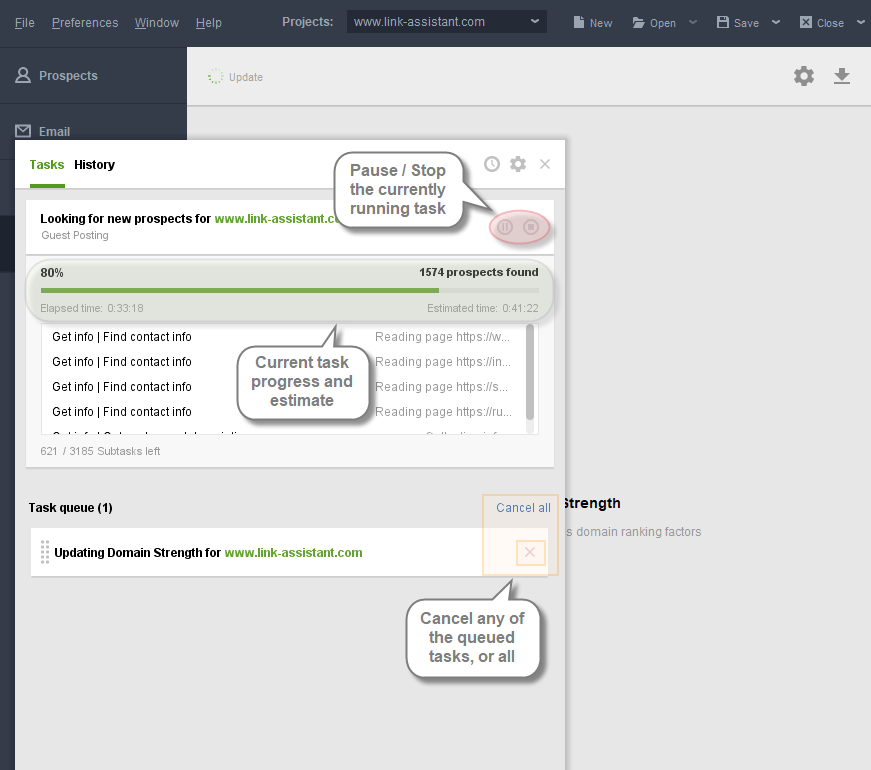
History section will show the list of finished/stopped tasks along with details.
- View Log: check the error log for a certain task if necessary.
- Clear History: remove the list of all performed tasks from Task Manager.
- Switch directly to the Task Manager / Scheduler settings.

Buttons and Controls
Search for Prospects
- Start a New Search: choose the search method to run a new search fr potential prospects
- Select results: tick the boxes or click and drag to select the results
- Move to Prospects: move the results to the Prospects module for further work
- @ icon: open details and contact info tab on the right
- Update Preview or Open in external browser
- Table view: switch to a spreadsheet workspace
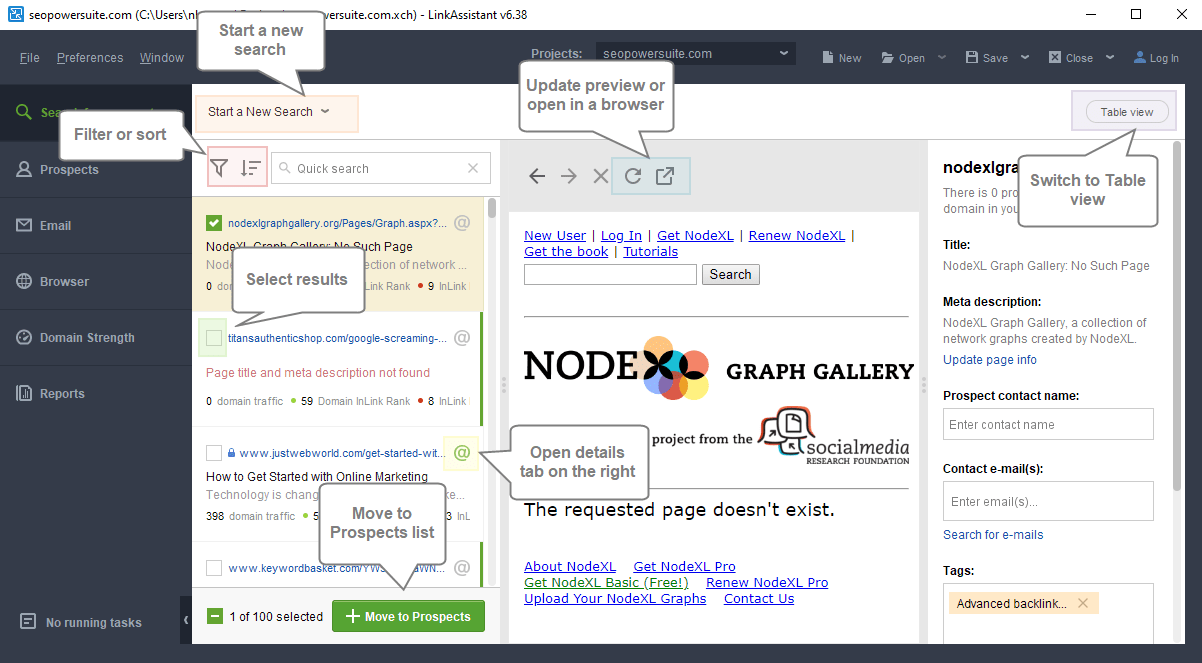

Table View
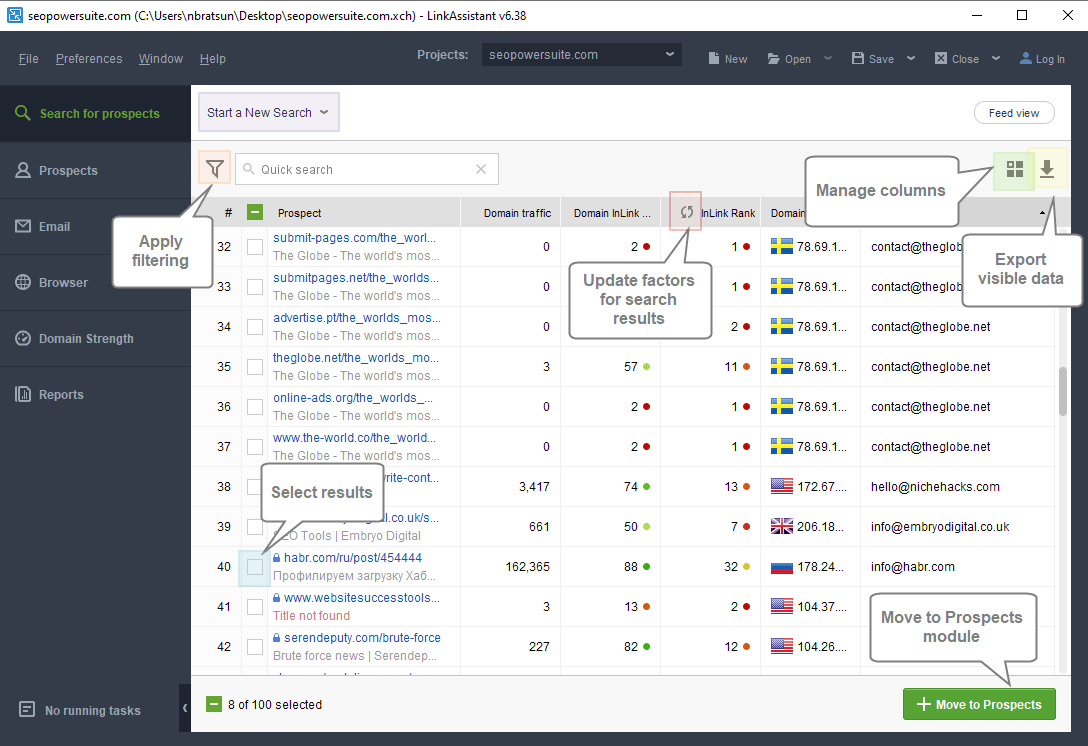
- Start a new search
- Apply filtering
- Manage visible columns
- Update metrics for the pages
- Select results and Move to Prospects
- Export currently visible data
 \
\
Prospects
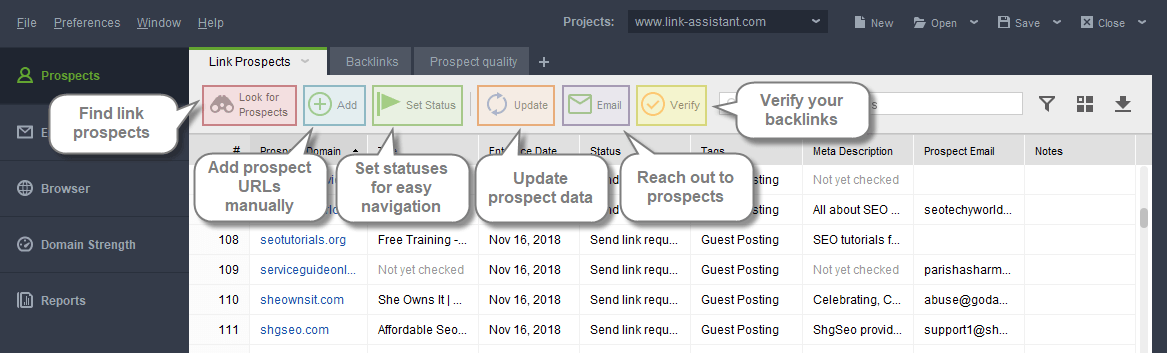
- Find link prospects: select a prospect search method and provide the required information to help LinkAssitant look for the prospects you need.
- Add link prospect: insert URLs of current or potential backlink sources you'd like to add.
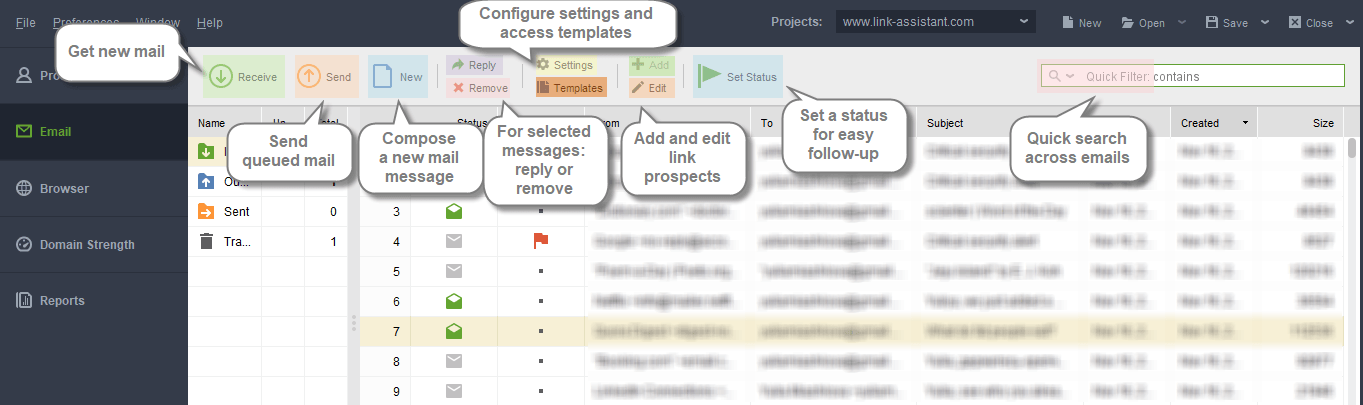
- Set a status: assign a status to each prospect for easy navigation.
- Update prospect data: run an update of prospect data to make sure all essential info is up-to-date.
- Send emails to selected partners: use our predefined templates or build upon them to develop personalized outreach emails to your prospects.
- Verify linking domains: run a deep scan to check that your linking domains are still linking back.

- Get new mail: make sure you have an updated list of incoming emails.
- Send queued mail: once you have a list of partners to reach out to, send your queued emails.
- Create a new mail message: compose a new email and specify the receiver.
- Reply to the message selected: type a reply to a selected email in your inbox.
- Remove messages: move a selected email message to Trash or delete it permanently.
- Settings: manage your email client settings for LinkAssistant to use when reaching out to prospects.
- Email templates: add or edit email templates to customize your reach-out messages.
- Add link prospects: enter URLs of potential backlink sources and update their data.
- Edit link prospects: edit the newly-added partners.
- Set a status for a prospect: specify a status to quickly sort link prospects.

Browser
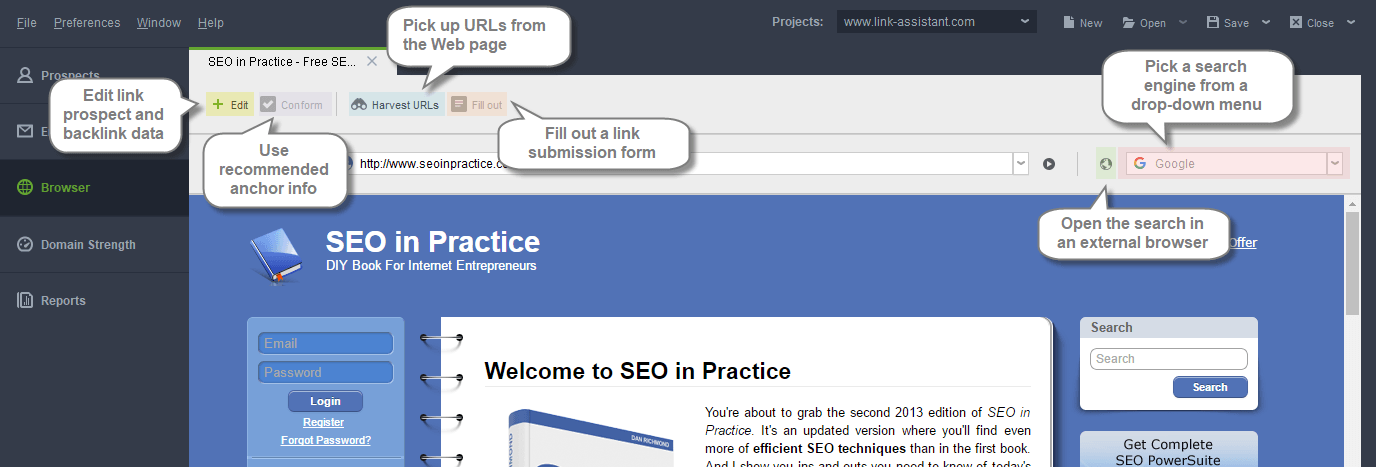
Use LinkAssistant's internal browser for easy navigation around your prospects' websites.
- Edit link prospect: revise your link prospects as well as backlinks data.
- Conform anchor info: use the recommended anchor info.
- Harvest URLs: harvest all URLs from the opened Web page to be added as link prospects.
- Fill out link submission form: automatically fill out link submission forms where applicable.

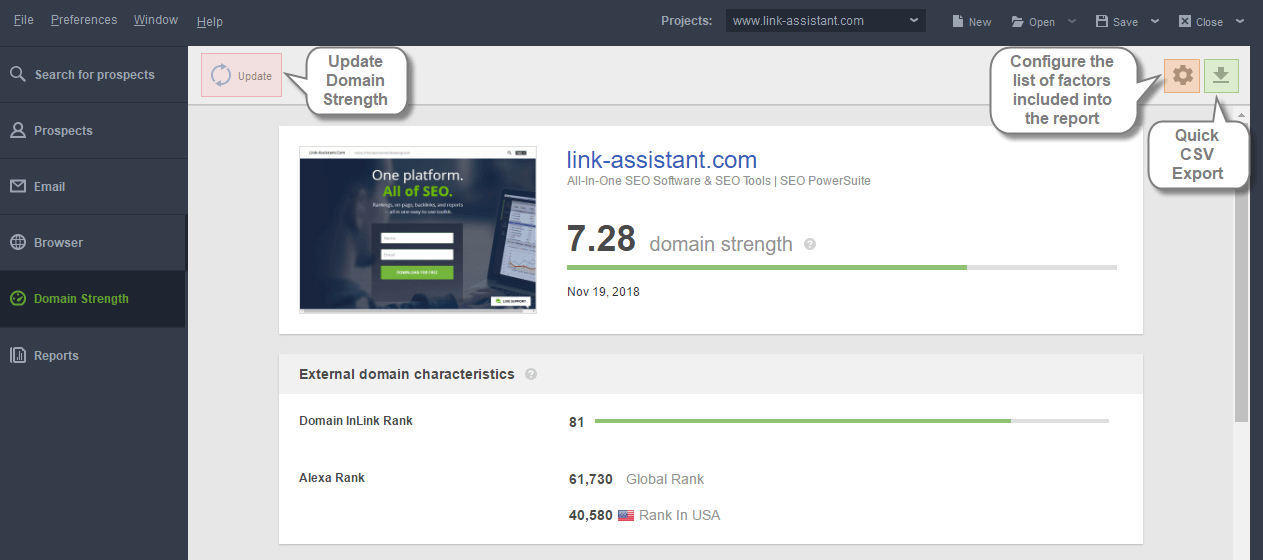
Domain Strength
- Update: update all the factors and re-calculate Domain Strength.
- Cogwheel icon: configure the list of SEO factors included in the module.
- Export icon: quickly export the results into CSV.

Reports module
- Publish: export the report using a publishing profile (e.g., email to clients, upload to a site).
- Share: share the report via a shareable link.
- Quick Save: save the report to your hard drive (no publishing profile required).
- Print: print the report.
- Click the + button to create a new report template.
- Click the star button to fill in your company info to brand the reports.
- Click the pencil icon (on hover) to edit an existing template.
- Access the context menu to rename, clone, move or delete a template.


Managing Workspaces
Each LinkAssistant project contains predefined workspaces in the Prospects module, displaying the list of prospects alongside prospect-related information. The workspaces are totally customizable and allow adding or removing any columns from the table. To edit a workspace, click the small arrow button and it will unfold the drop-down menu with the following options:
- Edit workspace: add or remove columns from the current workspace;
- Clone workspace: create a new workspace with the same set of columns;
- Copy workspace to another project: copy the current workspace to any other LinkAssistant project;
- Remove: delete the current workspace from the project.
By clicking the + on the right to existing workspaces, you can create a new workspace.
You can also edit the current workspace by clicking the square button at the top right, or by clicking on the header of any column in the workspace: rename the workspace and adjust the list of columns displayed in it. The columns can be re-arranged by drag-n-dropping.

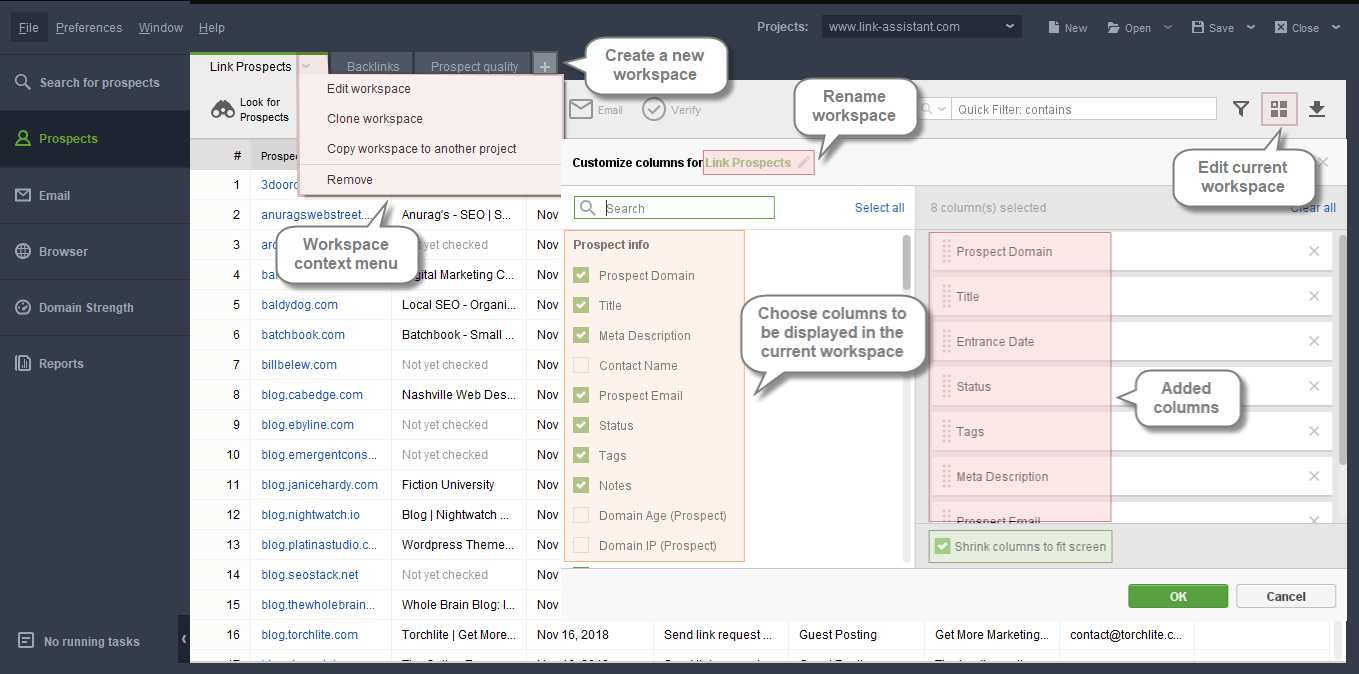
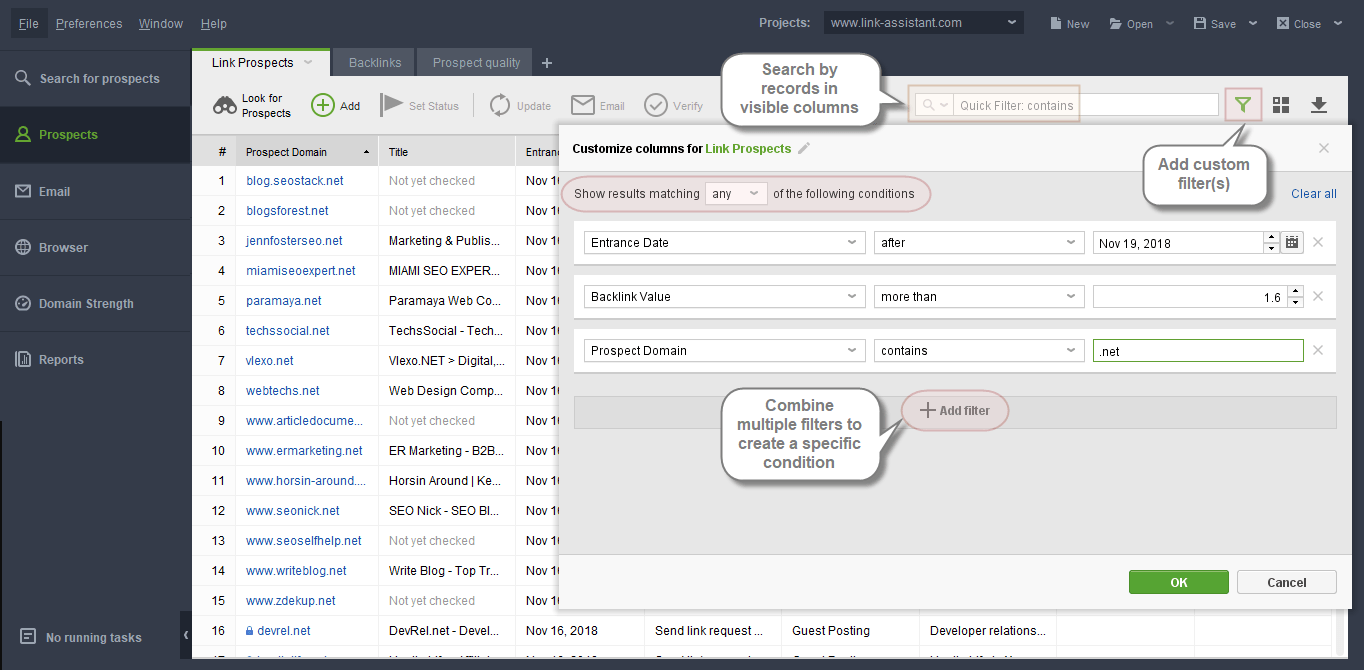
To quickly sort out the records in a workspace, you can use the Quick Search field to search by any records in the displayed columns, or apply custom filter(s) to the workspace (those will be saved if you save the project file). Multiple filters can be combined to create a complex filtering condition.