17031
•
25-minute read


On-page SEO is probably the most rewarding part of SEO optimization. Unlike your off-page efforts, the on-page improvements often impact your search visibility right away, not "months later, maybe". Luckily, WebSite Auditor can be your one-stop shop for performing numerous SEO tasks.
In this post, I’ve put together the top use cases for WebSite Auditor, from site crawling to in-depth site auditing and optimization.
For your convenience, I organized all tasks in categories in a clickable menu below. If you're looking for something specific, just click on the relevant category and dive straight into the section you're interested in.
Here are 65+ SEO tasks you can use WebSite Auditor for:
The foundation of any SEO strategy is a thorough understanding of your website's health. We'll begin by exploring WebSite Auditor's crawling and auditing features that can give you a clear picture of your site's structure and potential issues.
By default, WebSite Auditor will crawl the pages and resources of your site that are allowed for all bots in your robots.txt.
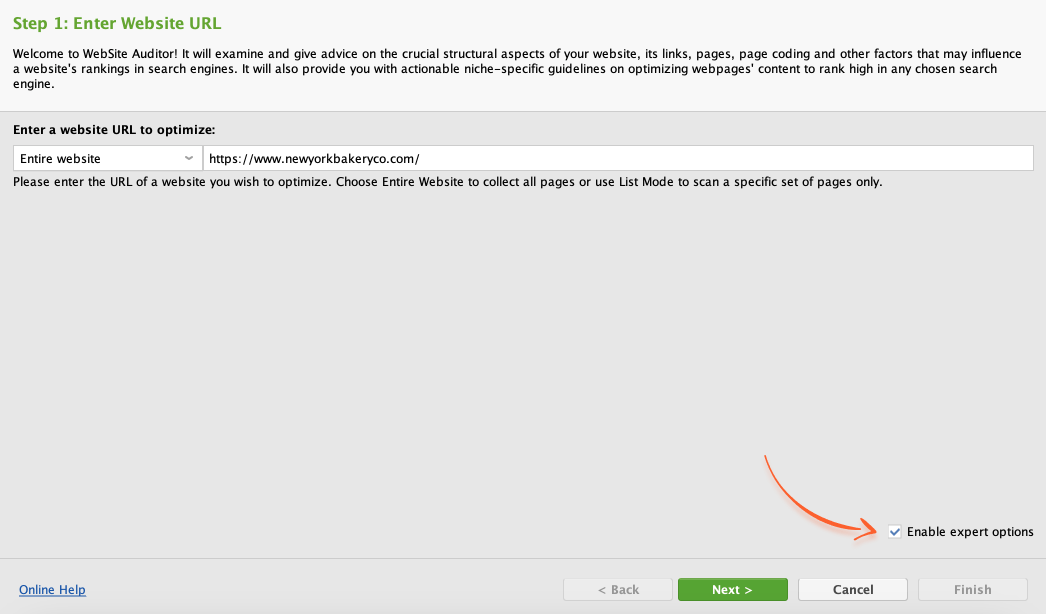
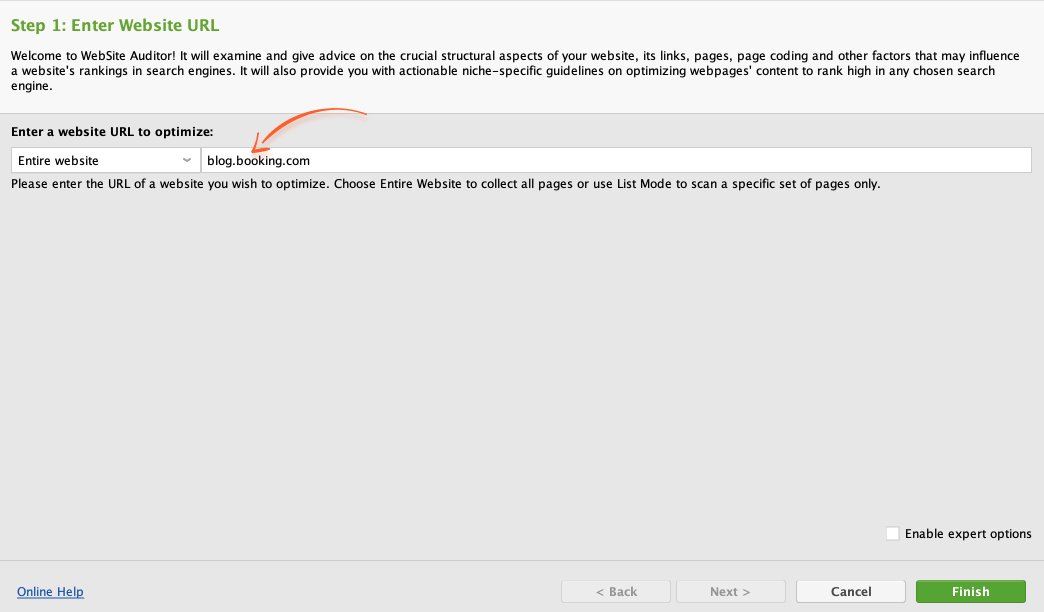
If you'd like to crawl and audit all site pages (regardless of robots.txt instructions), you can easily configure those settings in the tool. First, create a project (or, if you are doing this for an existing project, click on Rebuild Project). Then, tick the Enable expert options box in Step 1.

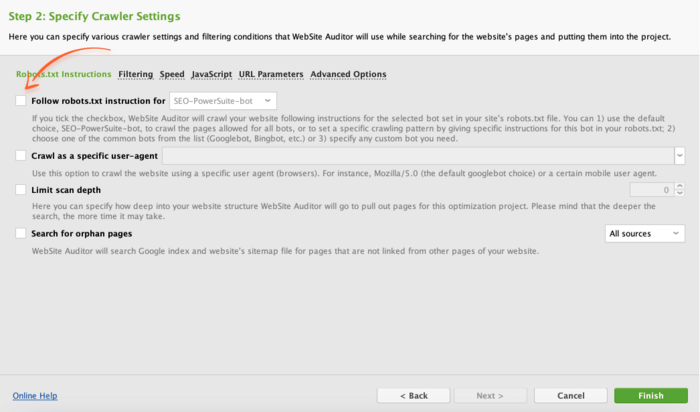
In Step 2, untick the Follow robots.txt instructions box and hit Next.
In a while, all of the pages and resources on your site will be collected and crawled.
WebSite Auditor lets you crawl websites following the robots.txt instructions for a specific bot of your choice. For that, make sure you’ve ticked Enable expert options in Step 1.
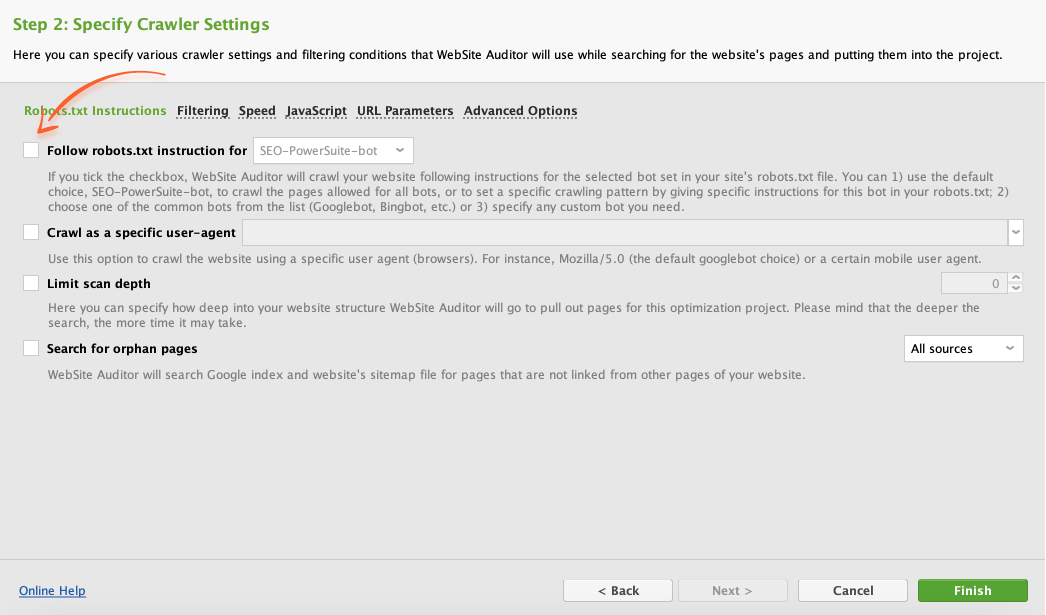
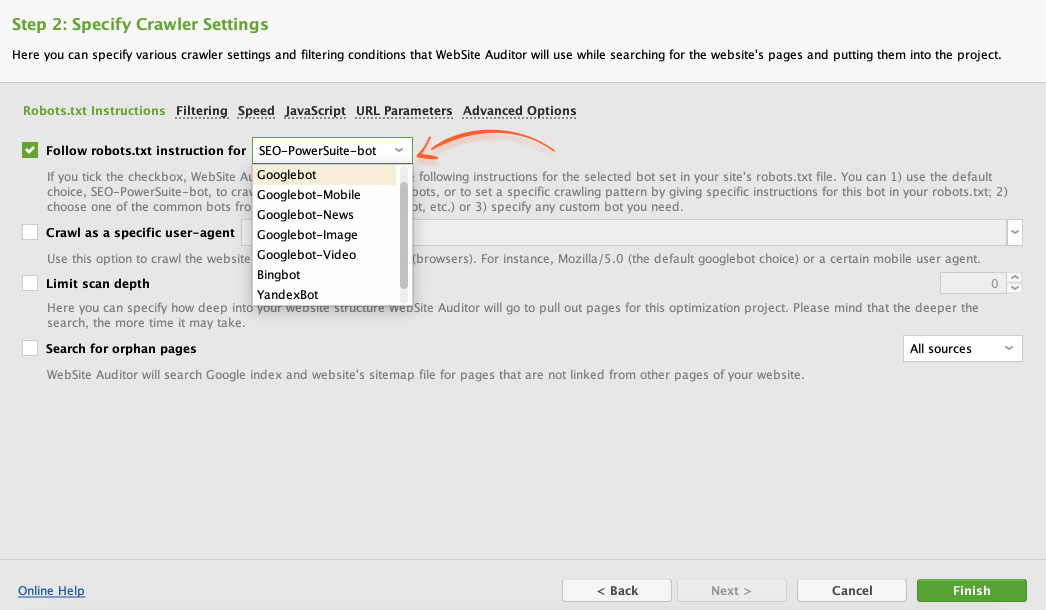
Then, in Step 2, ensure the Follow robots.txt instructions option is enabled, and click on the drop-down menu next to it. Select the bot to crawl your site with (if the bot you're looking for isn't on the list, feel free to specify a custom one). Finally, hit Finish to proceed with the crawling.

Depending on your audit purposes, you might sometimes want to use a specific user agent to crawl your site. To do this, ensure the Enable expert options box is checked in Step 1. In Step 2, tick the Crawl as a specific user agent box. In the drop-down menu, pick a user agent.

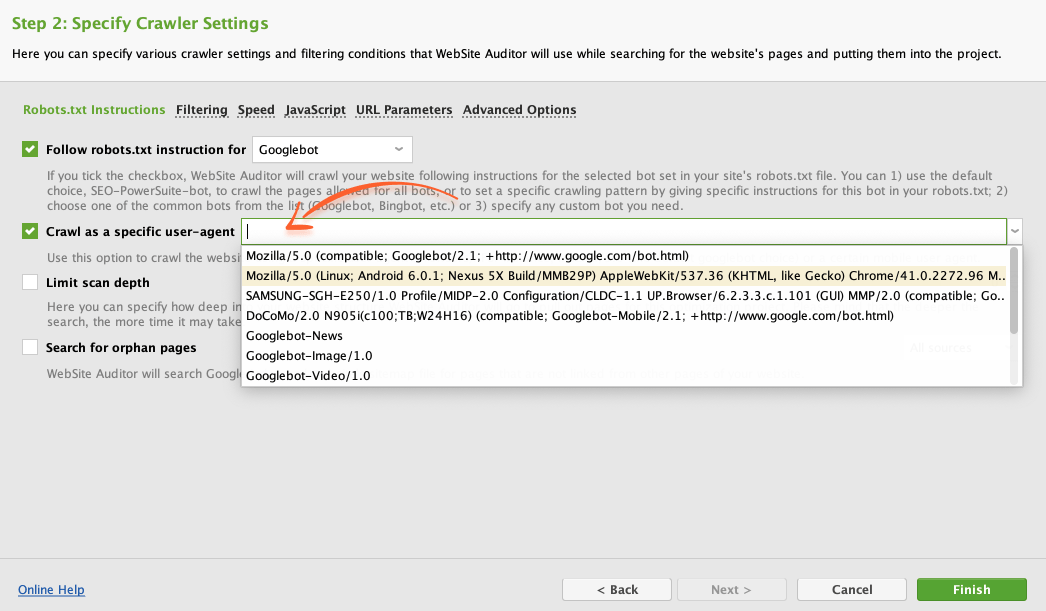
Remember to also specify the search engine bot compatible with the user agent you're about to use in the Follow robots.txt instructions dropdown menu.
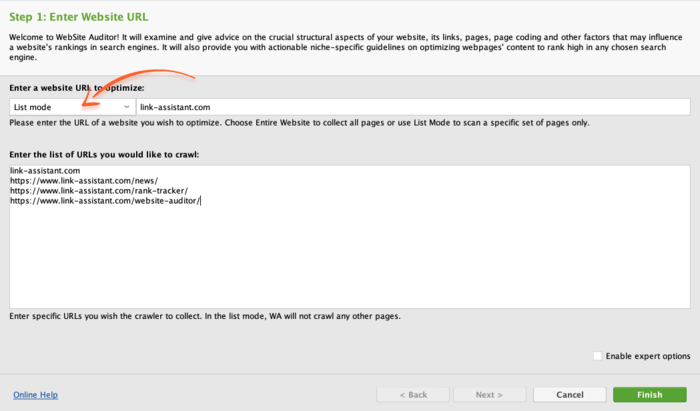
If you need to focus on specific content, you may crawl only the chosen directories and pages instead of the entire website.
In Step 1 of project creation, select List mode in the dropdown menu and specify the list of URLs you’d like to crawl.

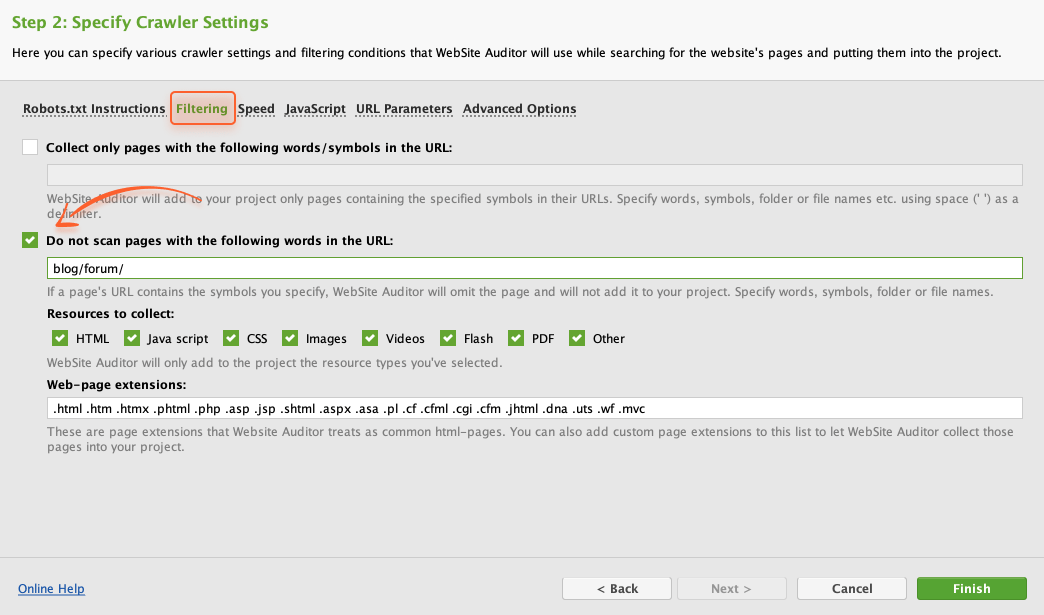
To ensure the crawler focuses only on the important public pages, you may sometimes want to exclude some pages or directories from the crawl. To do this, you'll need to check the Enable expert options box in Step 1 of project creation/rebuild.
Next, switch to the Filtering tab and tick Do not scan pages with the following words in the URL. In the field below, specify the folders/pages you'd like to exclude from the crawl.

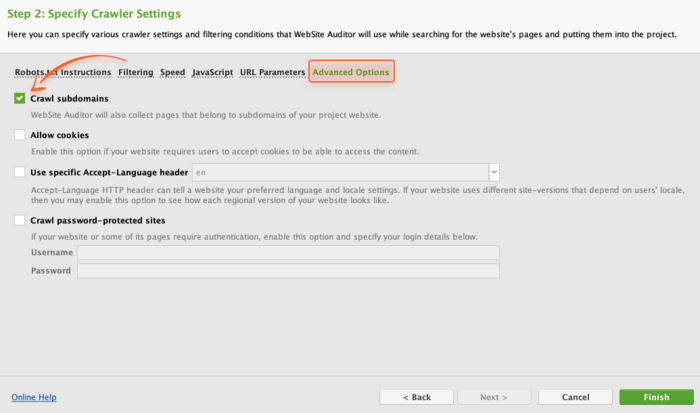
If your website includes subdomains, you can crawl them along with your main domain. This will help you to comprehensively evaluate your site structure as a whole — in a single project.
To crawl a domain and its subdomains altogether, create (or rebuild) a project and tick Enable expert options. At the next step, go to Advanced Options and tick the Crawl Subdomains box.

Within a specific task, you may need to analyze a single subdomain of your site. For that, create a new project and enter the URL of your subdomain, without specifying any additional settings.

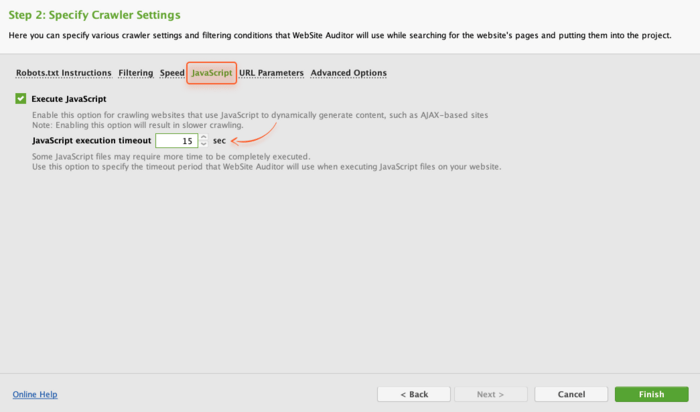
A lot of websites feature dynamic content like personalized recommendations and media feeds. If it’s your case, you may need WebSite Auditor to execute the JavaScript while crawling your website pages.
To enable rendered crawling, create (or rebuild) a project and tick Enable expert options in Step 1. Then, navigate to Advanced Options and tick Execute JavaScript in Step 2.

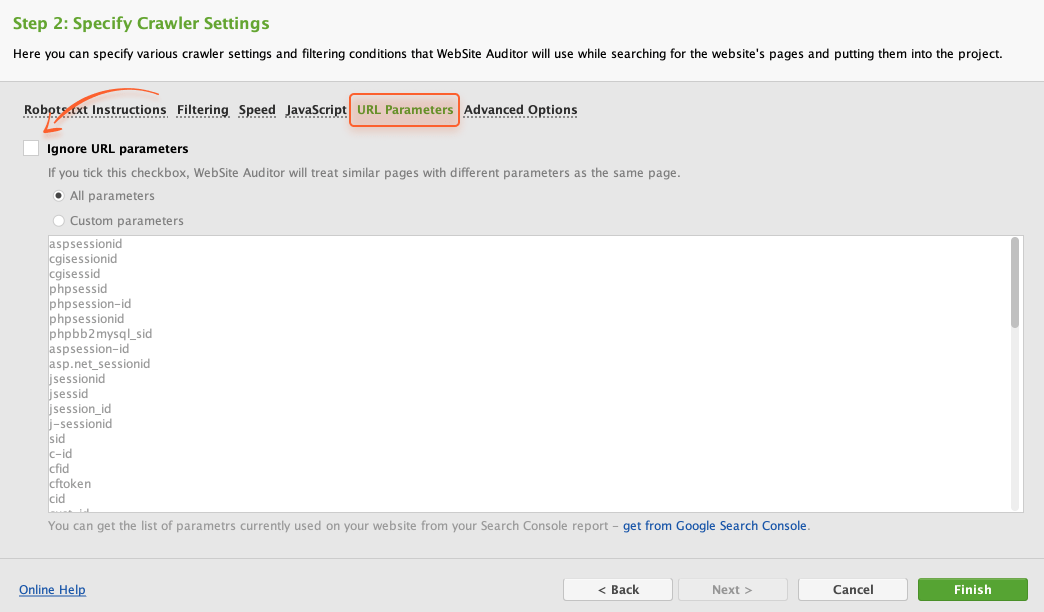
Sometimes your pages have extra bits added to their URLs (like those weird things you see after a question mark). This is especially true for sites powered by a CMS that might generate those parameters automatically.
However, WebSite Auditor lets you spot any unnecessary URL parameters so that you can get rid of them to keep your URLs clean. To do that, create (or rebuild) a project with the Enable expert options box checked in Step 1.
In Step 2, go to the URL Parameters tab, untick the Ignore URL parameters box, and click Finish to proceed with the scan.

WebSite Auditor can be helpful if you need to get a list of pages with certain URL parameters. Say, you want to count marketing campaigns or sort out items that are most popular on your product pages.
First, create (or rebuild) a project with the Enable expert options box checked in Step 1. Switch to the Filtering tab and specify the parameter you're looking for in Step 2 (if you're entering several parameters, make sure to separate them by space).
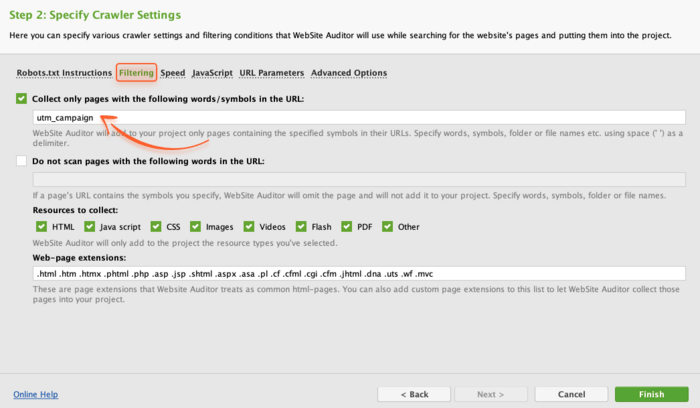

Then, go to the URL Parameters tab and untick the Ignore URL parameters box (as shown in the previous section Spot any unnecessary URL parameters). Click Finish to proceed with the scan.
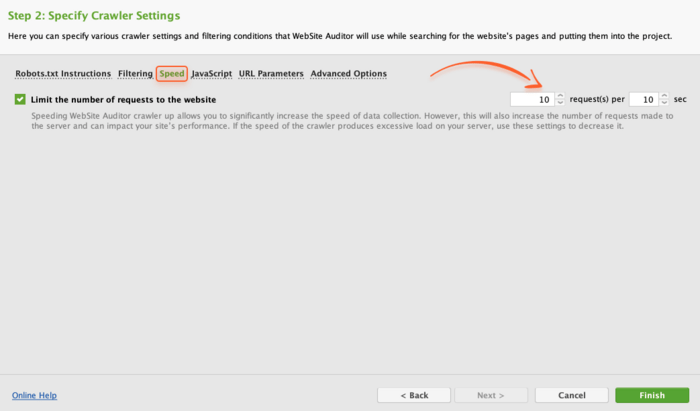
Old servers may not be able to handle the number of concurrent requests sent by crawlers. To deal with this, you can change your crawl speed in WebSite Auditor.
In Step 1, create (or rebuild) a project and make sure the Enable expert options box is ticked. In Step 2, go to the Speed tab, check the Limit the number of requests to the website box, and specify the number of requests per second to be sent to your site.

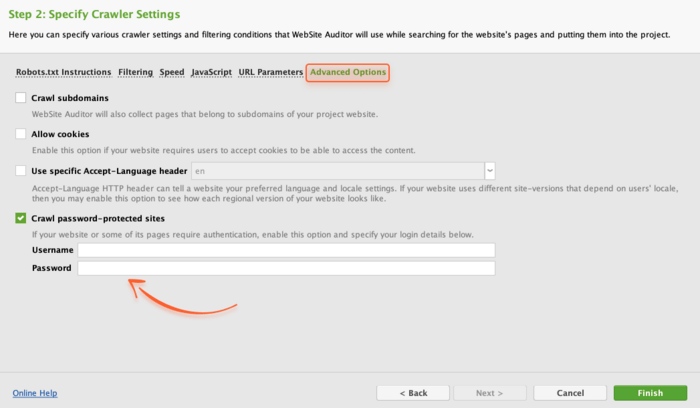
With WebSite Auditor you can crawl sites, certain subdomains, or directories that require authentication. You should simply create (or rebuild) a project and click Enable expert options in Step 1.
In Step 2, go to the Advanced Options tab, tick the Crawl password-protected sites box, and specify your login details.
By default, WebSite Auditor will collect all kinds of internal and external resources used on your site. Go to Site Structure > All Resources and click on any type of internal/external resources you're about to look into.
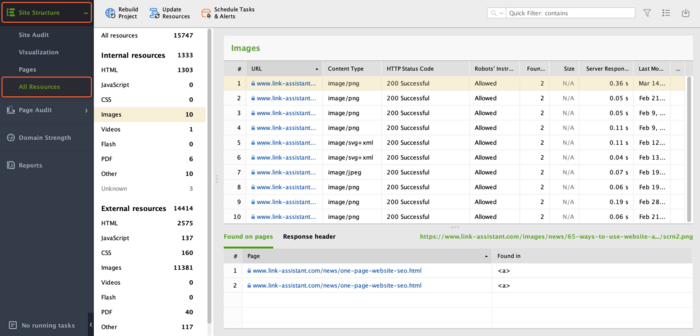
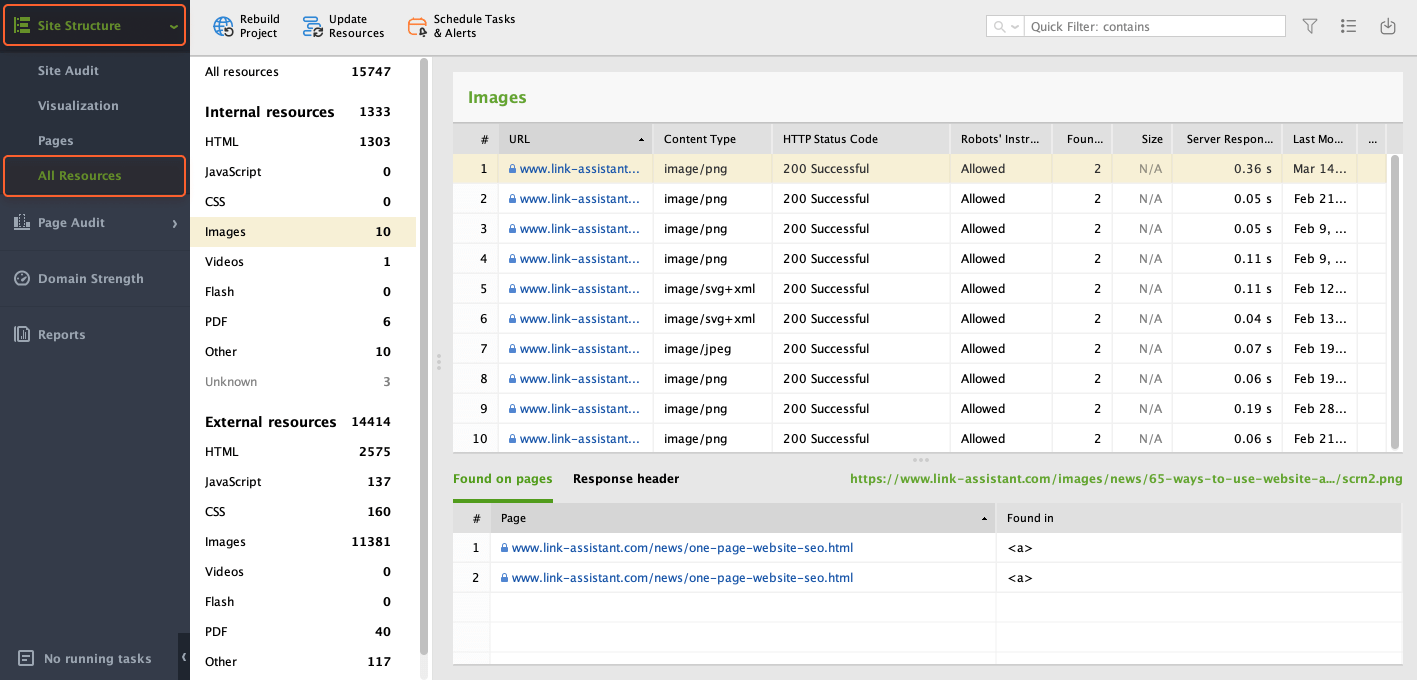
Here, you'll see a full list of resources of every type, along with each resource's HTTP response code, robots’ instructions, and the number of pages it was found on.
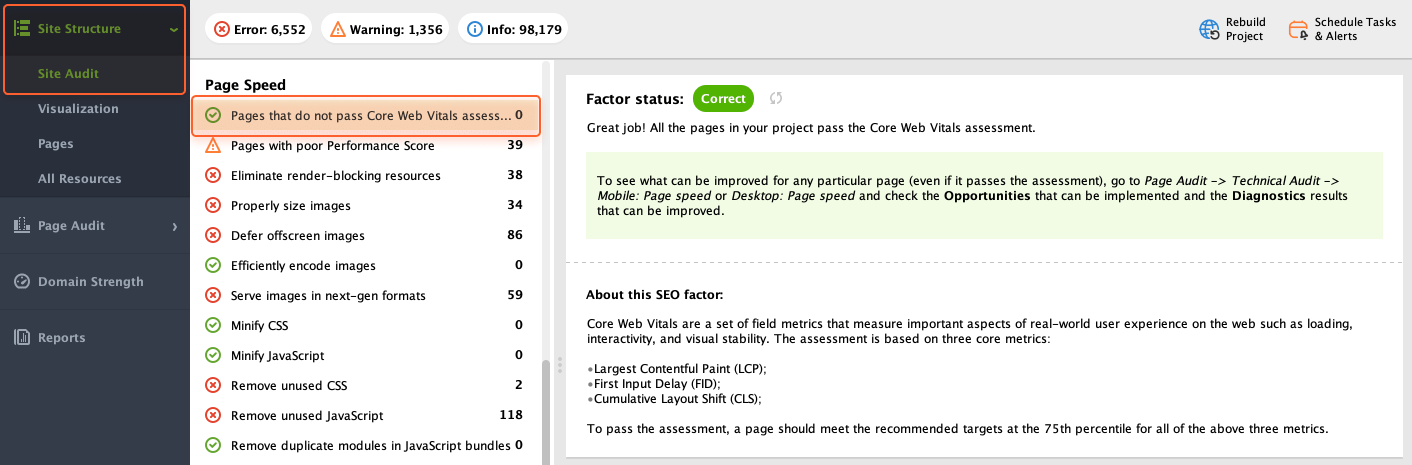
Since Core Web Vitals are a significant ranking factor for Google, measuring these metrics should become part of your regular checkups. WebSite Auditor can analyze all pages in bulk to provide you with data on the overall website's performance.
How We Improved Core Web Vitals [Case Study]


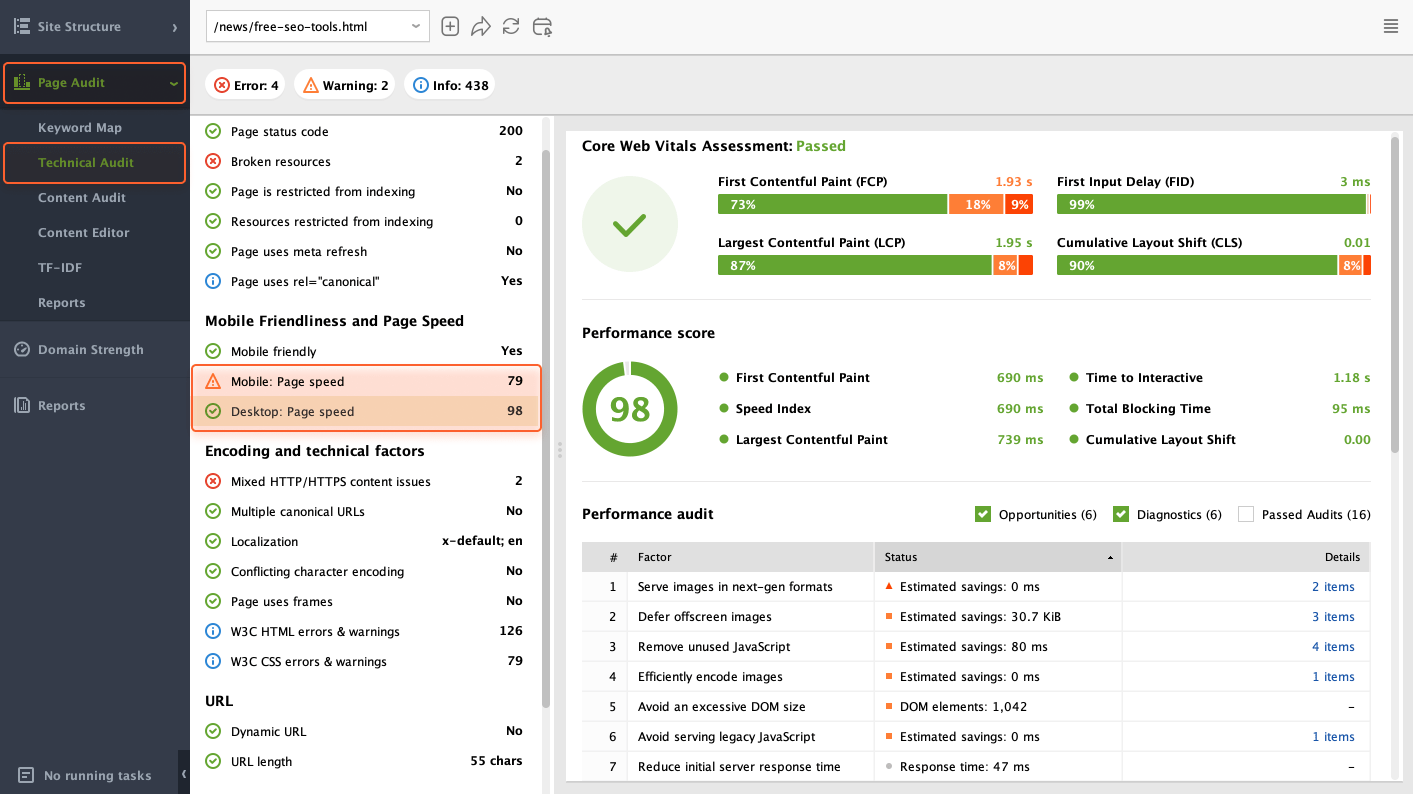
Navigate to Site Structure > Site Audit > Page Speed. Here you’ll see if some of your pages don’t pass the Core Web Vitals assessment and get tips on optimizing your site for both search engines and users.

Many W3C errors can hinder website's SEO efforts. For instance, poorly structured code makes it difficult for search engine crawlers to understand and index your content effectively.
To check if some of your pages have W3C errors, go to Site Structure > Site Audit > Encoding and technical factors. Here, check Pages with W3C HTML errors and warnings and Pages with W3C CSS errors and warnings.
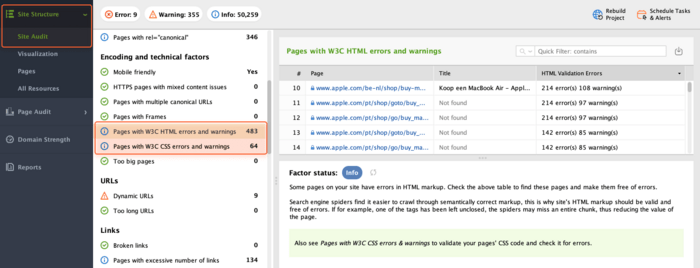
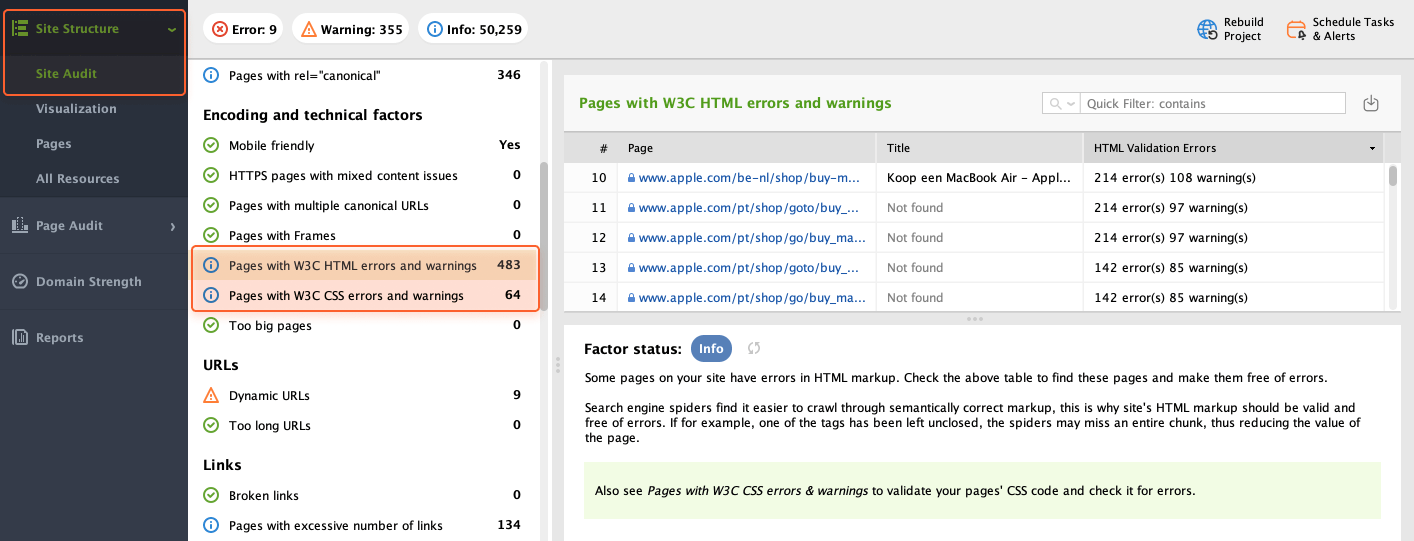
If any of these errors occur, you'll see the list of pages with the errors in the right-hand part of your screen.
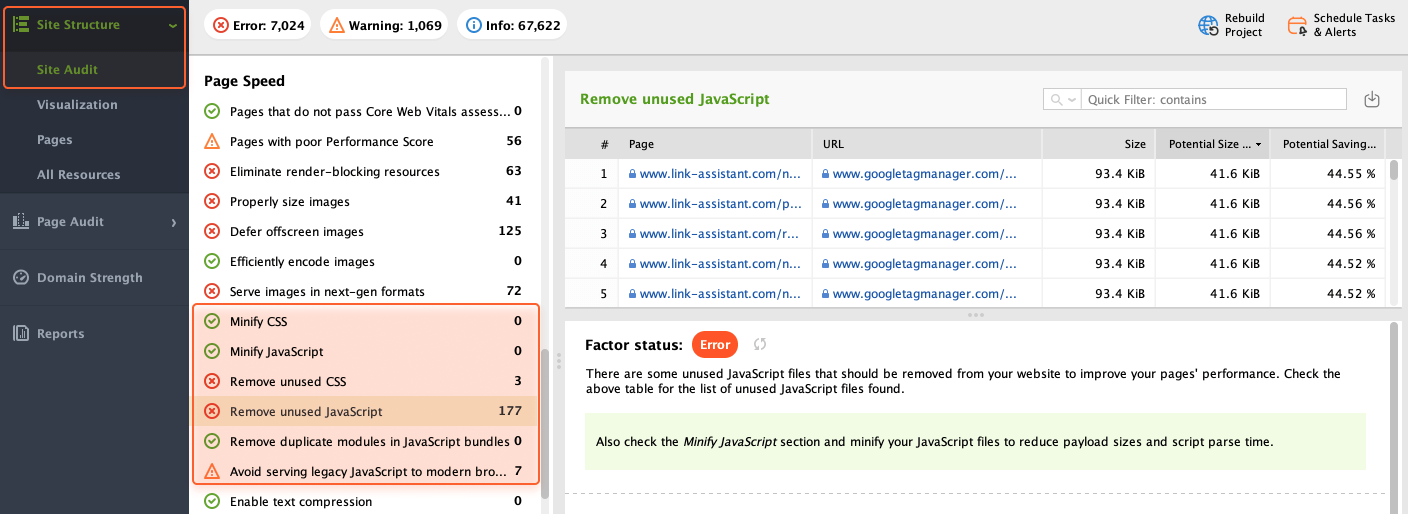
JavaScript and CSS are essential for creating a smooth user experience and great website performance. By identifying and fixing JavaScript and CSS problems, you can potentially improve your SEO ranking.
To do this with WebSite Auditor, go to Site Structure > Site Audit > Page Speed. Here, you need to check all the corresponding fields containing JavaScript and CSS.

Broken pages and incorrect redirects lead to user frustration and hinder SEO, so regular checks are crucial for a healthy website.
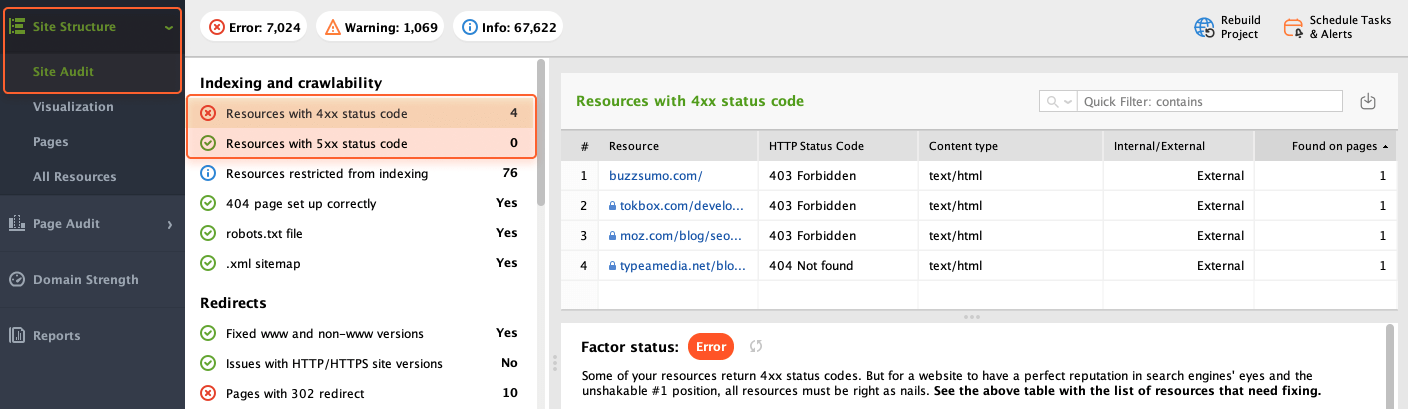
Status codes are error messages from your website. 4xx codes (client errors) mean there's an issue with the user's request. 5xx codes (server errors) indicate problems on your website's end.
You can view a list of pages with 4xx/5xx status codes by navigating to Site Structure > Site Audit > Indexing and crawlability. If any such resources are found, you'll see a list of them on the right.

If you want to ensure that search results include only relevant pages for users (without private info or unfinished content pieces), you may check the list of pages restricted from indexing.
To do that, go to Site Structure > Site Audit > Indexing and crawlability. By clicking on Resources restricted from indexing, you’ll see the list of corresponding pages.

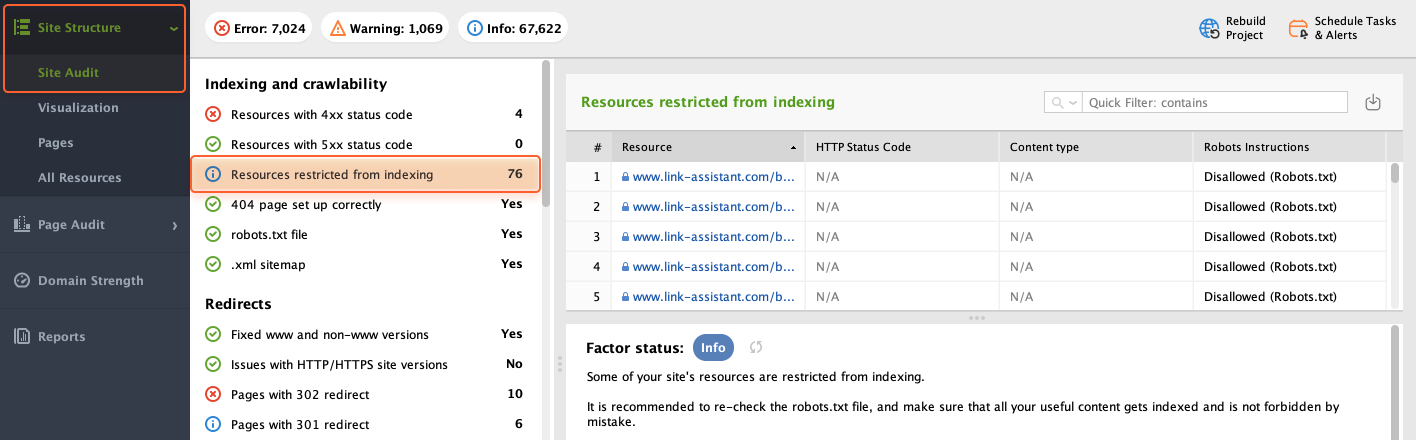
I recommend you check this list from time to time to ensure that no useful pages are hidden from users by mistake.
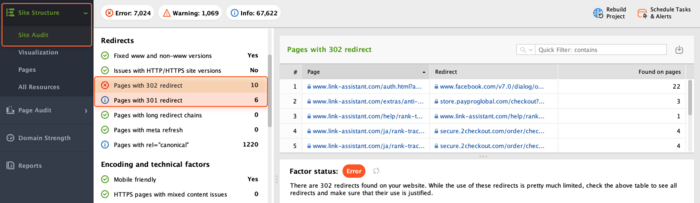
Incorrect redirects can send users to irrelevant pages or create frustrating loops. Search engines also struggle with broken redirects that prevent proper content indexing. To avoid such issues, you can check your redirects with WebSite Auditor.
Go to Site Structure > Site Audit. In the Redirects section, you need to look for Pages with 302 redirect and Pages with 301 redirect. If such pages are found, you'll get a list of them on the right, along with the URLs they redirect to and the number of internal links pointing to them.

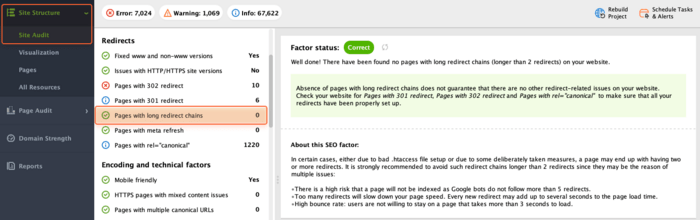
Long redirect chains are bad for your site because they slow down loading times. Each redirect sends users and search engines on an extra journey, delaying the time it takes to reach the final destination.
To spot those janky chains, go to Site Structure > Site Audit > Redirects. At this point, check the Pages with long redirect chains field. If any redirect chains are found, you'll see a list of pages with too many redirects along with the full redirect paths. As such, you’ll quickly see what needs to be fixed and where.
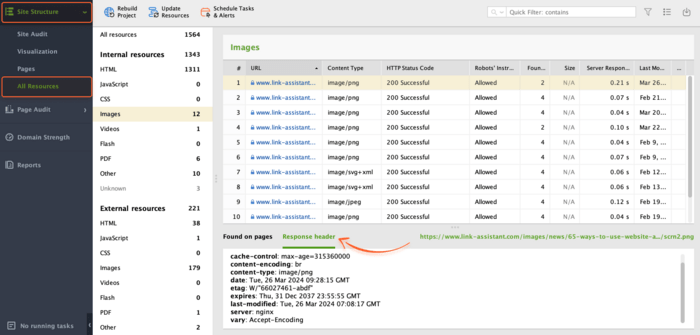
If you need to gather information about server performance, caching directives, and potential security vulnerabilities, you may need to view HTTP response headers. In WebSite Auditor, navigate to Site Structure> All Resources. Here, select a resource and switch to Response Header in the lower part of your screen.

If you fail to maintain consistency in website versions (e.g. both www and non-www site versions are indexed), you may face duplicate content problems and low website rankings.
To make sure HTTP/HTTPS and www/non-www versions of your site are set up correctly, take a look at those factors by navigating to Site Structure > Site Audit > Redirects. If any problems are found, you'll get detailed how-to-fix advice on the right.


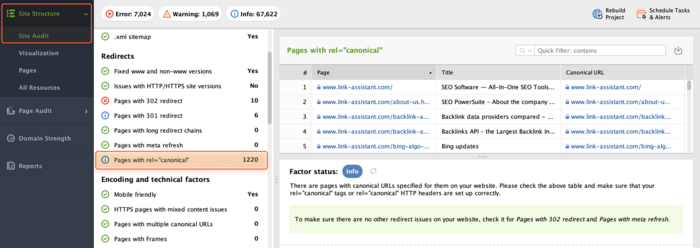
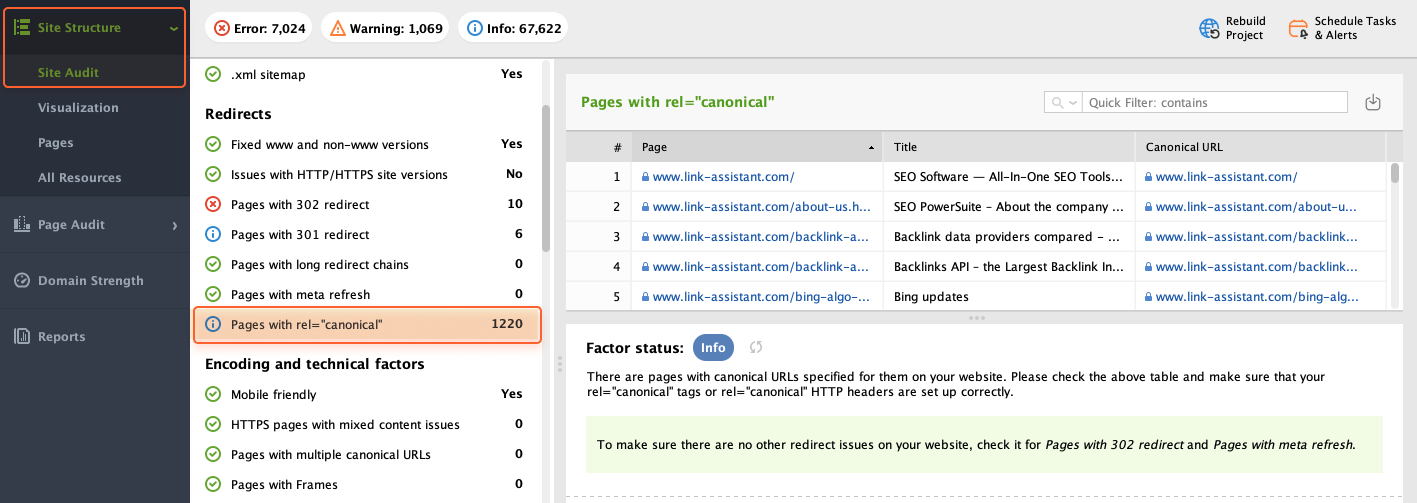
When there are several resources with similar content, assigning the rel="canonical" tag ensures that search engines see the correct, intended one.
To see which pages of your site have a canonical URL set up and what that URL is, navigate to Site Structure > Site Audit > Redirects and click on Pages with rel="canonical". On the right, you'll also see the pages' titles and canonical URLs.
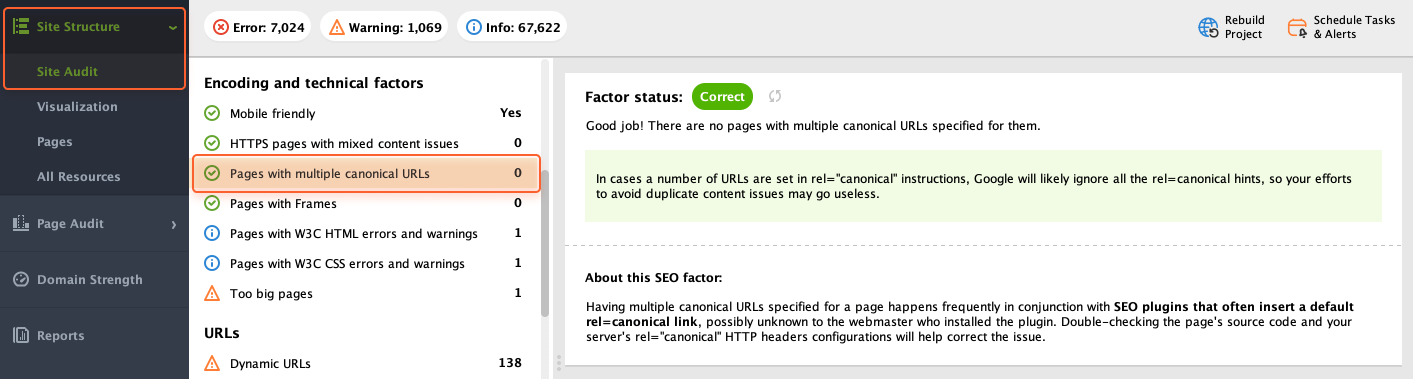
Instances of more than one canonical URL on a single page can occur when some CMS automatically adds a canonical tag to the site's pages. Multiple canonical URLs will confuse search engines and likely cause them to ignore the canonical elements altogether.
Check if there are such instances on your site by going to Site Structure > Site Audit > Encoding and technical factors and clicking on Pages with multiple canonical URLs.

Meta refresh is used as a common spam technique and not the most SEO-friendly way of redirection. In WebSite Auditor, you can see if any pages on the site use meta refresh by navigating to Site Structure > Site Audit > Redirects.


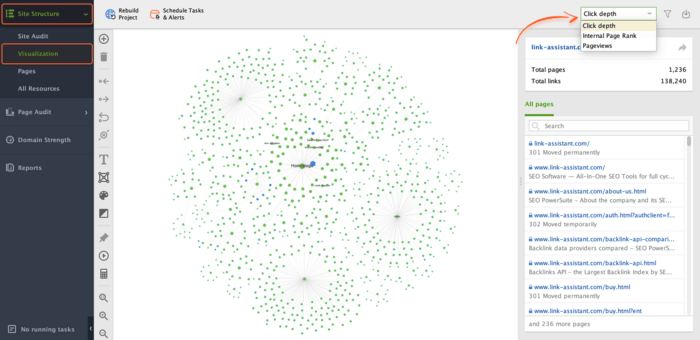
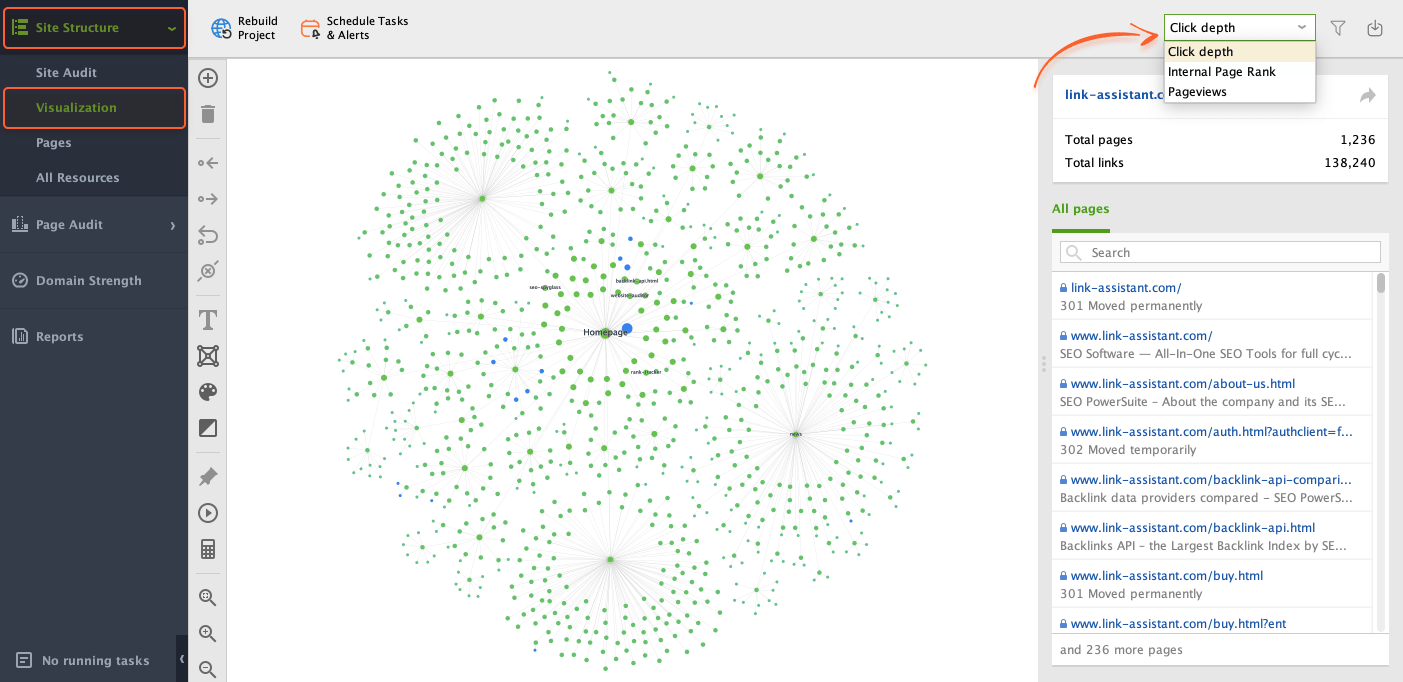
Checking on your website linking is always a good idea. By doing so, you make sure that users can always reach the correct destination while search engines can understand your website structure and assess credibility.
A visual map allows you to see how all your pages connect and reveal areas where you might be missing internal links, leading to orphan pages.
To visualize your website structure in WebSite Auditor, navigate to Site Structure > Visualization. In the dropdown menu in the right upper corner, you can also choose among 3 representation modes: Click Depth, Internal Page Rank, and Pageviews.
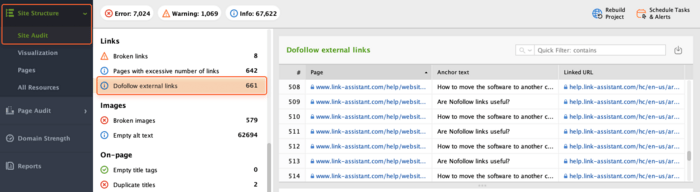
If you need to check who you're linking to, you can get a full list of dofollow external links in WebSite Auditor. For that, navigate to Site Structure > Site Audit > Links. The tool will show you pages on which dofollow links are found, the linked-to URL, and the link's anchor text.

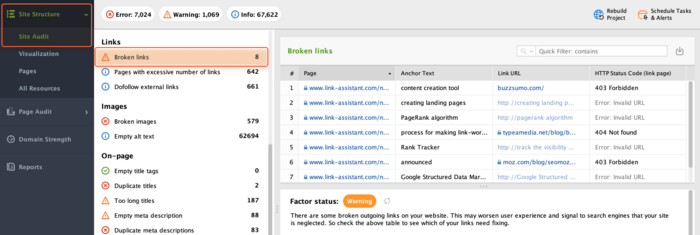
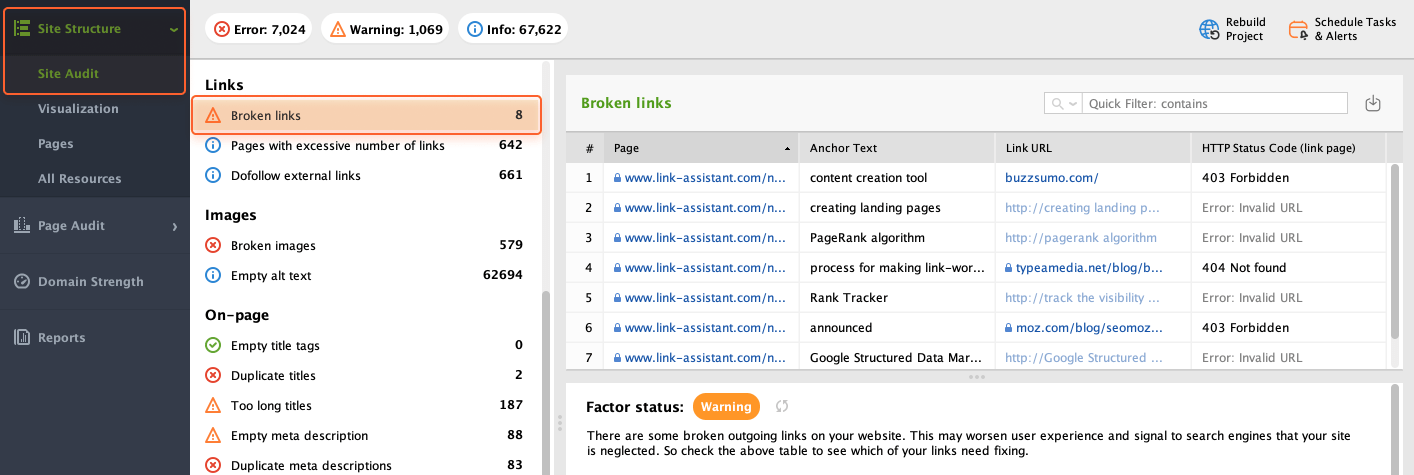
Broken links can hurt your website's reputation and SEO, making users feel lost and telling search engines that your site is poorly maintained.
To get a list of all broken links on your website, go to Site Structure > Site Audit > Links. If any of the pages are broken, WebSite Auditor will show the URL of the broken link and its anchor text.
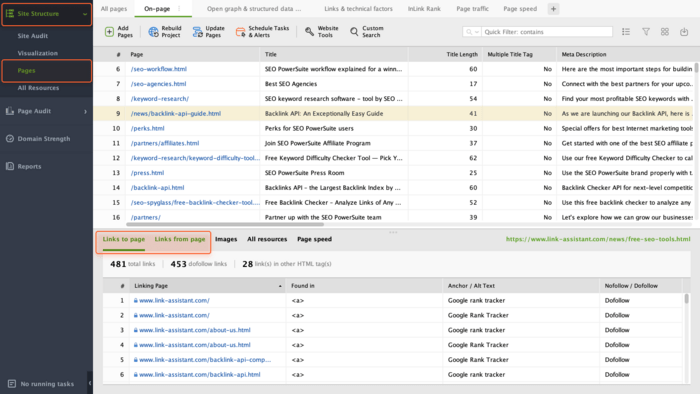
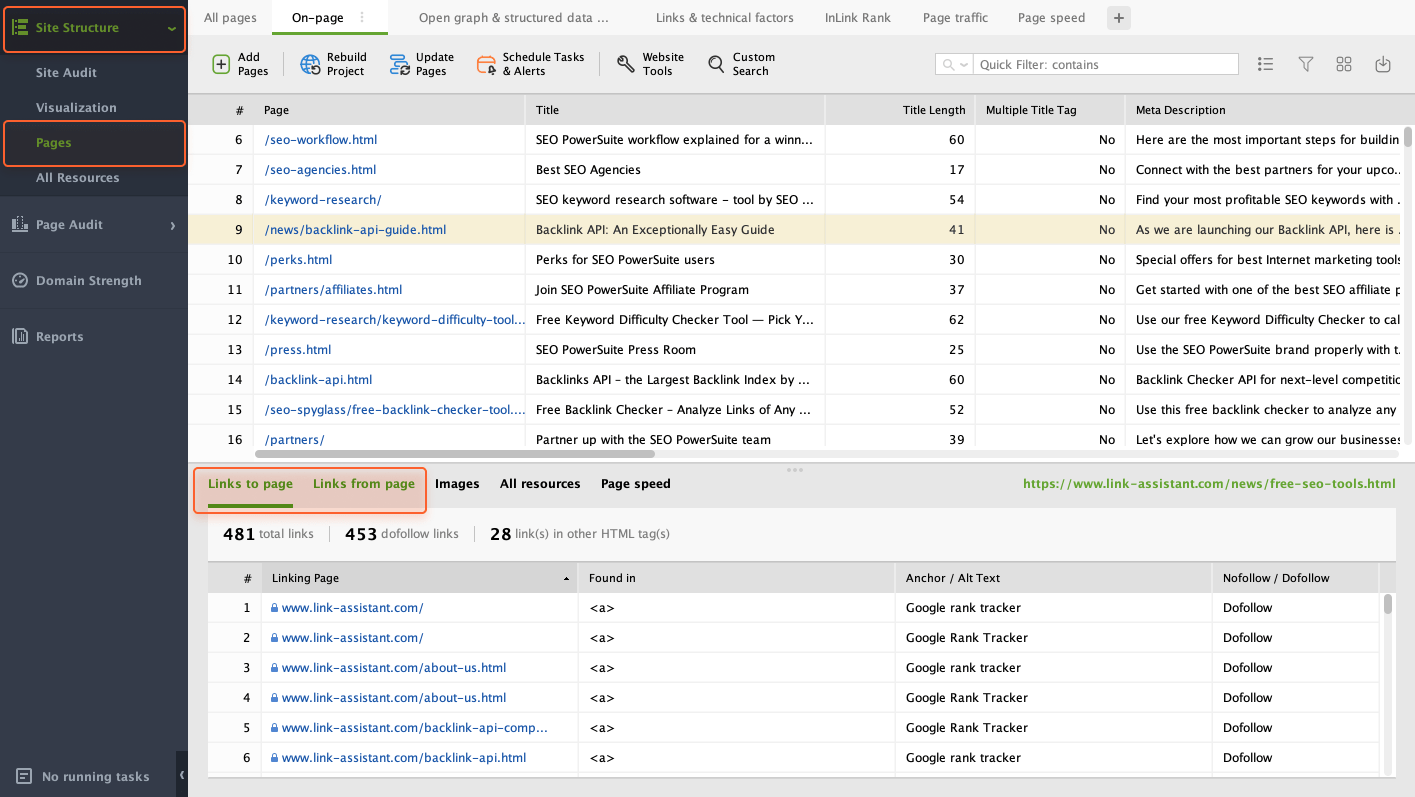
If you need to get a list of links to/from a certain page, head to Site Structure > Pages. Choose any page in the table and click Links from page (or Links to page) below. The tool will display the linking page, anchor text, and nofollow/dofollow status.
For a list of broken links from specific pages, go to Site Structure > Pages and switch to the Links & technical factors tab. In the Broken Links column, you’ll see the number of broken links on every page.
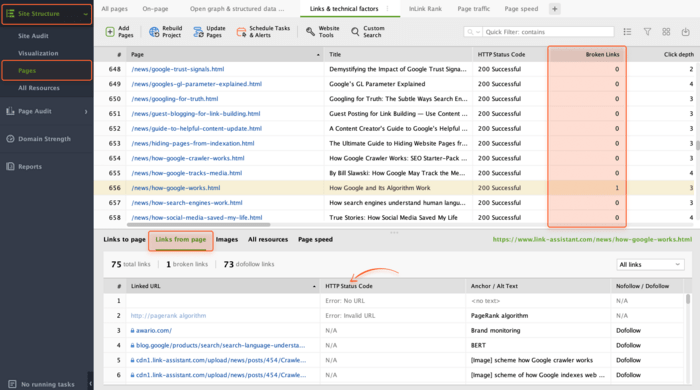

To get a full list of broken links from a certain page, click on the page in the table. Below, click on Links from page. Check the HTTP Status Code column to identify broken links by 4xx/5xx status codes.
For detailed info on any link, head to Site Structure > Pages and click on one of the pages in the table. Below, click on Links from page (or Links to page) to see every link along with its HTTP response code, anchor text, and robots.txt directives (nofollow/dofollow).

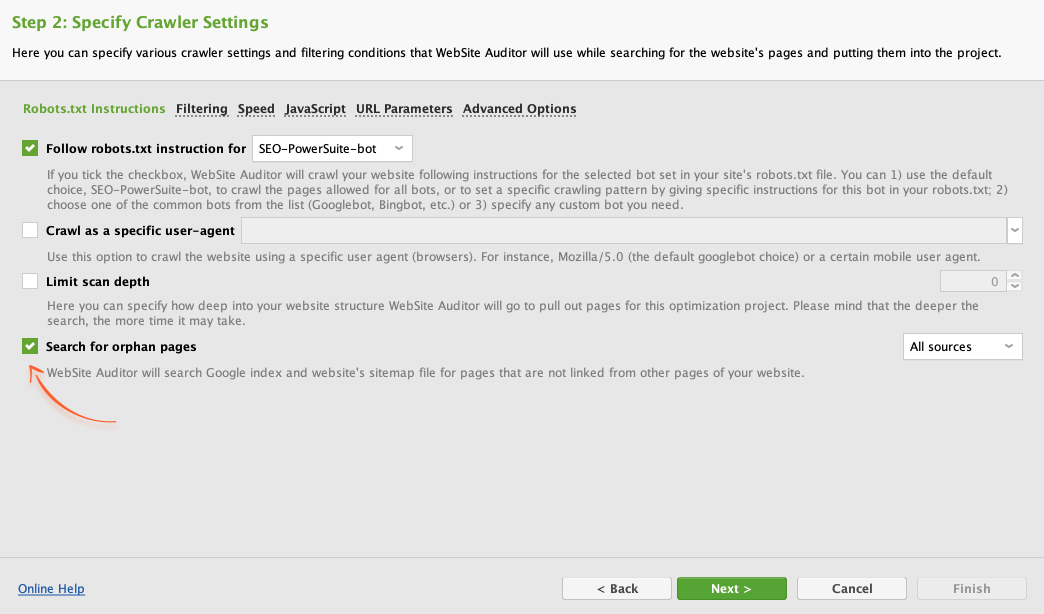
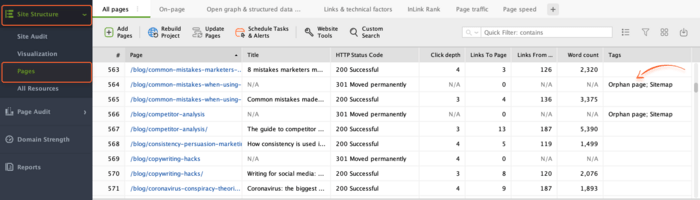
Orphan pages are not linked to other pages of your site. Thus, their valuable content might not get indexed and appear in search. To check if your website has orphan pages, configure the corresponding settings when you create/rebuild the project in WebSite Auditor.
You need to tick Enable expert options in Step 1 and then select Look for orphan pages in Step 2.

Once the crawl is complete, you'll be able to find orphan pages in Site Structure > Pages. They will be marked with the Orphan page tag.
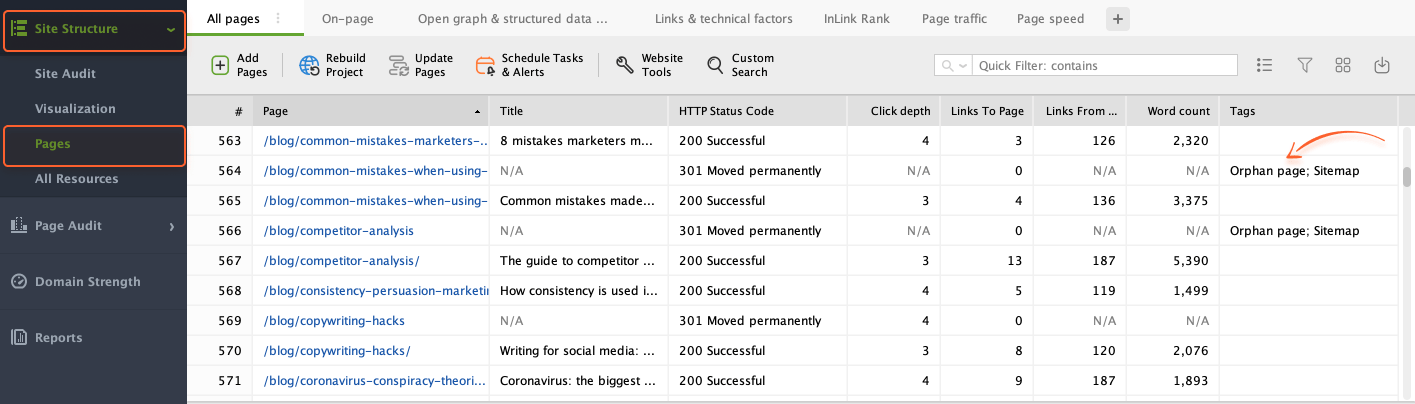
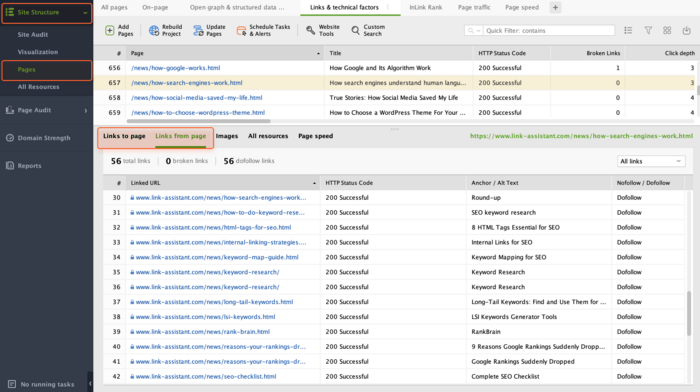
To easily spot pages that are hard to find for users and search engines, you can use the Click Depth metric. It shows the number of clicks it takes to get to a given page from the home page. Ideally, all pages should be accessible at no more than 4 clicks to boost crawlability.
You can check the click depth by going to Site Structure > Pages and checking the corresponding Click Depth column in the table.

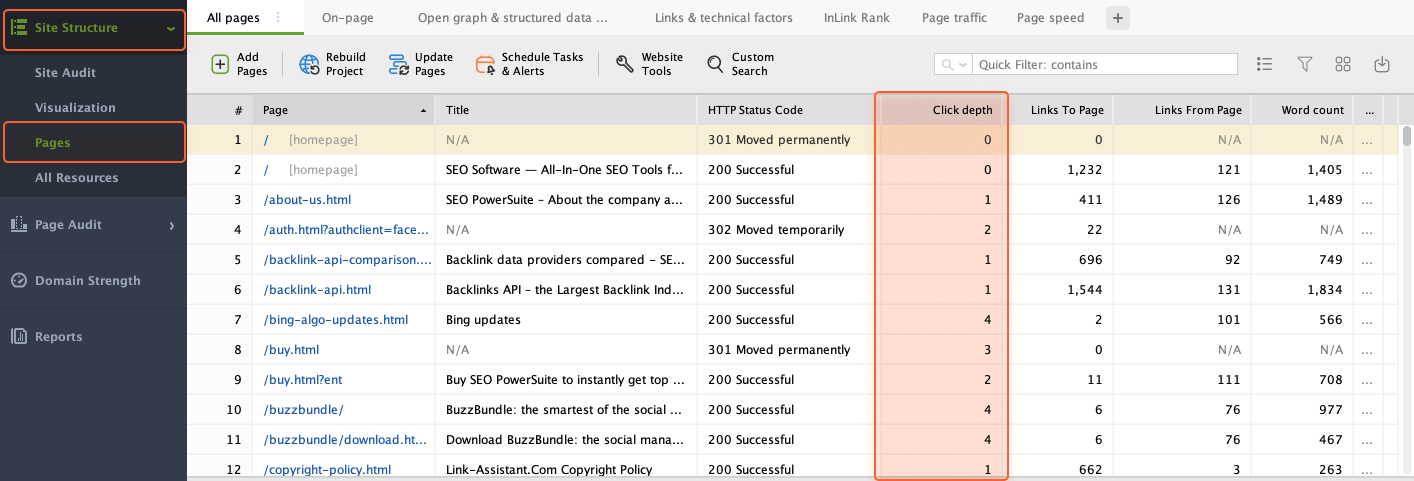
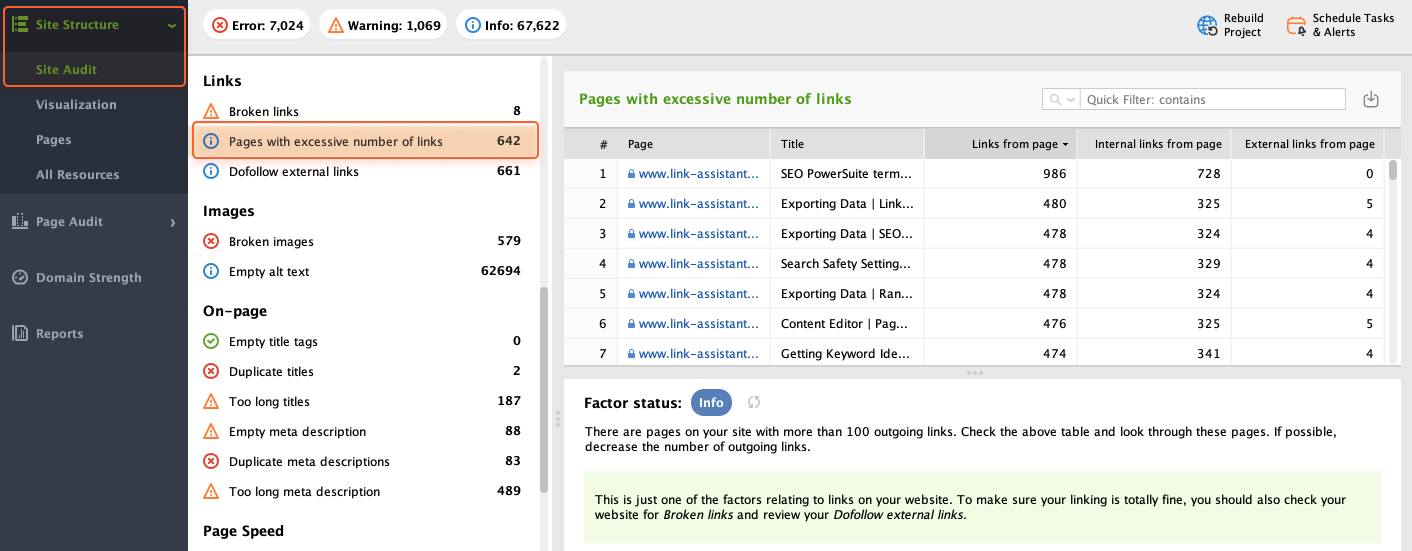
A page with too many outgoing links can hurt your website in two ways. For users, it's overwhelming and distracting. For search engines, it may look spammy.
To get a list of pages with too many outgoing links, go to Site Structure > Site Audit > Links and click on Pages with excessive number of links. Here, you'll see the pages that have over 100 outgoing links (both internal and external).
Regular checkups help you spot issues that prevent your website from attracting more traffic and getting higher search rankings.
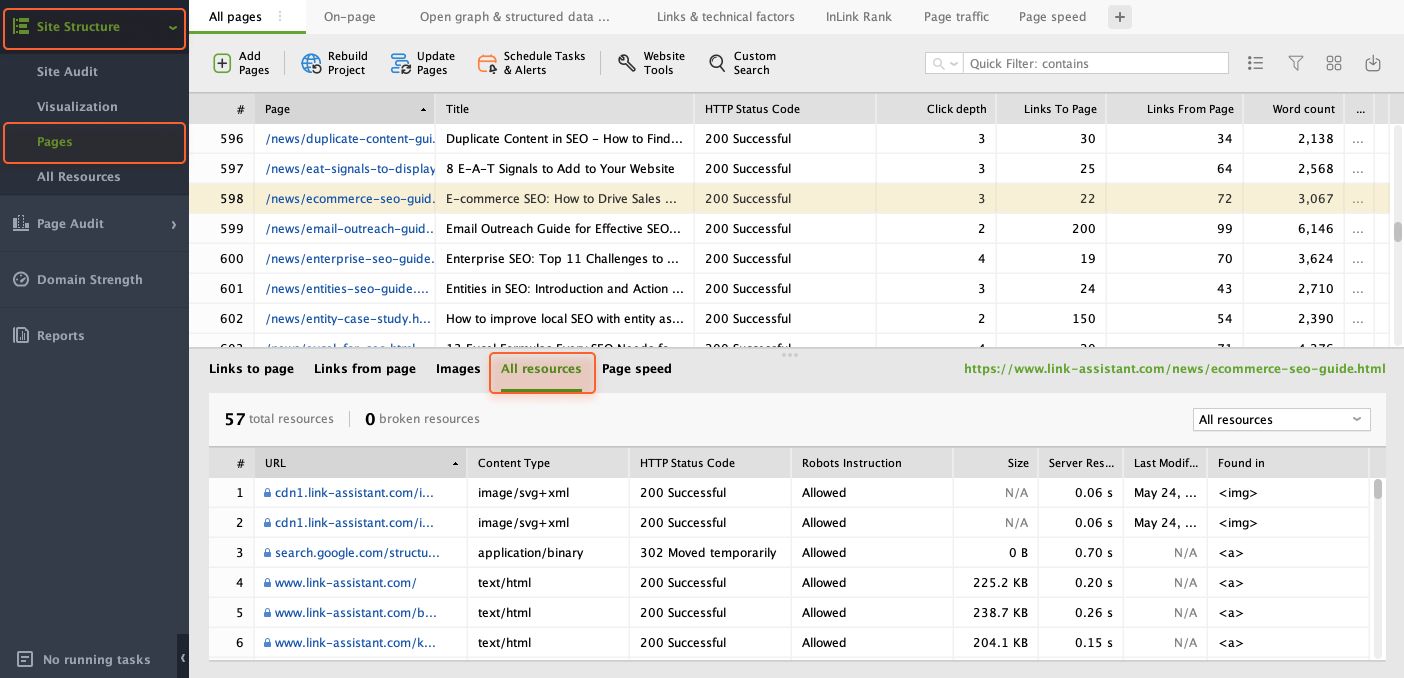
If you need to ensure that all important page elements like images and scripts are crawlable by search engines, you can easily see a full list of resources used on any website's page. For that, go to Site Structure > Pages and click on one of the pages in the table.
Below, click on All resources to see every resource used on the page, along with its content type, HTTP response code, robots’ instructions, the HTML tag (or HTTP header field), and more.

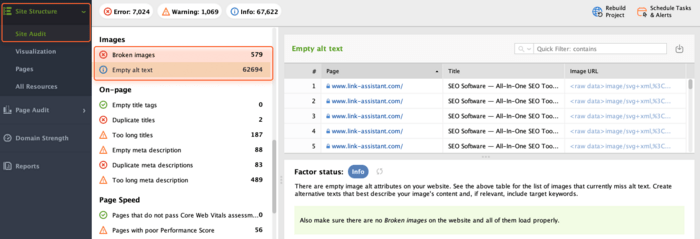
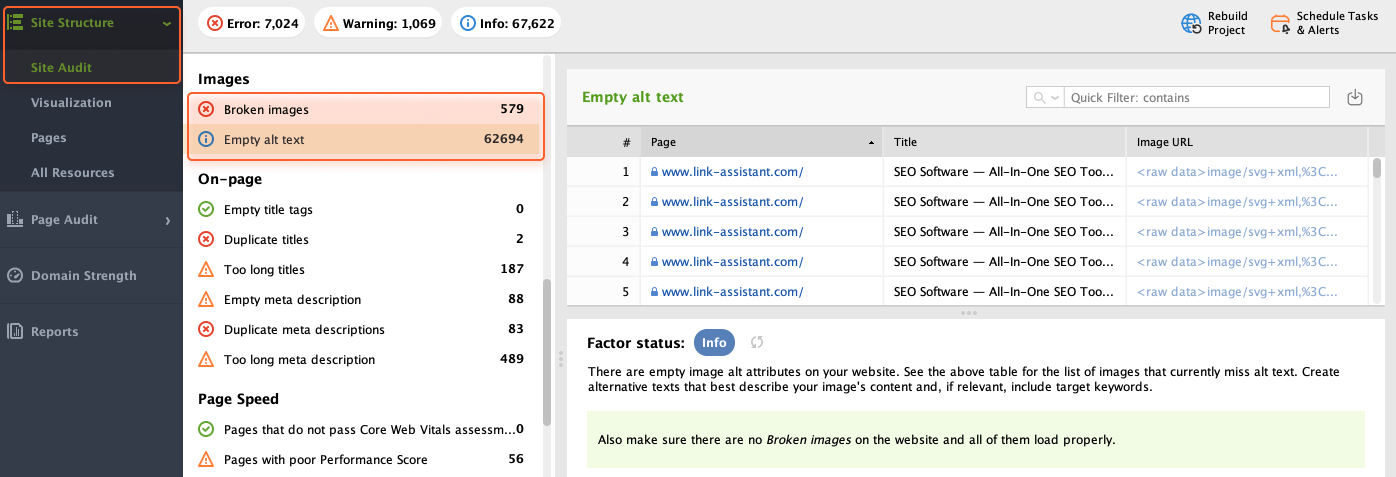
Blank spaces or error messages in place of images look confusing. To avoid this, you need to check if all your pictures are in good shape.
To get a list of broken images on your site, go to Site Structure > Site Audit and check the Images section. Here, you'll see the images that are broken or have missing alt text, along with the pages containing those images.
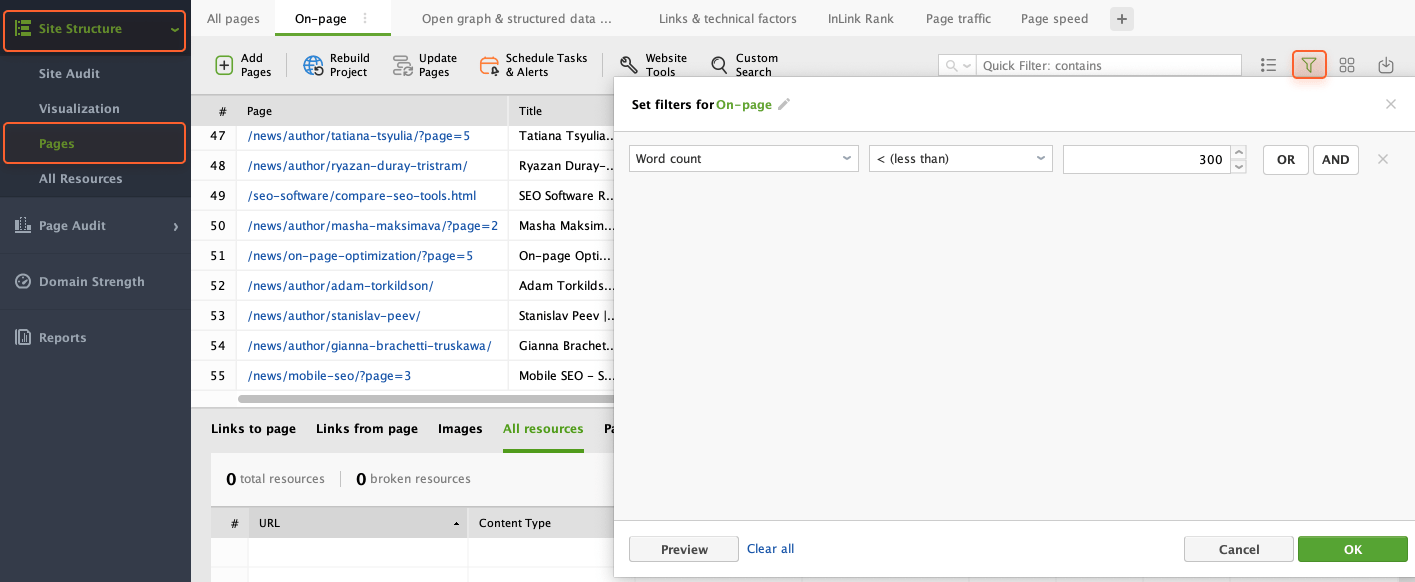
Thin content is typically the outcome of low word count. In terms of SEO, search engines see thin content as lacking value and unlikely to satisfy user queries. If your website contains such pages, I recommend finding them and adding more content to potentially increase traffic.
For that, go to Site Structure > Pages. In the table, you can find the Word Count column to see how many words each page contains. For your convenience, you can set up filters (e.g. Word Count less than 300 words) to pinpoint pages where you might need to add more content.

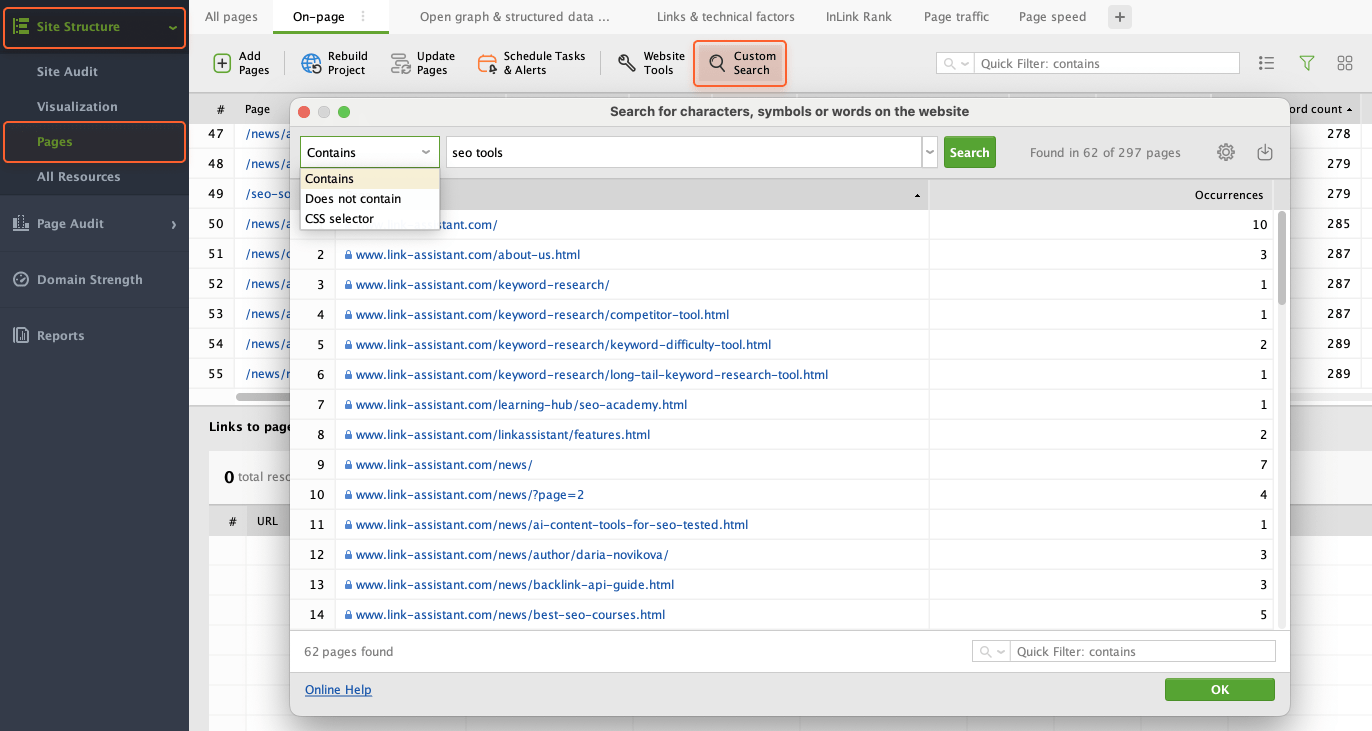
With WebSite Auditor's Custom Search, you can find all instances of any piece of content across a website — be it Google Analytics code, social sharing buttons, specific HTML tags, a script, a plugin, or a piece of text. You can also use the CSS Selector option to look for specific elements by indicating any kind of selector.
To do that, navigate to Site Structure > Pages and click the Custom Search button in the top menu bar. In the pop-up window, choose the filtering condition in the dropdown menu, type your query in the search bar, and click Search.

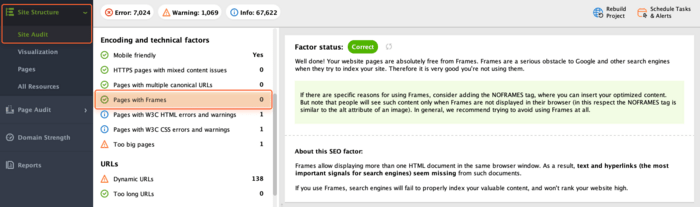
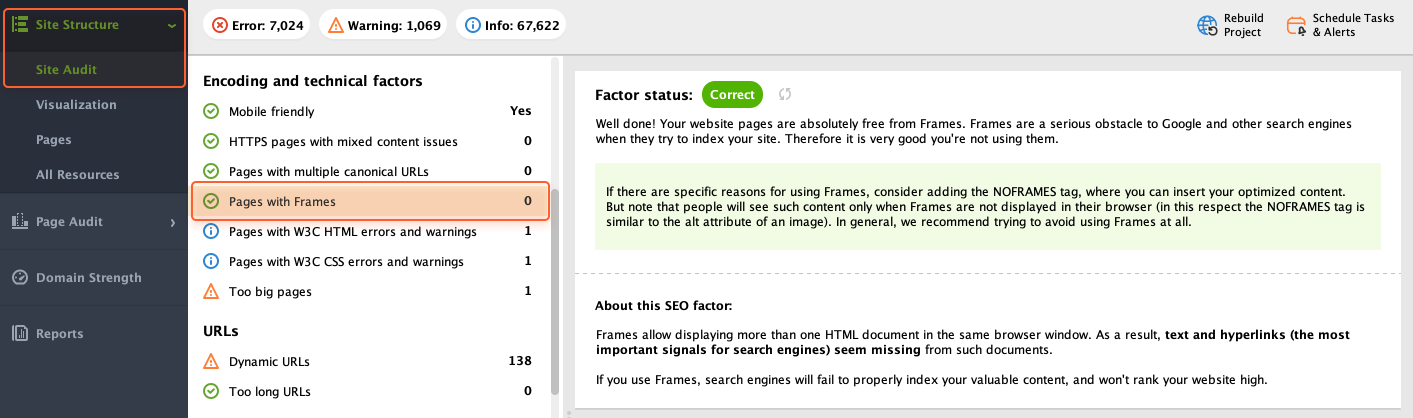
Using frames can pose a problem for SEO, as search engines are often unable to index content inside frames. You can find Pages with frames by heading to Site Structure > Site Audit > Encoding and technical factors.
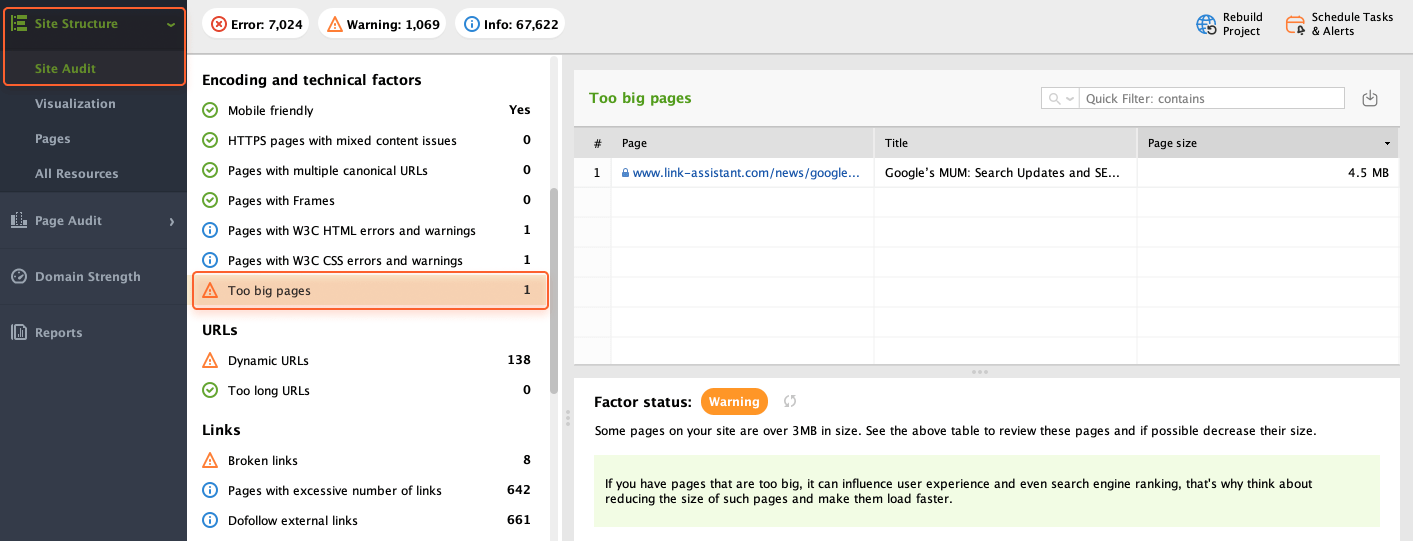
When crawling your site, WebSite Auditor can help you identify pages that are too big and thus may negatively affect SEO and user experience. Web page size is calculated comprehensively by adding the size of its HTML code to the size of every resource used on the page, including images, videos, and scripts.
You'll find a list of your site's slower-loading pages (along with each page's size) by going to Site Structure > Site Audit > Encoding and technical factors.

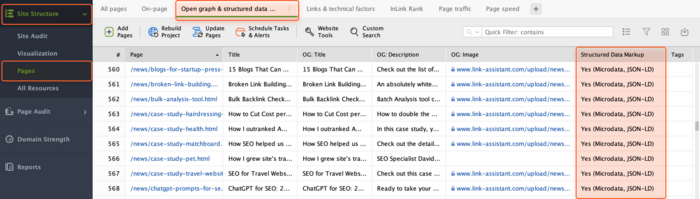
You can check if your pages have a schema markup in place in Site Structure > Pages. Go to the Open graph & structured data markup tab, locate the Structured Data Markup column, and click on its header to sort your records by the values in this column. For pages that do use structured data, you'll also see the type of structured data being used in brackets.
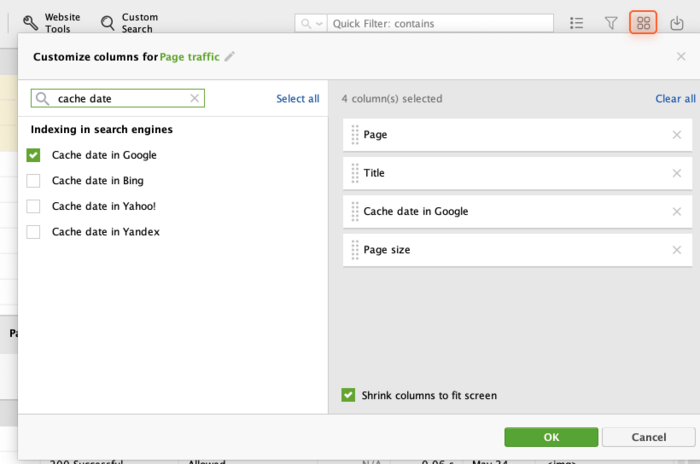
To see your pages' cache date in Google (or other search engines) go to Site Structure > Pages and select the pages you'd like to get the data for (use Ctrl + A to select all). Click on Update Pages and tick Search Engine Cache Dates in the pop-up window.
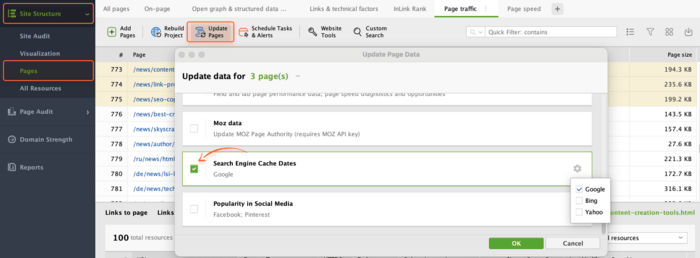

When the update is complete, check the corresponding column to see when the chosen pages were last cached by the search engines.
Note: If the Cache date in Google column is not displayed in the table by default, you can add it by clicking the Edit visible columns button.
Proper meta tags and descriptive URLs help both users and search engines understand what your page is about. Fixing issues in these elements improves search ranking and user engagement.
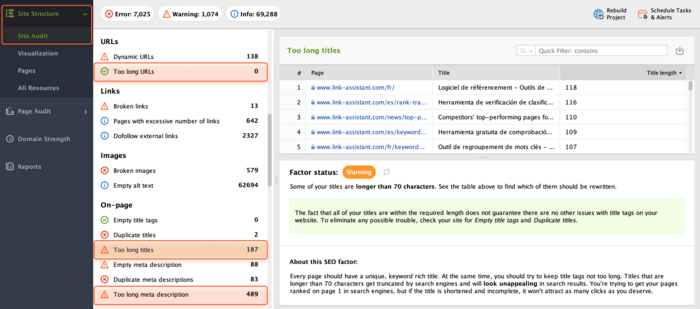
To check if any of your URLs are too long (over 115 characters) and thus hard to read for users and search engines, go to Site Structure > Site Audit > URLs and look for Too long URLs.
If any of your page titles and meta descriptions are over the recommended length, WebSite Auditor will display those in the Too long titles and Too long meta description fields of the On-page section. These lengthy titles and descriptions will likely get automatically truncated in your pages' snippets in search results, so it's best to rewrite them to make sure they are fully visible to searchers.
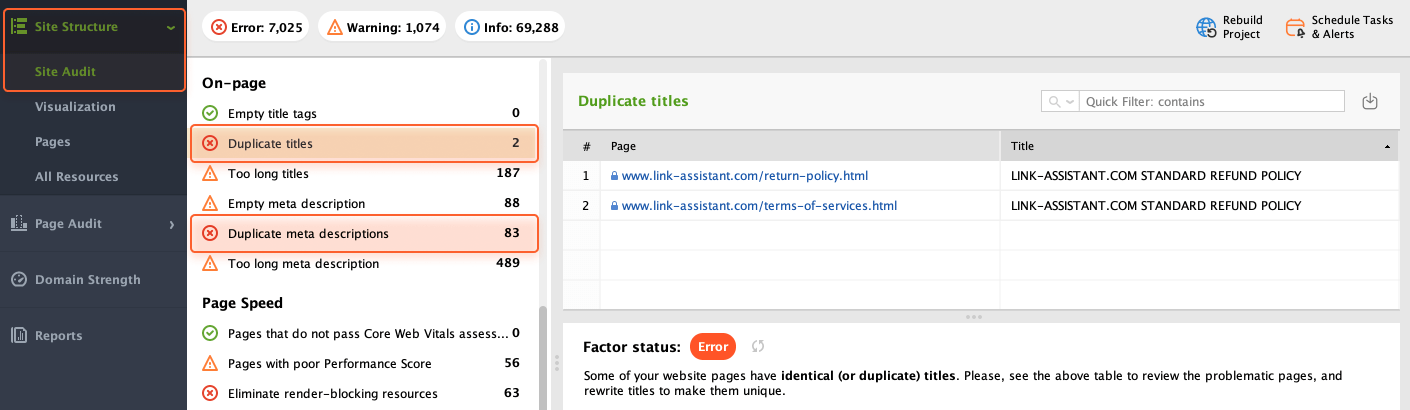
Duplicate titles and descriptions confuse search engines as they can’t detect which pages should be ranked in response to a given query. This issue is called keyword cannibalization.
To see if any of your site's pages have duplicate titles or meta descriptions, check the respective factors under the On-page section of the Site Audit dashboard.

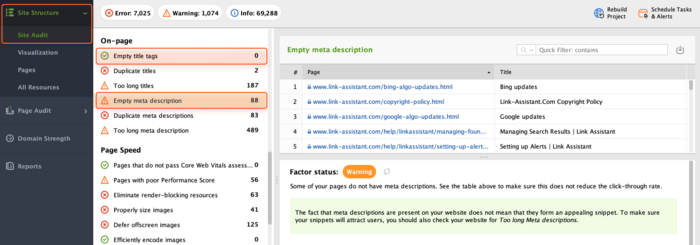
If your page has an empty title tag, it's unlikely that it will rank well in search results as the page's title is a strong relevance signal for search engine bots. Meta descriptions have a weaker correlation with rankings, but it's best to create a unique description for every page. Otherwise, the search engines will put up your snippet automatically from the page's content, which may not always look appealing to searchers.
To find pages with empty titles or meta descriptions, check Empty title tags and Empty meta description in the On-page section of Site Audit.
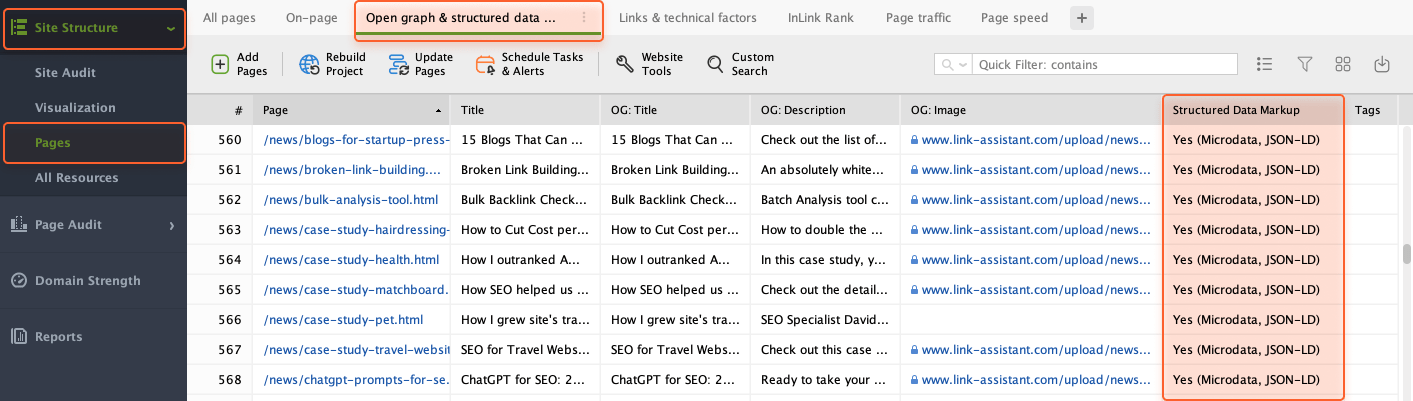
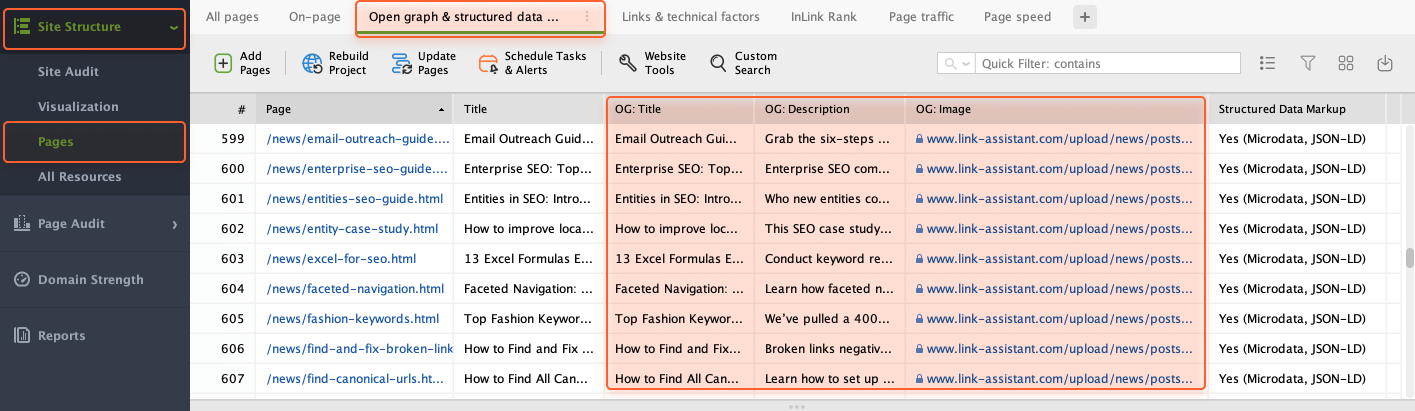
Open graph markup is used for the snippets of your pages when they get shared on social media. To see the contents of the open graph tags for any of your pages, go to Site Structure > Pages and switch to the Open graph & structured data markup tab. Here, check the OG Title, OG Description, and OG Image columns.

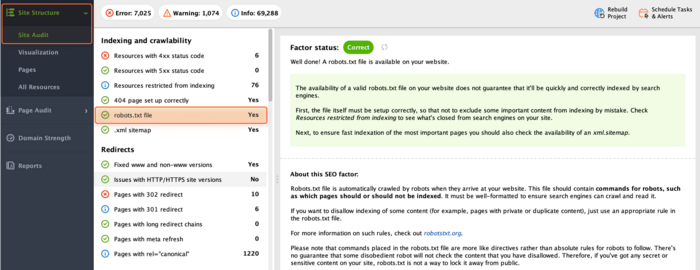
Since the robots.txt file guides search engine crawlers, it’s vital to check its condition regularly. A broken or incorrect file can accidentally block important pages from being indexed and hurt your website's visibility.
If you’re not quite sure that the robots.txt file is available on your website, you can quickly check this with WebSite Auditor. Simply go to Site Structure > Site Audit > Indexing and crawlability.

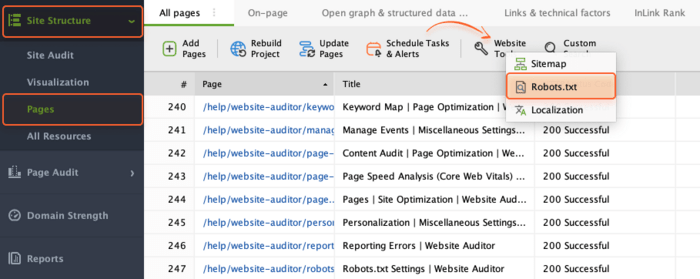
If your site doesn't have a robots.txt file, you can create one with WebSite Auditor. Go to Site Structure > Pages, click the Website Tools button, and select Robots.txt in the dropdown menu.

Then, set your robots.txt rules in the pop-up window to specify how search engines should crawl your pages. When you're done, click Next and either save the file locally on your computer or upload it to your site via FTP.
If you already have the robots.txt file but need to edit it, again navigate to Site Structure > Pages, click the Website Tools button, and select Robots.txt in the dropdown menu.
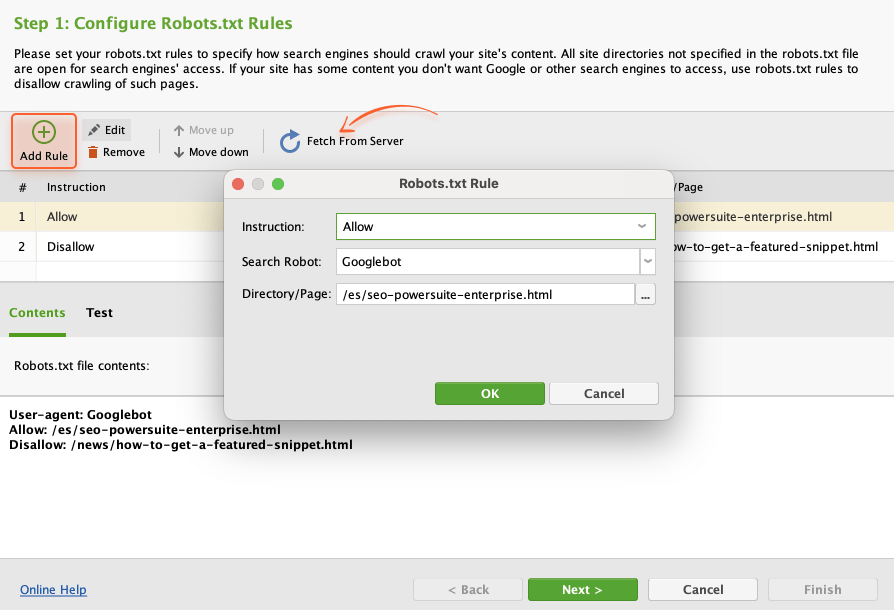
In the pop-up window, you'll see the list of robots’ instructions in the current file. If you haven’t created a robots.txt file in WebSite Auditor yet, you can upload it from your server by clicking the Fetch From Server button.
Click Add Rule to specify a new rule or Edit to configure an existing one.
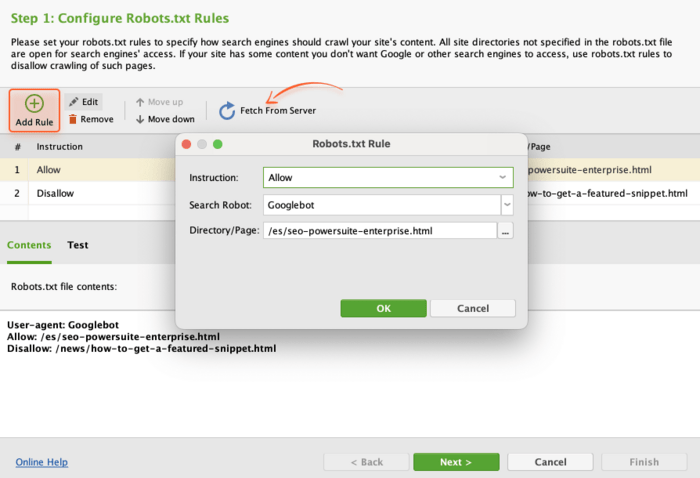
When done, click Next and either save the file locally on your computer or upload it to your site via FTP.
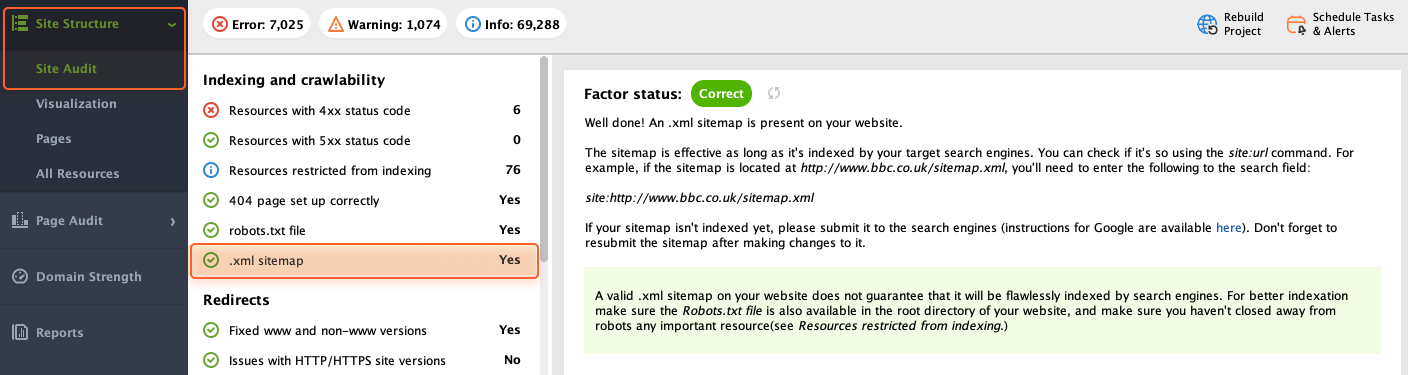
Being like a roadmap for search engines, a sitemap ensures they can find and index all your important website pages. If sitemaps are broken or outdated, this can cause important pages to be invisible in search results.
To quickly check the availability of a sitemap on your website, head to Site Structure > Site Audit > Indexing and crawlability and find the corresponding factor.

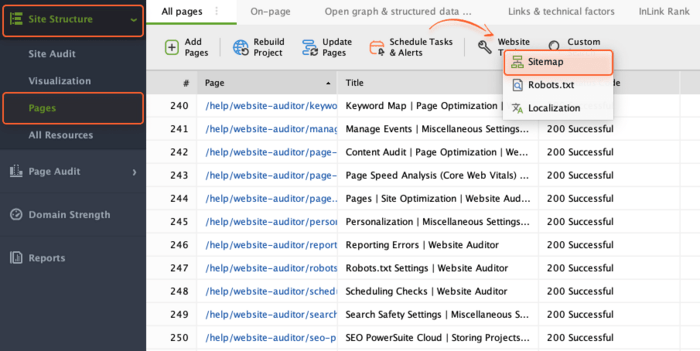
You can build a sitemap for your site from scratch right in WebSite Auditor. Go to Site Structure > Pages, click the Website Tools button, and select Sitemap in the dropdown menu.

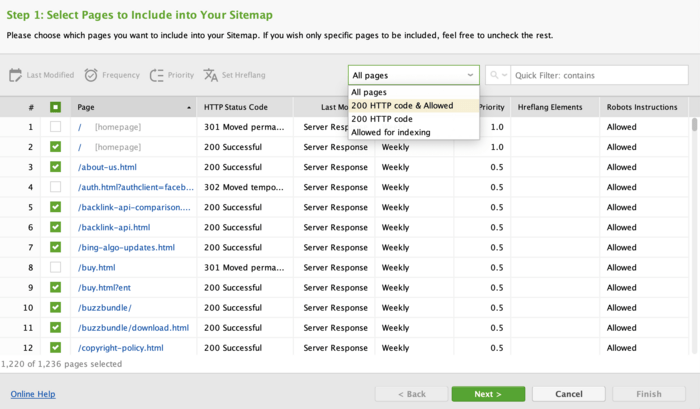
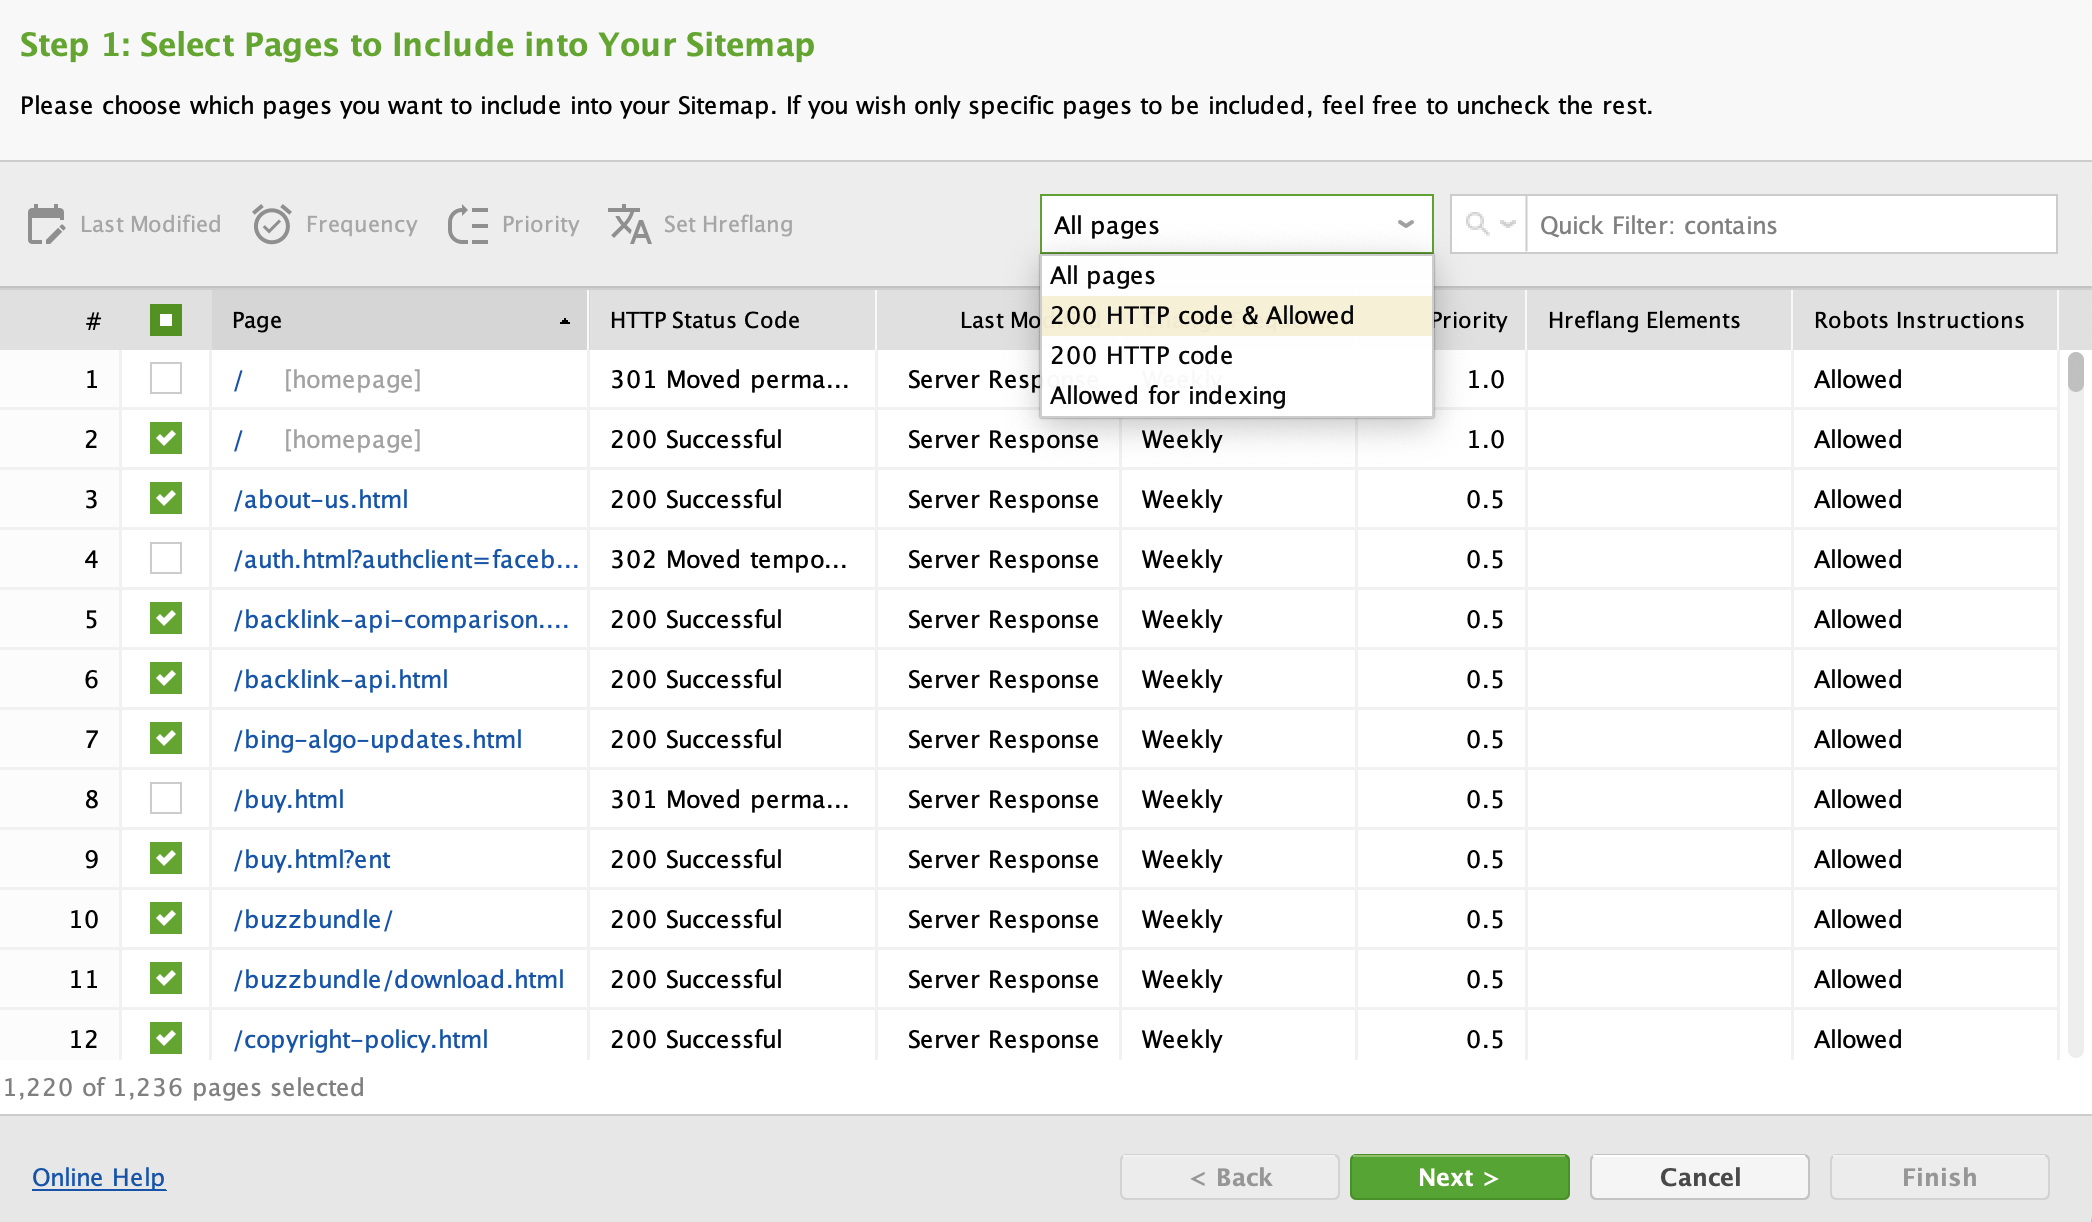
In a pop-up window, you can select pages you want to include in your sitemap and adjust each page's change frequency and priority.
Once your sitemap is generated, you can either save it locally on your computer or upload it to your website via FTP.
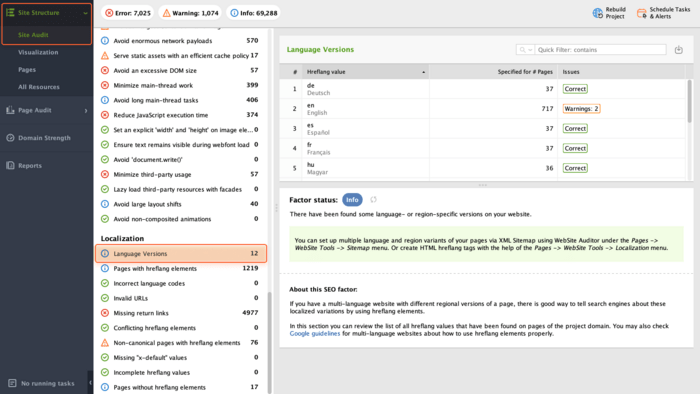
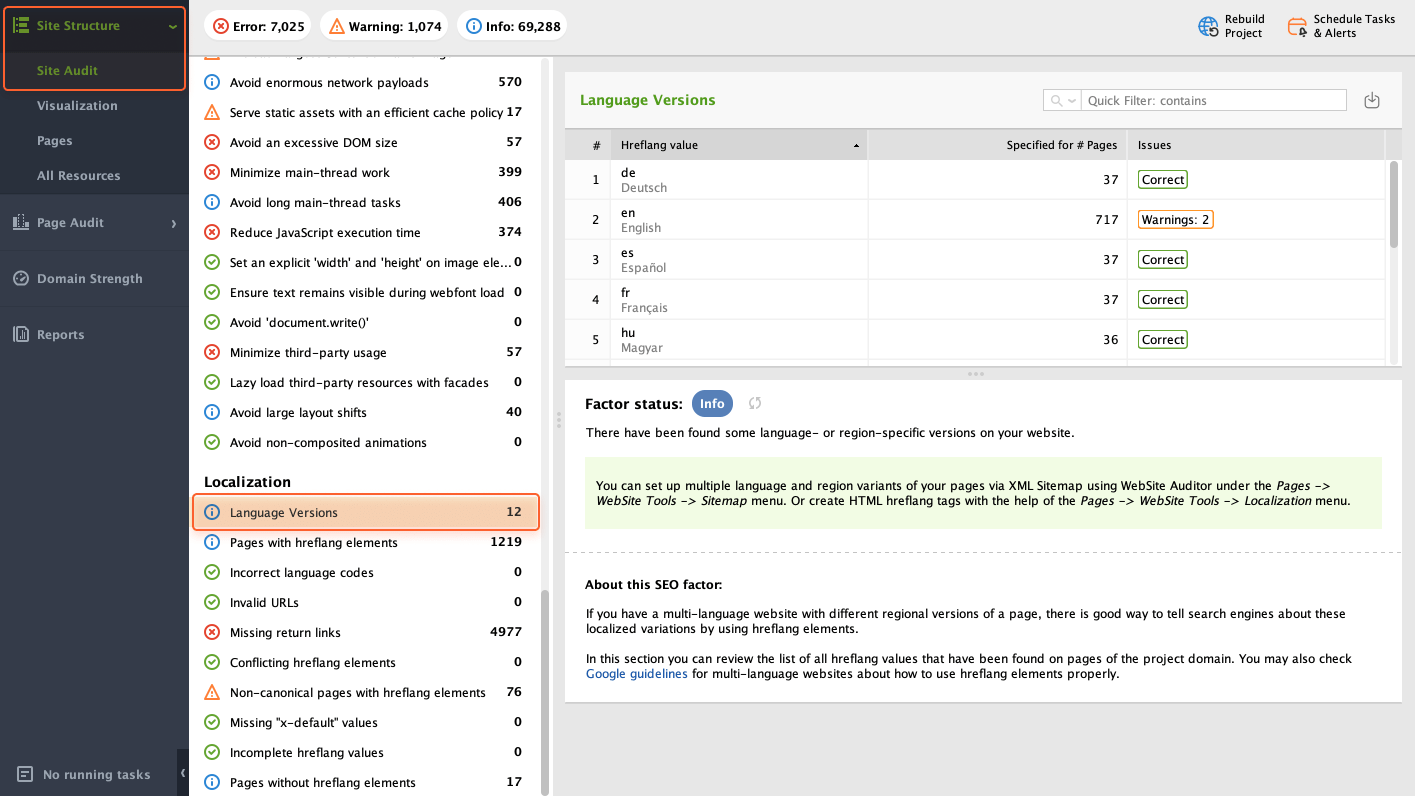
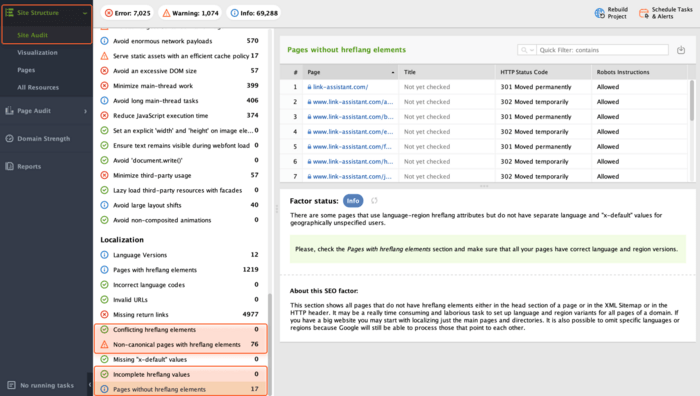
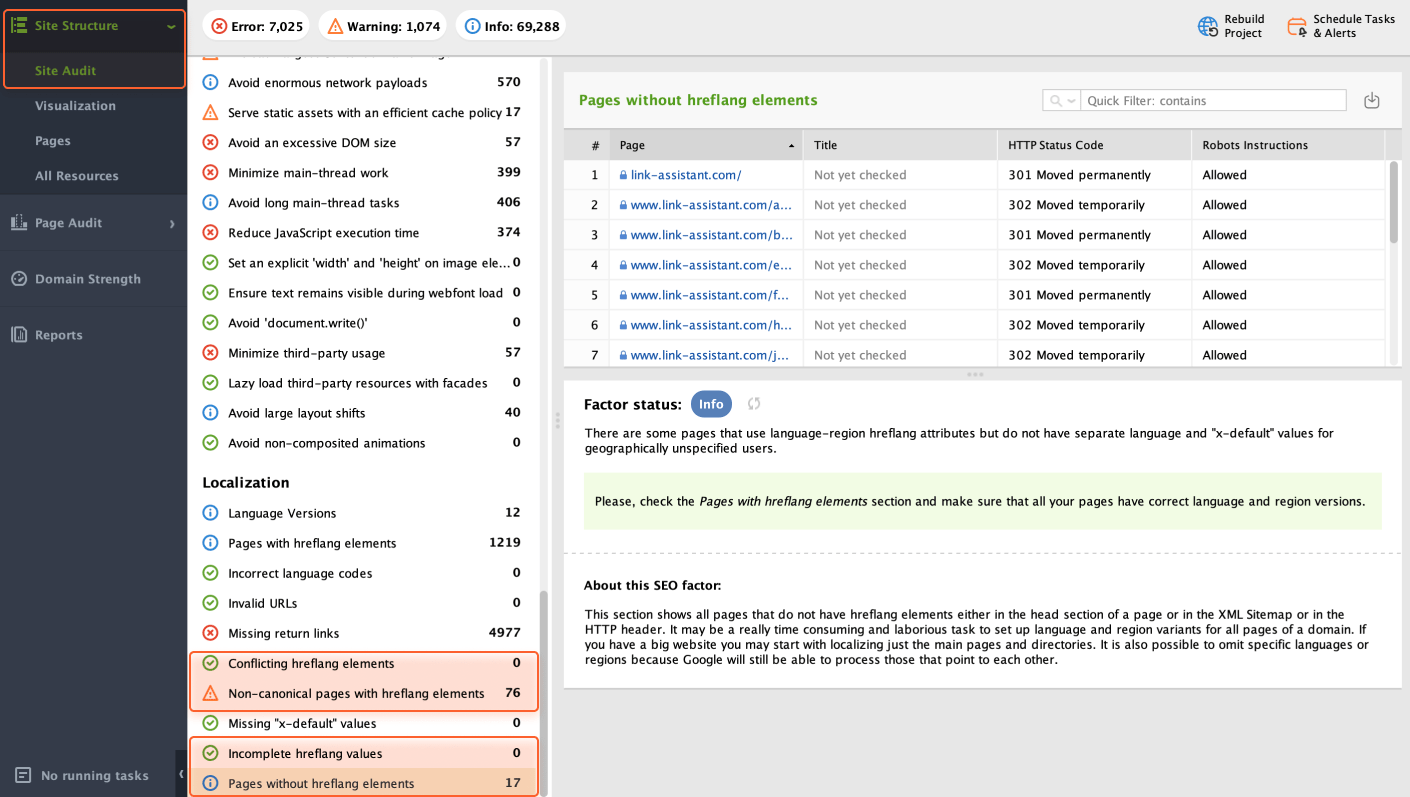
Checking localization elements is key for multilingual websites. Hreflang tags tell search engines which version of a page is meant for specific languages. Without proper setup, search engines might show the wrong language version to users, hurting their experience.
By crawling your site, WebSite Auditor can flag different language versions. To check them all, go to Site Structure > Site Audit > Localization and select the Language Versions field. On the right, you’ll see all language versions currently available on your website.
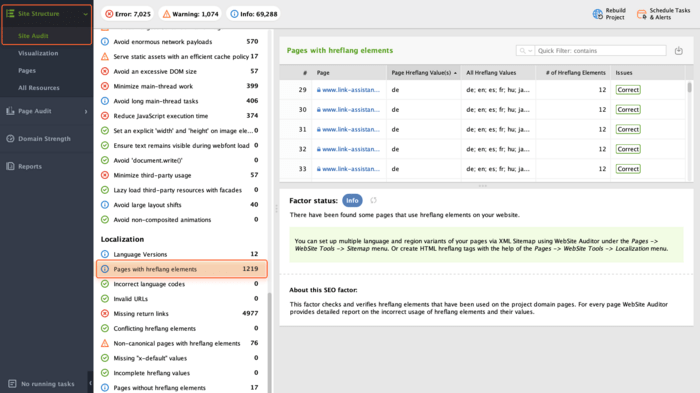
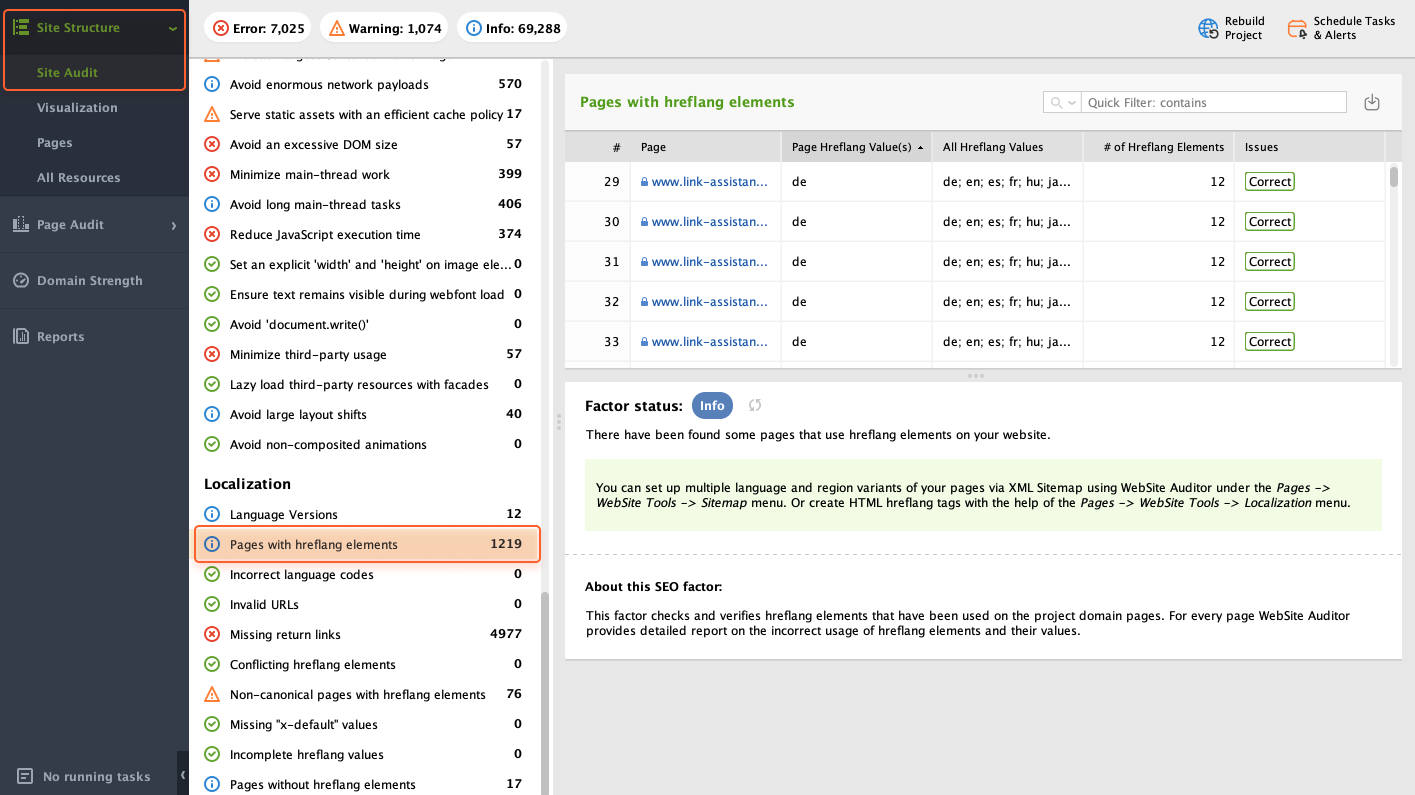
Websites with multiple languages rely on hreflang to ensure users see the most relevant version based on their location or language settings. It's important to check these pages to verify they're set up correctly. You can do that by navigating to Site Structure > Site Audit > Localization and selecting the Pages with hreflang elements field.
Errors can lead to search engines showing the wrong language version to users, potentially hindering SEO for all your languages. To avoid that, check the corresponding hreflang issues in the Localization section and fix them following WebSite Auditor’s instructions.
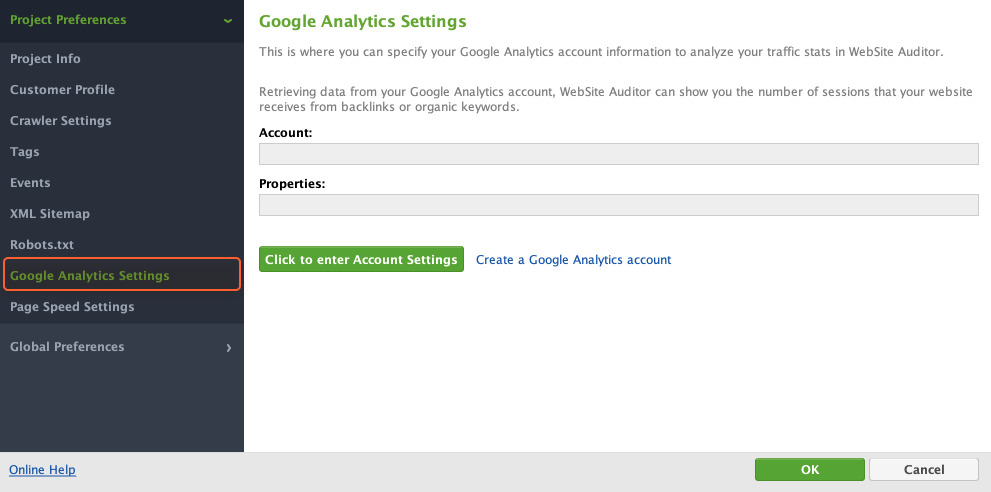
Analyzing traffic data helps you understand what content resonates most and identify areas for further improvement.
You can view visits to your pages right in WebSite Auditor if you sync your Google Analytics account with the tool. To do this, go to Preferences > Google Analytics Account and specify your credentials.

Now head to Site Structure > Pages and switch to the Page traffic tab. Select the pages you'd like to check visits for (use Ctrl + A to select all) and click Update Pages. In the pop-up window, tick Google Analytics data.
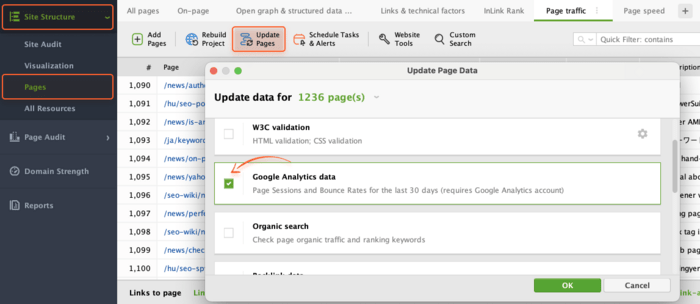
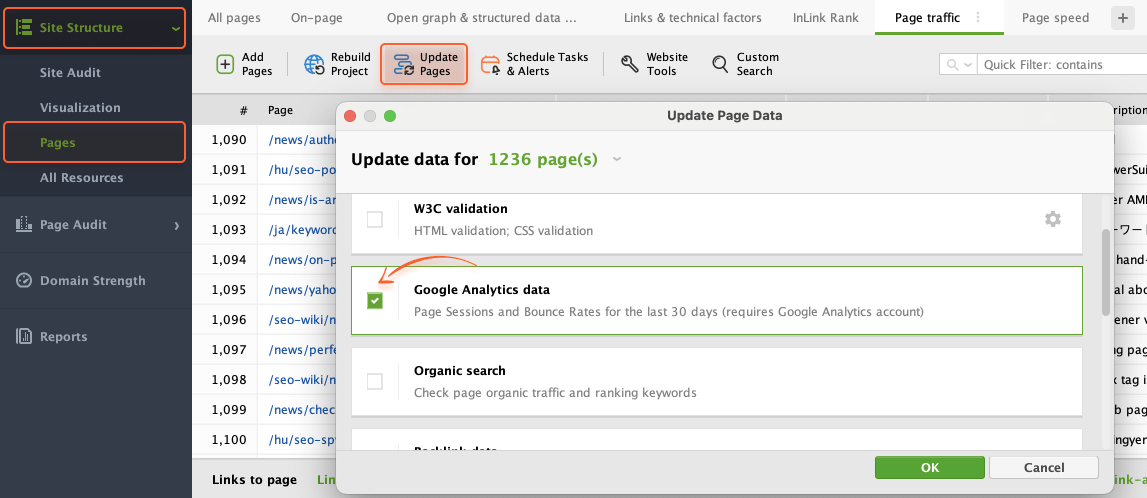
To add Pageviews and Page Bounce Rate columns to the table, click the Edit visible columns button and tick the corresponding items. Once done, you’ll be able to check these metrics in the table.
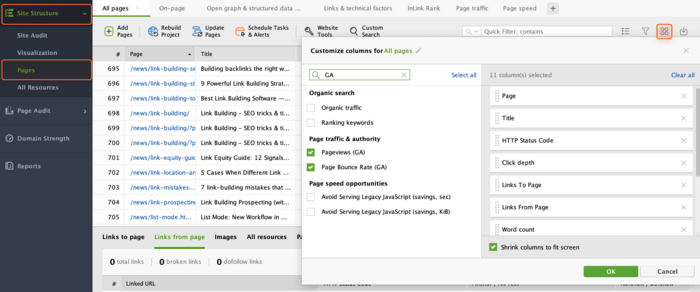

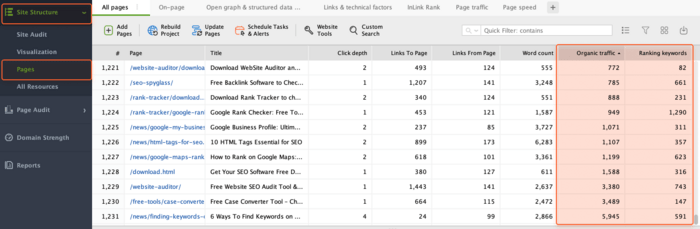
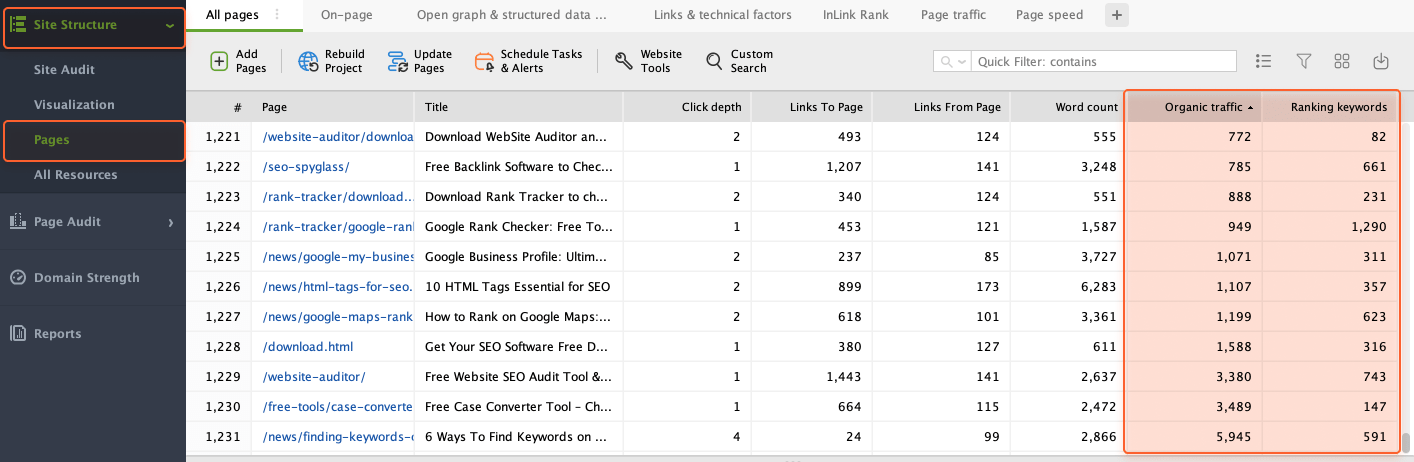
To check your organic traffic and the number of ranking keywords, navigate to Site Structure > Pages and switch to the Page traffic tab. Here, you need to select the pages you want to check (use Ctrl + A to select all) and click Update Pages. In the pop-up window, tick Organic search.

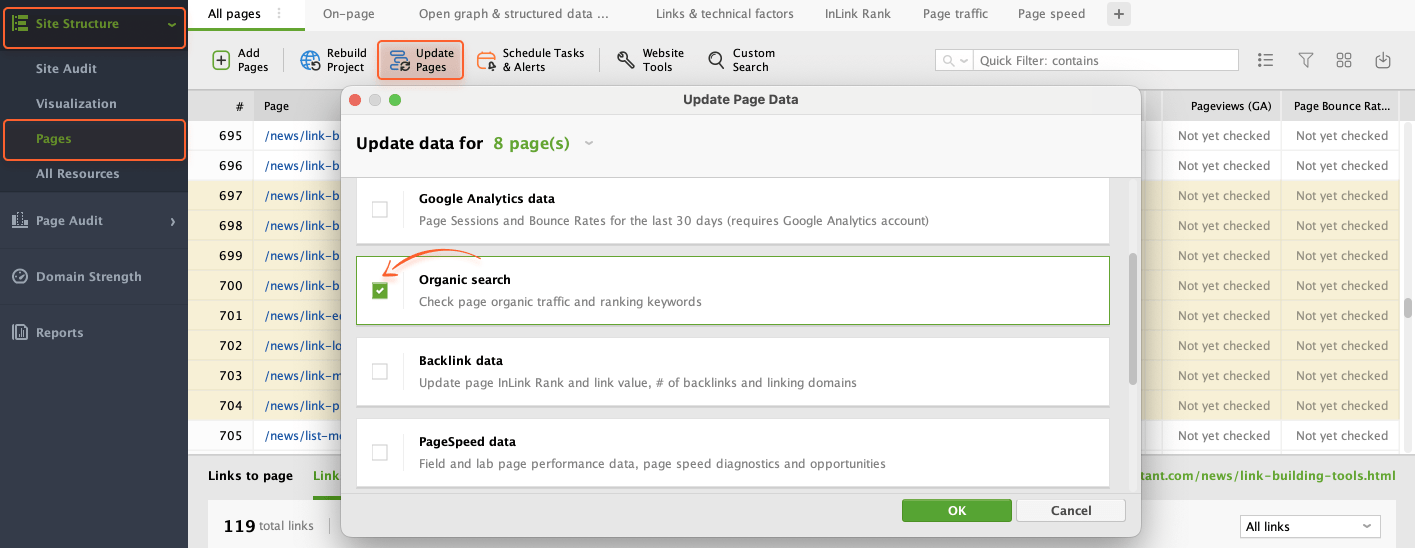
Once updated, you’ll be able to see the metrics in the corresponding columns in the table.
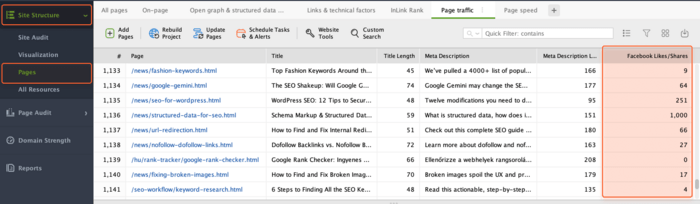
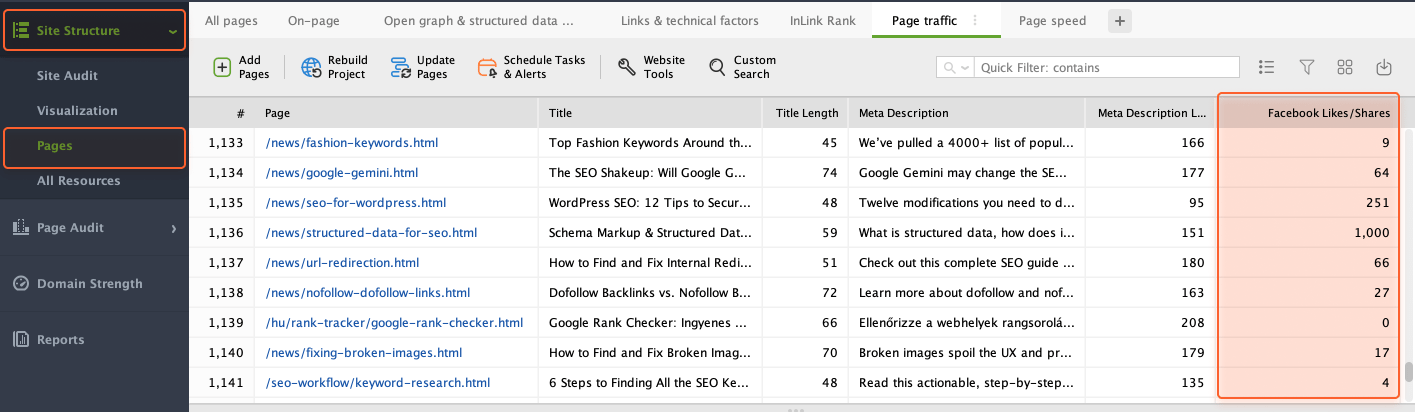
To see the page's Facebook stats, go to Site Structure > Pages. Select the pages you'd like to get the stats for (use Ctrl + A to select all) and click Update Pages. In the pop-up window, tick Popularity in Social Media.
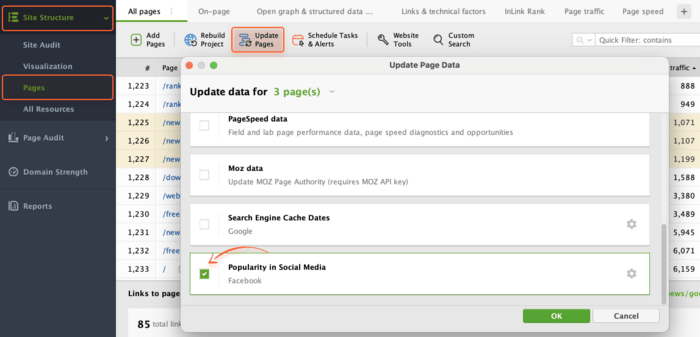
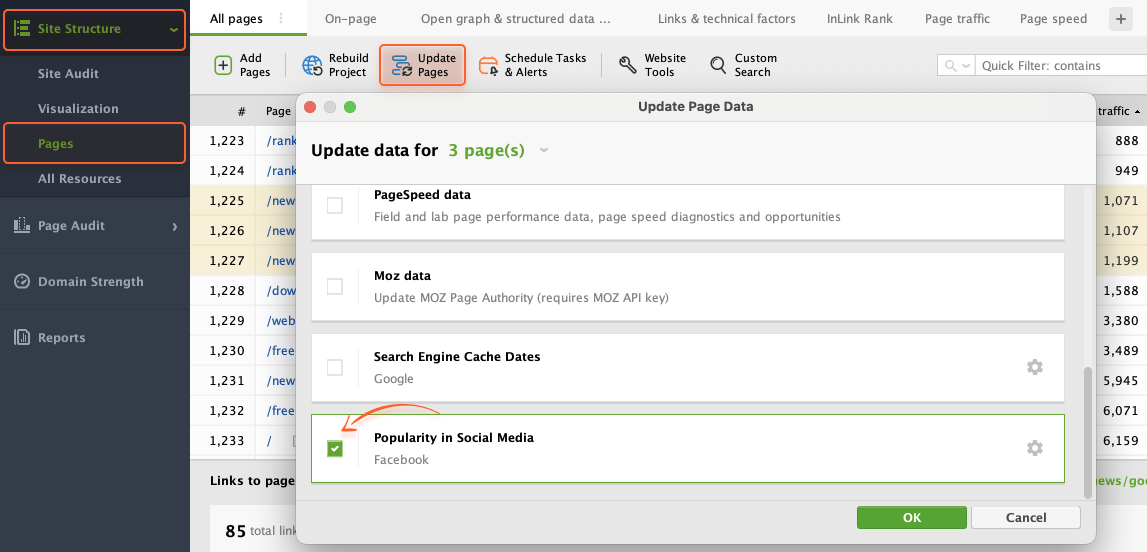
In a few moments, you'll see your pages' popularity in the respective columns in your workspace.
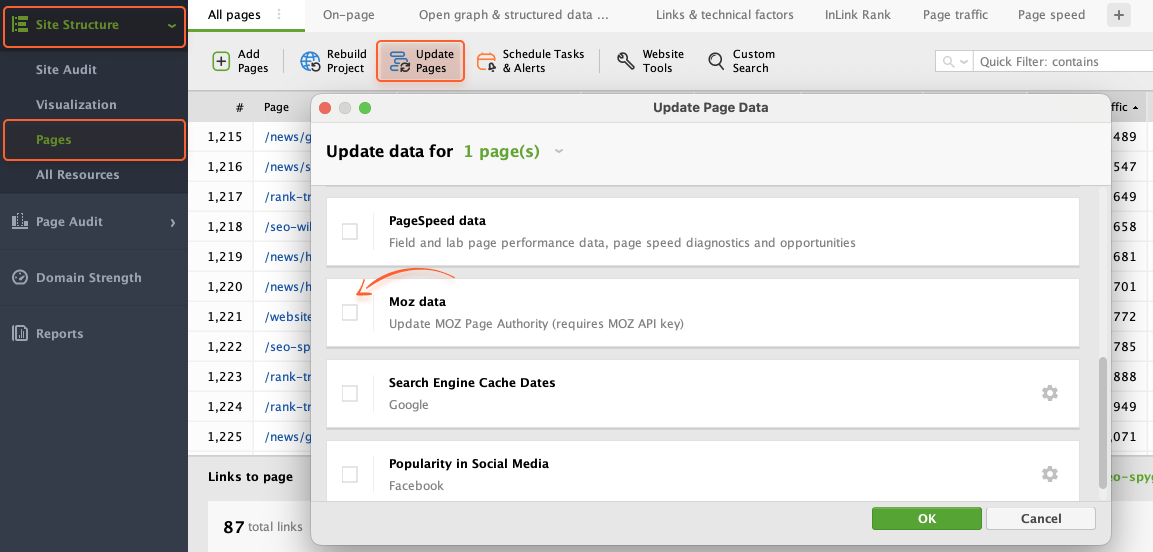
To check Moz's Page Authority for your site's pages in WebSite Auditor, go to Preferences > Moz API Settings. Click Add Key if you already have a Moz API key. If you don't, click on the link to get a free one.
Back in the Pages, select the pages of interest, and click on Update Pages. In the pop-up window, tick Moz data.

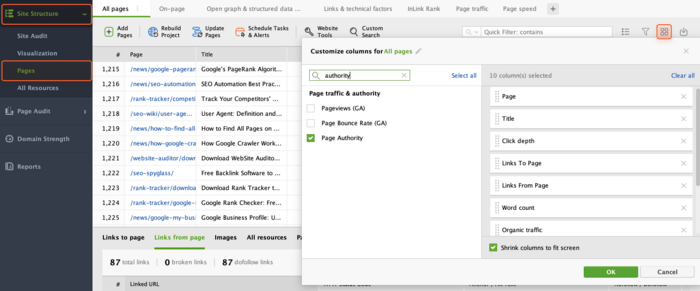
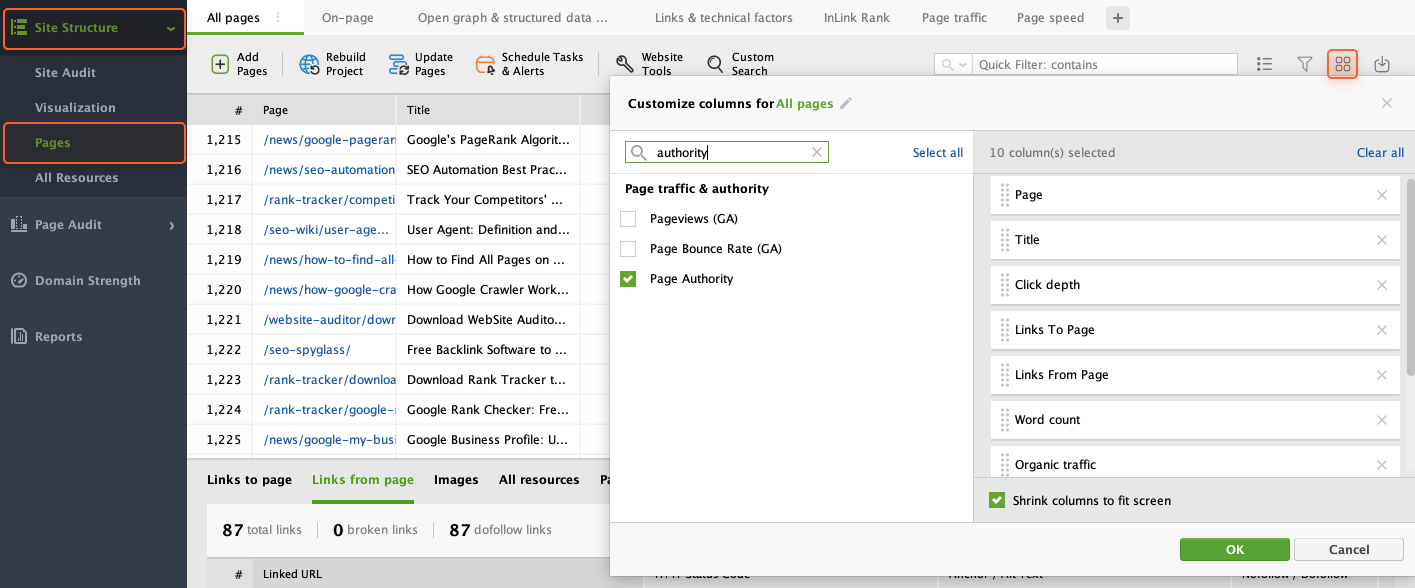
To add the Page Authority column to the table, click the Edit visible columns button and tick the corresponding item. Once done, you’ll be able to check this metric in the table.
Auditing your website's page performance is vital as it helps to identify areas for improvement in technical aspects, user experience, and SEO.
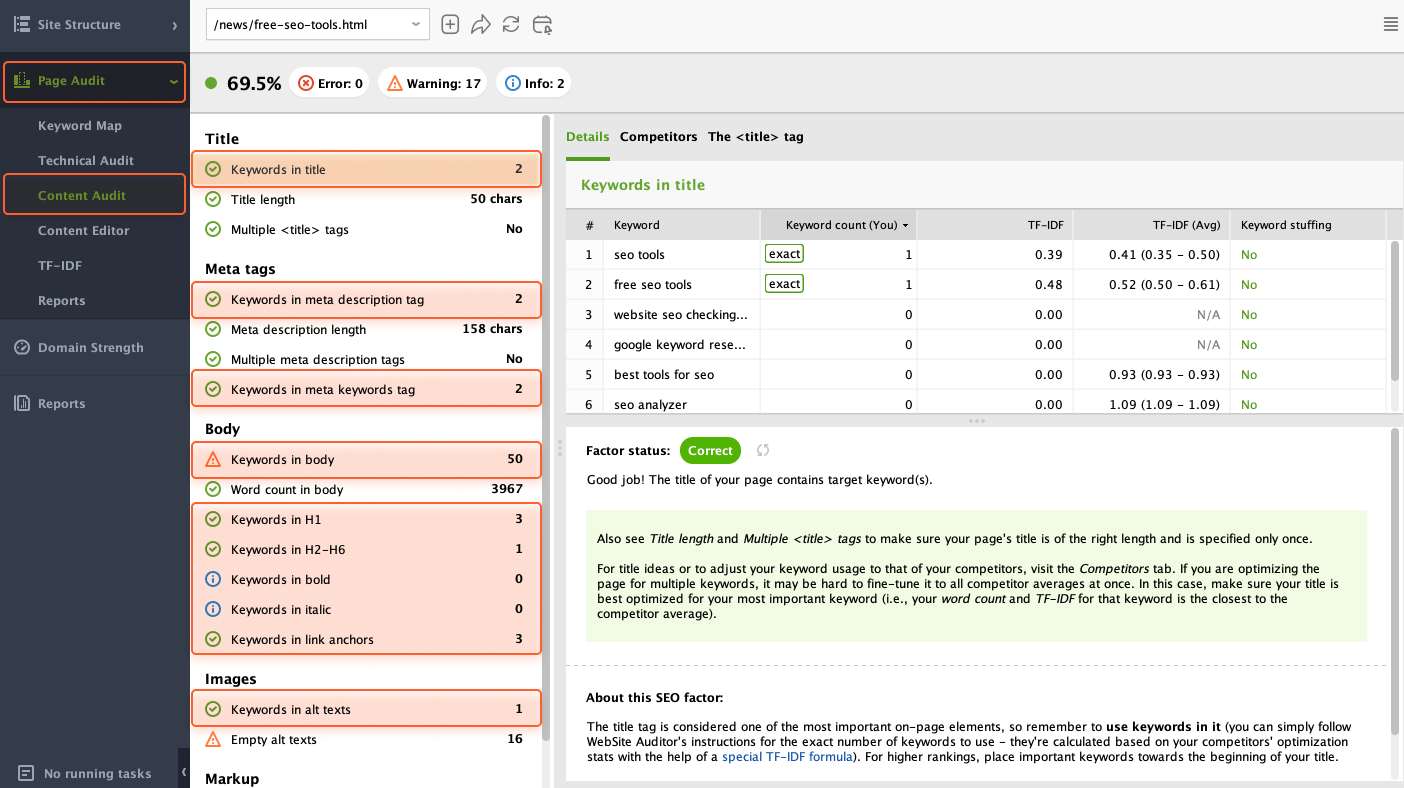
With WebSite Auditor, you can analyze any page (landing page, blog post, etc.) for keyword optimization. For that, go to Page Audit > Content Audit, select a page to analyze, enter your keywords, and select the search engine you're optimizing the page for.
In a moment, you'll see a detailed on-page analysis of your page, including the overall optimization score for your keywords. As usual, you can click on any factor in the list for details and SEO recommendations.

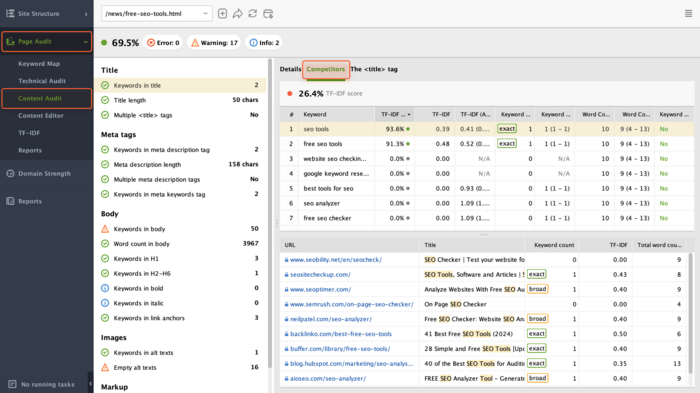
In WebSite Auditor, you can also see how the top 10 ranking competitors are optimizing each page element for your keywords. In the Content Audit module, switch to the Competitors tab.
Here, you'll analyze how competitors are handling any factor in the list: keywords in titles, meta descriptions, and headings, content length, word count, etc.

To check if your page is mobile-friendly, navigate to Page Audit > Technical Audit. The Mobile friendly factor will show whether or not the page is considered mobile-friendly by Google.
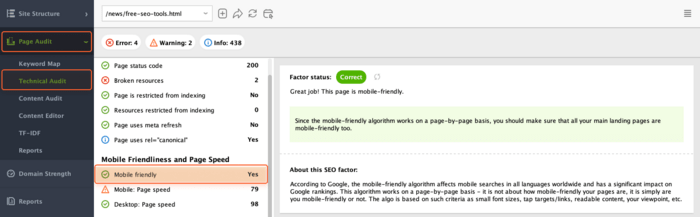

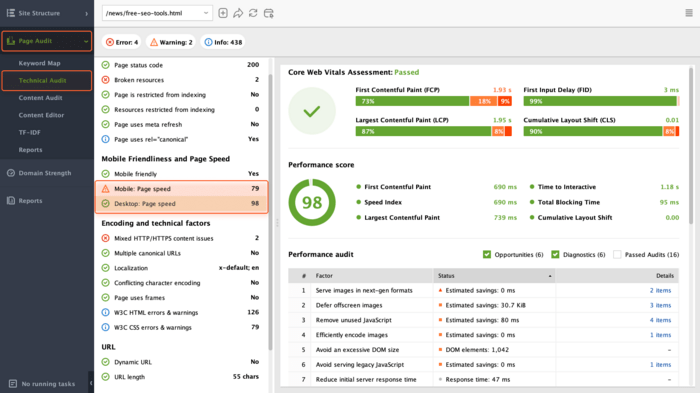
If you want to check whether a page passes Google’s Core Web Vitals on both mobile and desktop, head to Page Audit > Technical Audit and check the corresponding factors in the Mobile Friendliness and Page Speed section.
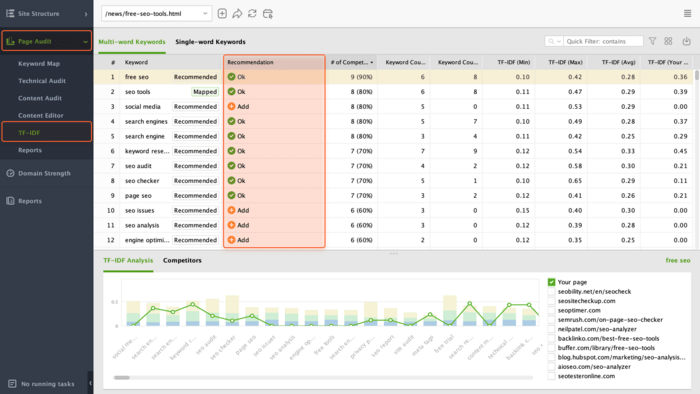
WebSite Auditor can help you search keywords that are relevant for a specific page, not just common words across the web. For that, go to Page Audit > TF-IDF.
This dashboard will contain the full list of topic-relevant terms and phrases associated with your target keywords, based on your top-ranking competitors' content. For optimization advice tailored for your specific page, check the Recommendations column.

Well-optimized content attracts more visitors and ranks higher in search results. By following WebSite Auditor's suggestions, you can rewrite content to target relevant keywords, improve readability, and ensure it provides real value to your audience.
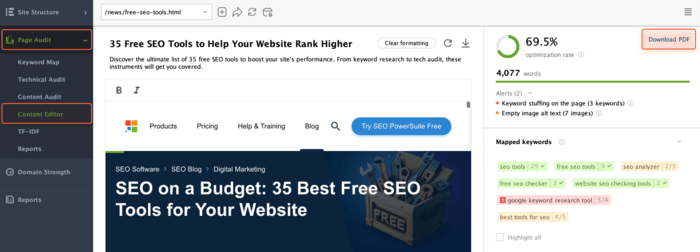
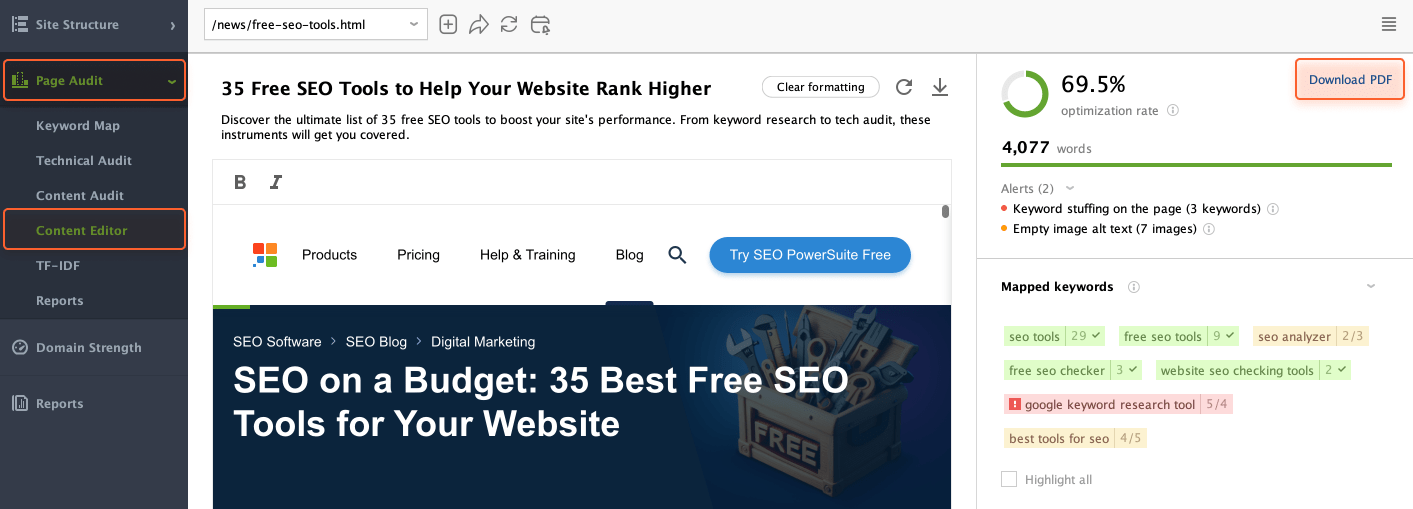
Editing and optimizing your pages directly within WebSite Auditor saves you time and keeps things organized. To do that, simply head to Page Audit > Content Editor.
As you make changes, the on-page factors and your optimization score will be recalculated in real time. You can also use handy suggestions and recommended keywords to tweak content for better search ranking and user experience.

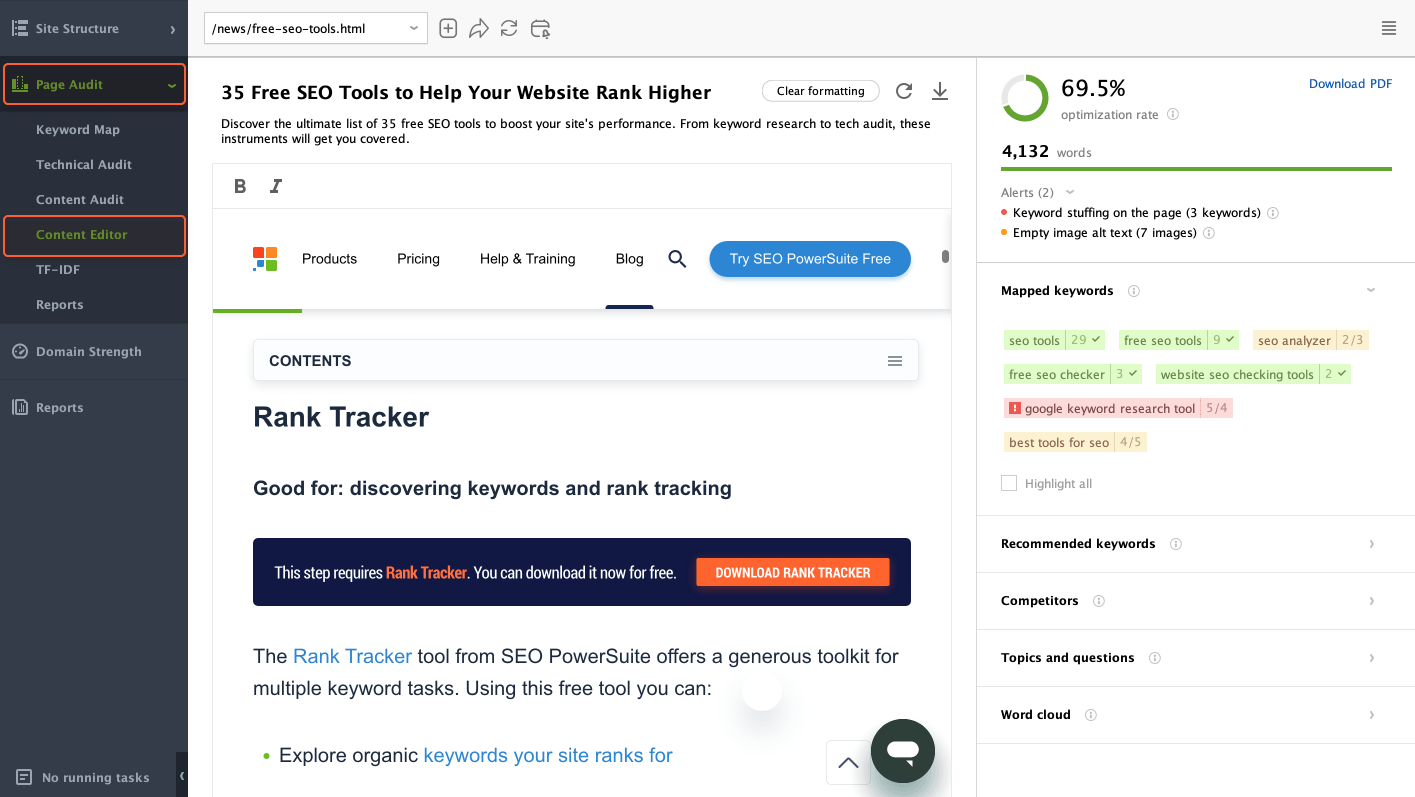
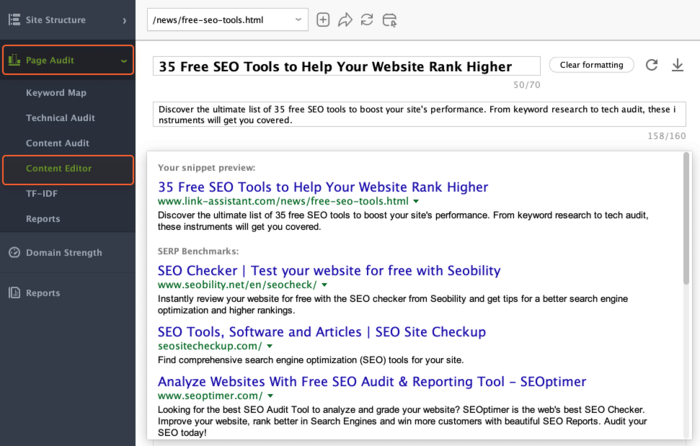
Apart from the body text of your page, you can also optimize meta tags. At the top of the Content Editor workspace, you can type a meta title and meta description. Plus, the tool will show a real-time preview of your page's Google snippet right below.

Exporting content optimization recommendations as a PDF is a convenient way to set tasks for your copywriting team. Simply click the Download PDF button in the Content Editor workspace and you’ll get a clear, easy-to-read document outlining all the SEO and content improvement suggestions.
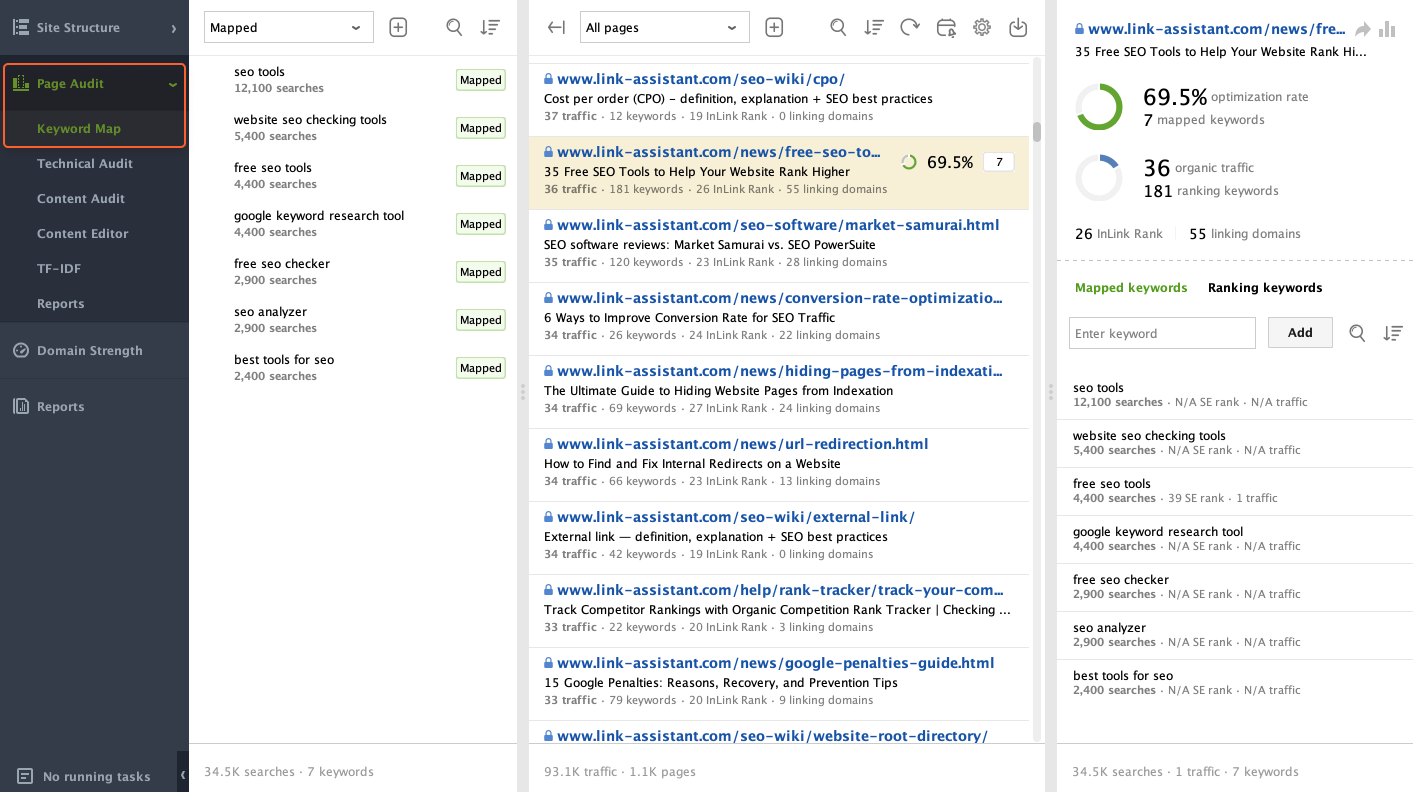
If you need to map keywords to specific pages, WebSite Auditor can help you with that task. Go to Page Audit > Keyword Map. Here, you have three options for adding keywords: manually, import from Rank Tracker, or import from CSV.
When all the needed keywords are listed in the Keyword Map workspace, you can assign them to the pages.

Reporting provides a comprehensive overview of your website’s performance, highlighting strengths, weaknesses, and areas for improvement. Such reports can help you track progress over time, communicate findings with stakeholders, and make informed decisions to achieve your goals.
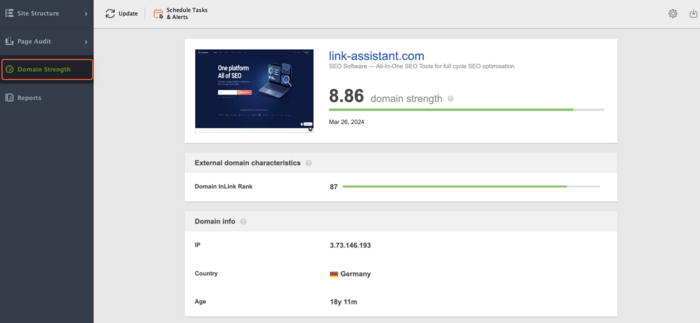
You can create a quick domain overview report with the major SEO factors on the site you're analyzing (backlinks, search engine indexation, domain age, etc.) in the Domain Strength module in WebSite Auditor.

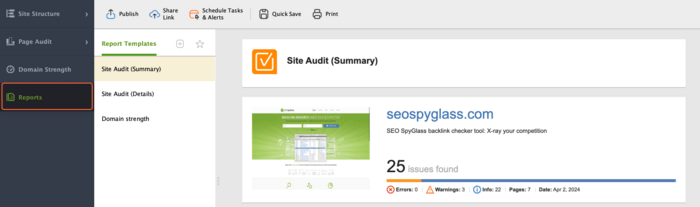
To generate a site audit report, go to the Reports module in WebSite Auditor and select the type of report you're about to create. By clicking on the gear button next to the report type, you modify the data it includes in the editor, customize the report's look, or brand it with your logo.
Then, you can print the report, save it, upload it to the web, or get a shareable report link to send to clients or colleagues.

Maintaining a healthy website requires regular checkups. WebSite Auditor can automate this process for technical SEO audits.
In Preferences, choose Schedule Tasks & Alerts.

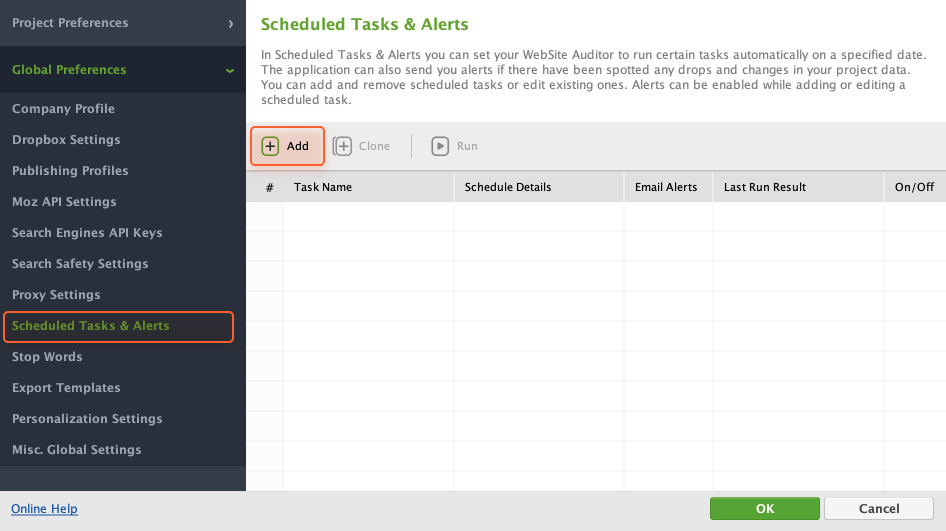
In the pop-up window, click the Add button and select the task.

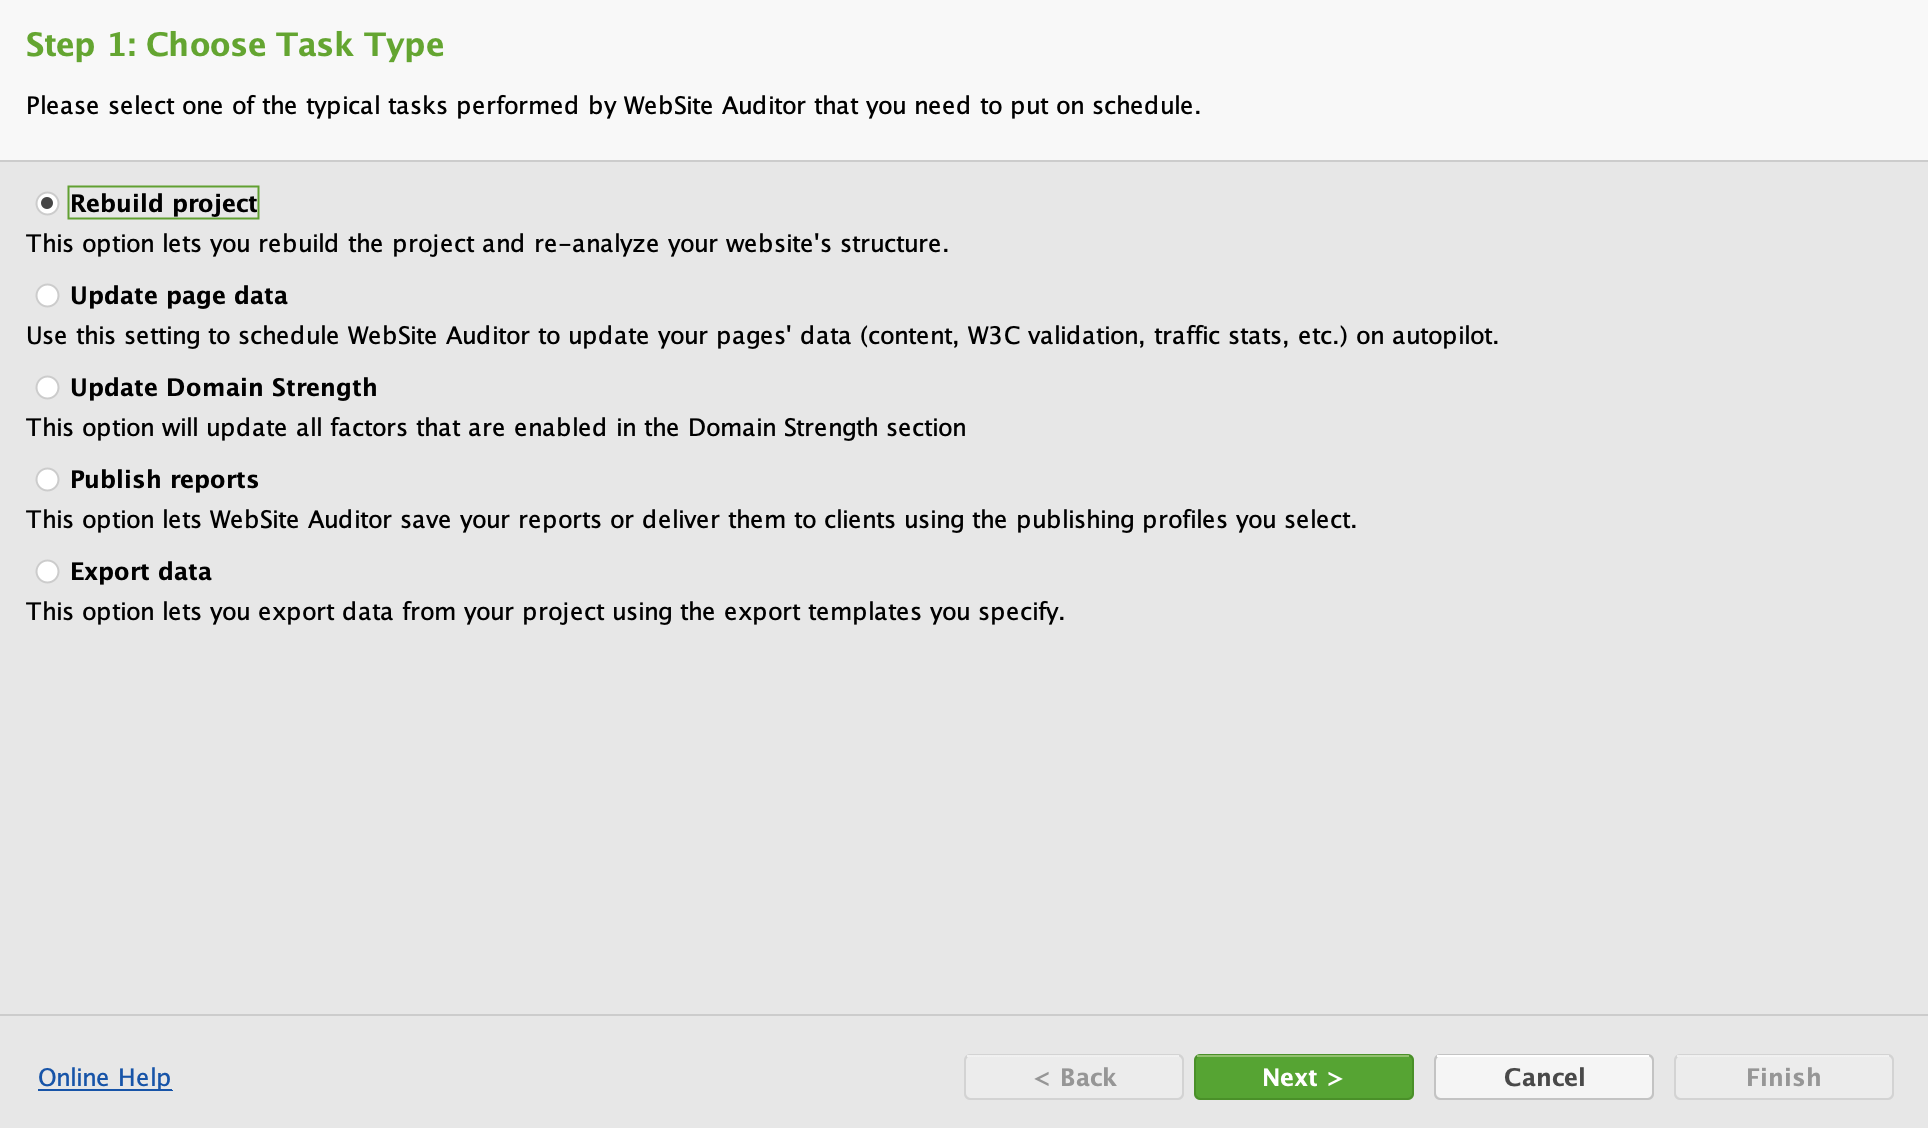
Follow the Task Schedule Settings to define the timing and conditions for receiving notifications, and specify your email address. WebSite Auditor will notify you whenever new issues arise or existing ones get resolved, keeping you in the loop.
WebSite Auditor goes beyond a simple website crawler. It empowers you to become a website optimization pro. With its vast array of cool features, you can diagnose every aspect of your website's health – from technical SEO and content quality to user experience and mobile-friendliness.
The list above is by no means complete, so you’re welcome to share your thoughts and use cases for WebSite Auditor in our Facebook group!