•
16-minute read

Images are often an afterthought in search optimization. And yet, they are a huge part of our pages. And I mean literally — images are often the largest element in the viewport and they are often the largest resource to be loaded on the page. But also figuratively — unique images of high quality are a valuable commodity in search and will help you rank above competitors who use images from elsewhere.
In this article, we will explore everything you should take into account when optimizing images for search.
The most immediate danger of using someone else’s images is that you may be infringing the copyright. In that case, you risk a range of consequences, from being asked to take the image down to being fined. So, if you are not using original images, make sure the license actually allows for them to be used on your website.
No less important is Google’s thirst for unique images. Whenever we search for a product or anything really, Google aims to show as many different images of that object as possible. So, if you are an e-commerce website and you are using the same product images as everyone else, your chances of getting into SERP are very slim.
Just as an example, here I’m searching for a relatively unknown product that very few stores carry. Since there is not much competition, these stores do not bother with unique images and Google has no choice but to show the same photos over and over:
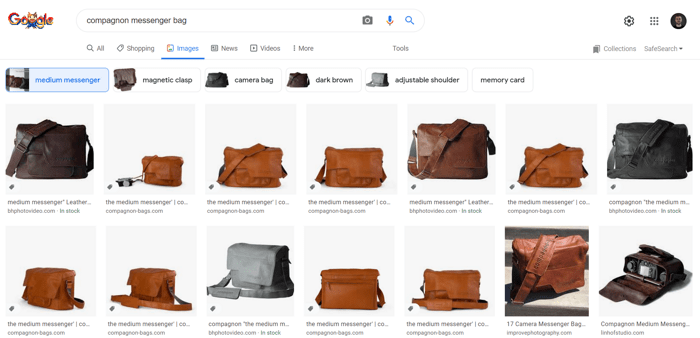

But look what happens when I search for a popular product that’s stocked by thousands of stores:
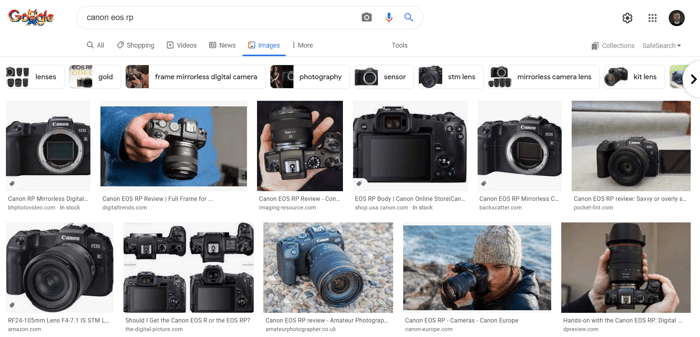
As soon as Google has some choice there is not a single repeated image in search — it digs deep to show the product from as many angles as possible. If you are a provider of these unique images, then your chances of appearing in SERP improve dramatically.
If you are anything like me, you might have totally missed the moment when JPEG and PNG stopped being the default image formats. Today, the preferred formats are AVIF, JPEG 2000, JPEG XR, and WebP. These formats are better at handling compression and thus can be made lighter, leading to better load times and overall improvement of user experience. Better user experience — better positions in search.
Of the four image formats listed above, let’s focus on WebP first. It’s considered to be the most universal image format for the web. It supports both lossy and lossless compression, allows transparency, and can be animated. Essentially, it’s PNG, JPEG, and GIF all rolled into one. What’s more, WebP files tend to be 25% to 35% lighter than PNGs and JPEGs of similar quality.
The only concern is that WebP hasn’t been supported by some of the browsers in the past. Although today, since Safari got on board, the format is actually supported in over 90% of sessions. Still, if you want to be extra careful, you can set your pages up to serve WebP when supported by the browser, and a different format when there is no support.
Even though next-gen formats are already light, you can have even more savings by running your images through compression software.
Here is where you have several options, depending on your website’s platform. Some e-commerce platforms compress images by default, while others come with a range of plugins that will compress your images as you upload them or even compress the images that are already used on your website.
If you don’t want to rely on plugins, supposedly because plugins are a drain on page speed, you can compress your images externally. There are plenty of free online tools that will run the compression for you. You can then download compressed images and upload them to your website.
Finally, you can ask your designer to compress the images using graphic editors or, if you are a one-man operation, you can try and do it yourself.
Here are the kind of savings I got by using an online image compressor:


It was a random selection of images from my download folder, so I think it’s a fair representation of what you can expect from these tools. As you can see, the savings range from 60% to over 90%.
Here is another thing that might have a negative impact on your rankings. When you skip image dimensions, the browser will spend some time trying to figure out the proper size for your images on the screen. From a user perspective, it will look like the elements on the page are dancing around and the page is unusable until they settle down. This is called layout shift and it’s measured by Google as a part of user experience evaluation.
To avoid this issue, always set width and height properties for your images, like so:
<img src="pillow.jpg" width="640" height="360" alt="purple pillow with flower pattern" />With this information, any browser will calculate your image dimensions and reserve enough room on the page. So, even if your image is not loaded immediately, the other page elements will not fight over the space, which is likely to solve most of your layout shift issues.
By the way, specifying image dimensions was one of the things we did to improve our Core Web Vitals. Check this case study to see how image optimization can help boost your own Core Web Vitals metrics.
Another image-related lifehack that can improve user experience is to defer offscreen images. Basically, it means you do not load the images until they are needed. The images up top are loaded right away, while the images at the bottom of the page are loaded only when scrolled to.
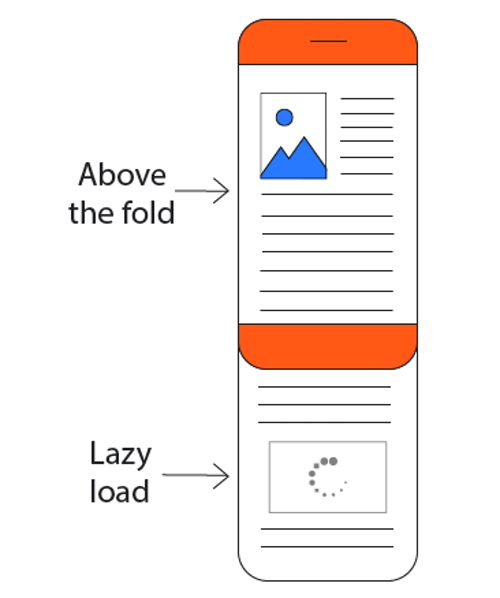
This approach frees more resources for loading the top part of the page, the one that the user sees first. And it gives a measurable impression of visiting a faster page.
Consult this guide on lazy-loading your images for more information.
Alt text is an image attribute that contains the description of the image. Its original purpose was to be shown when the image cannot be loaded or to be read out loud to visually impaired visitors.
In terms of SEO, however, the purpose of alt text is to describe the image to the search engine. Granted, it was more important in the past, when search engines did not have the capacity to interpret the images using artificial intelligence. But the technology is still far from perfect and search engines feel more confident showing your images in search when you provide descriptive alt text.
A good alt text is the one that describes the image precisely — with sufficient detail, but without keyword stuffing. Let’s take an image below as an example:


Not much happening in the image, but there are plenty of opportunities for an alt text to go wrong.
It can be overly generic:
<img src="sample.jpg" alt="coffee">Or it can be overly optimized:
<img src="sample.jpg" alt="coffee latte art cappuccino latte flat white">Or it can be just right:
<img src="sample.jpg" alt="barista shows how to make latte art">Just for the fun of it, let’s compare our alt text to what Google would see without an alt text. I have added the image to Google's Cloud Vision API and here is the result:
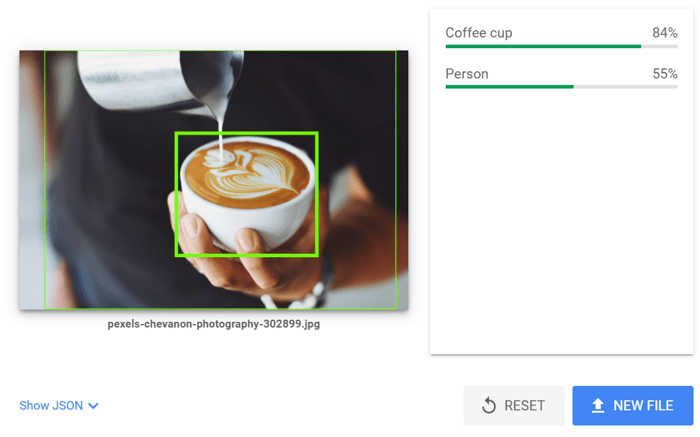

While the objects are identified correctly, the definitions are quite generic and the interpretation of the image is not nearly as specific as the alt text I can provide myself.
Schema markup is a collection of HTML tags used to tell Google what’s what on your page. For example, if you are a local business, you can use the tags to tell Google which bit of content on your page is an address, which is a phone number, and so on. This way Google feels more confident about displaying your information in search.
There are actually hundreds of different tags used for dozens of different purposes, and you can learn more about them in our guide on structured data.
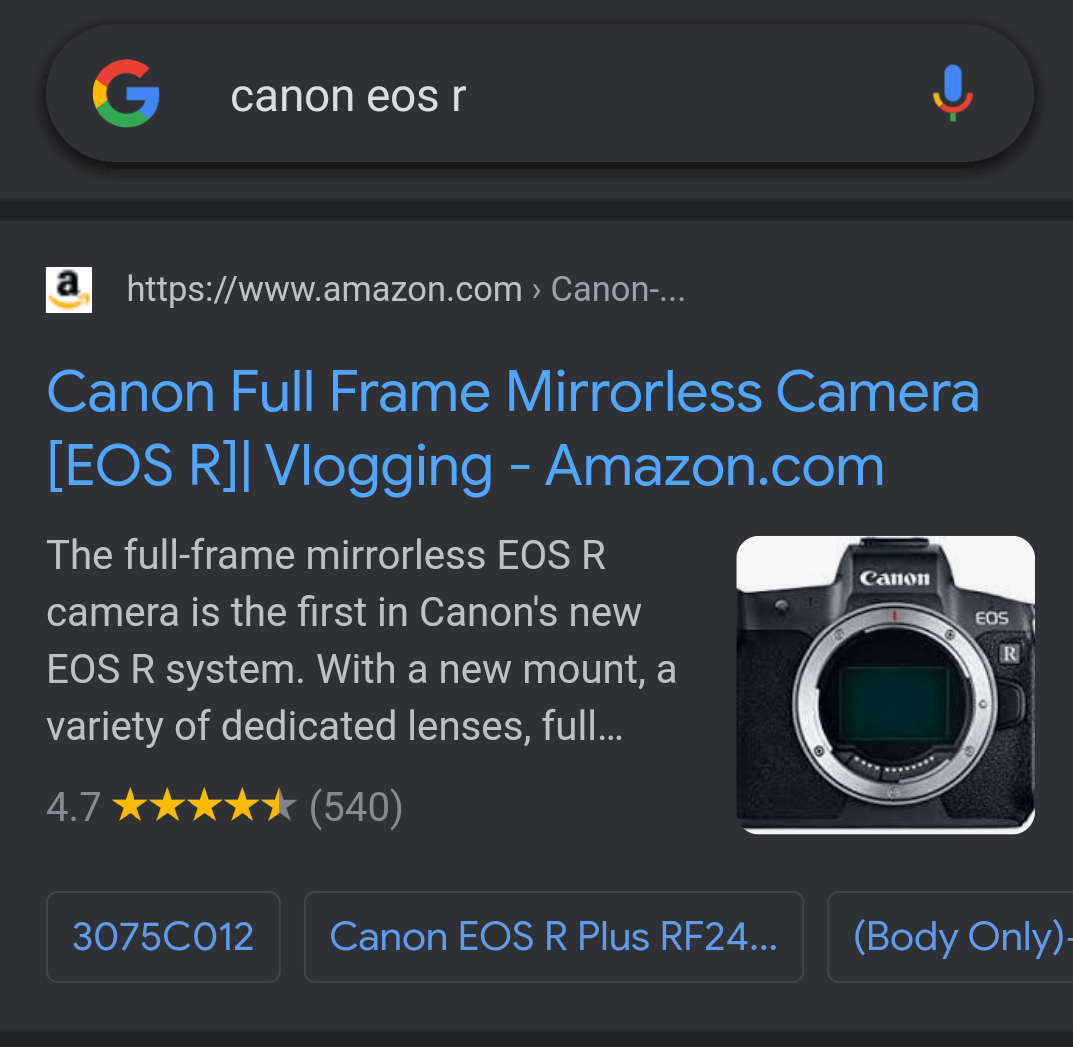
In terms of images, there are two types of pages where it makes sense to apply structured data: product pages and recipe pages. Both product and recipe Schemas have dedicated image tags. And, if you use them correctly, Google will be able to use your images to create rich snippets in SERP:

You can tag the images on your pages manually, use a dedicated plugin to tag the images automatically, or you can use Google’s Structured Data Markup Helper.
Just to give you an example of what the whole thing is about, I’ll walk you through the markup process in Google’s Markup Helper. All you have to do is choose the type of page you are working on and provide a link:

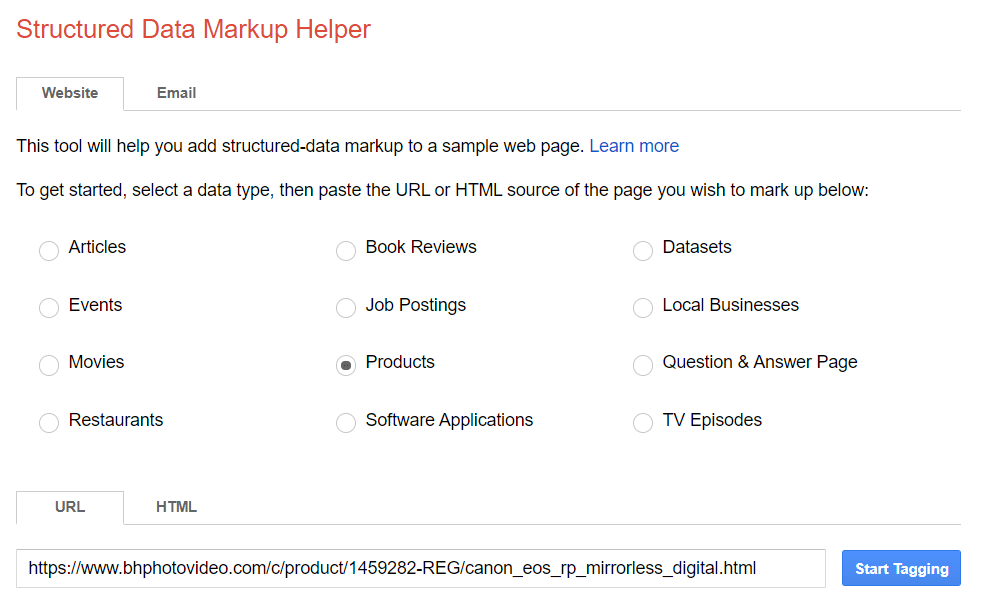
The tool will render the page. Now you can point on various page elements and choose what those elements are from the drop-down menu:


Once you are done tagging page elements, you can download the piece of markup code and add it to the <head> section of your page.
Image theft is a very common thing online and it puts you at risk of losing the uniqueness of your images. What’s worse, if the website using your images is better optimized for SEO, it can actually rank above you. With the help of your content!
In order to avoid that, ask your devs to add specific image attributes stating who the owner of the image is.
The three most important attributes are:
Author (artist; creator) — where you put the author of the image;
copyrightNotice — where you put the link to your copyright license and its description;
source (credit) — where you add the link to your website or the website you took the image from.
If your competitors just go ahead and copy the code you used for image integration, Google still considers you the actual owner and gives you preference because of these tags. And even if they delete the tags, Google will still give you preference as it considers tagged images more trustworthy.
With everything we’ve covered so far, where do you begin the process of image optimization? And how do you organize it to run efficiently? One way would be to audit your website with the WebSite Auditor and organize all of your image-related issues into a single dashboard.
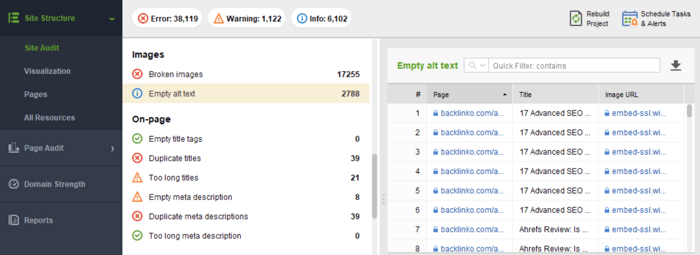
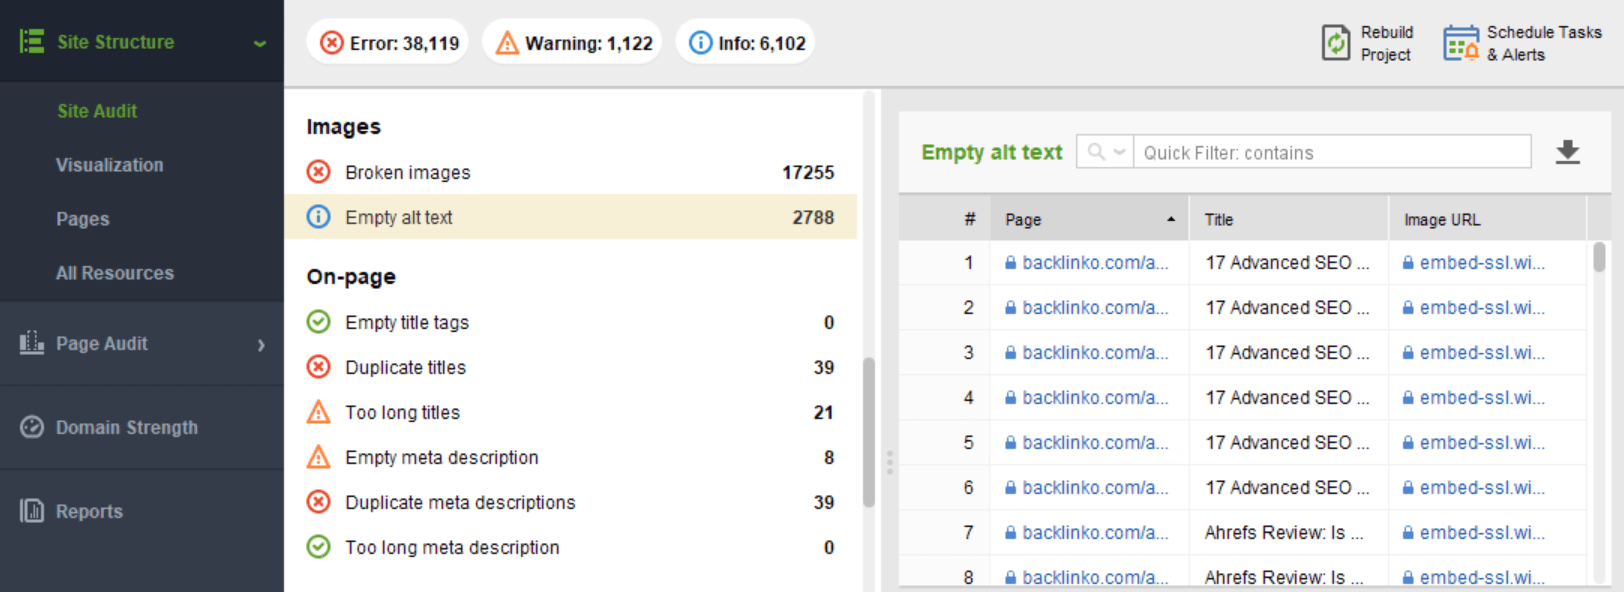
First, launch the WebSite Auditor, create a project for your website, and wait for the tool to crawl all of your pages. Once it’s done, you will get a full report on the dozens of technical issues on your website. There will be a separate block dedicated to images, where you can check if you have any broken images and if any of your alt texts are missing. Click on any of the issues and you will get a complete list of problematic resources on the right:
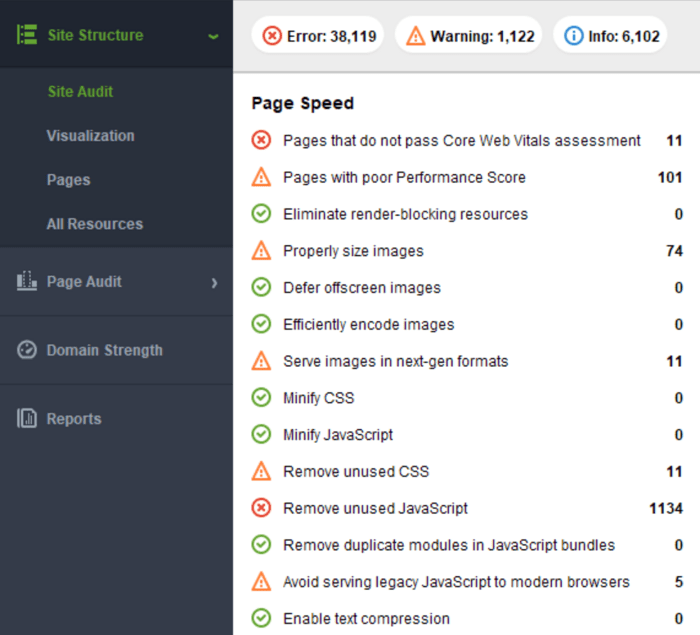
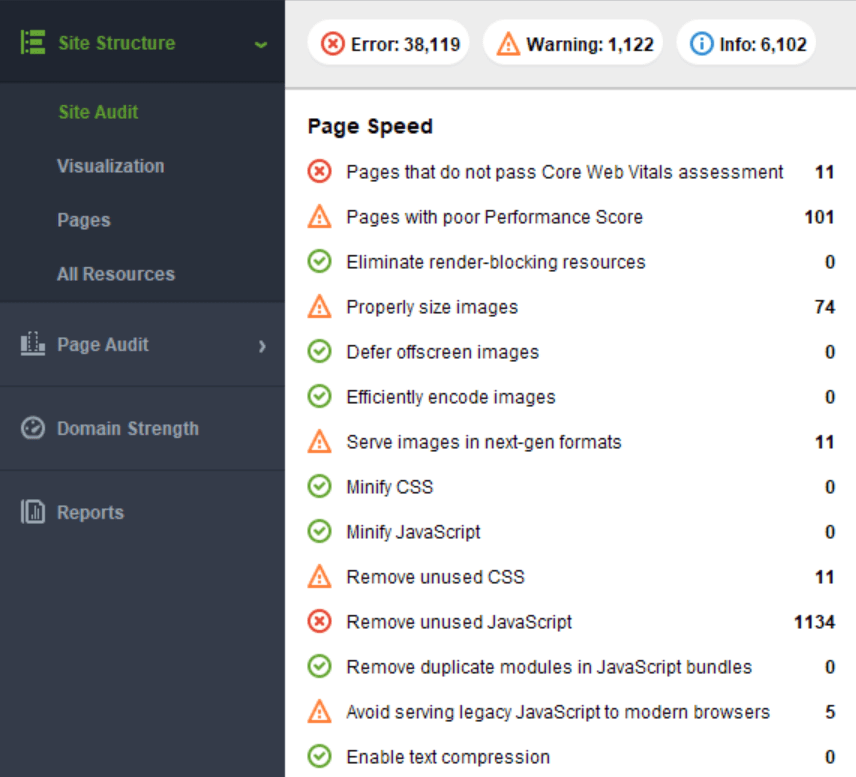
For more image-related issues, scroll down the report until you get to the Page Speed section. There, you will be able to see if there are any opportunities to improve page performance through images. In particular, whether it makes sense to resize, defer, re-encode, reformat, or pre-load any of your images:
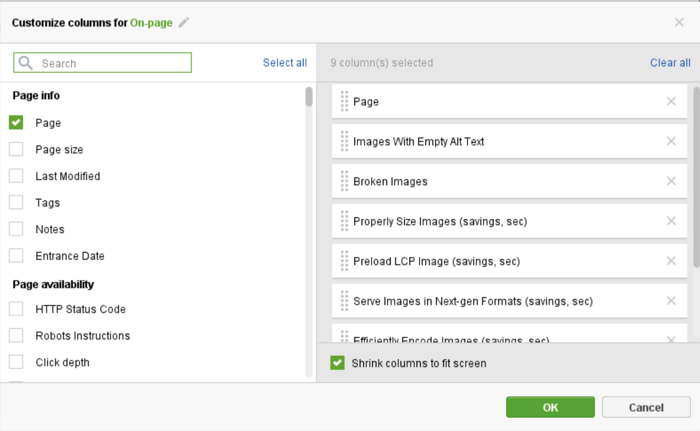
Since the amount of work can be overwhelming, and working on your images is a tedious task, you can prioritize the work by how important your pages are or by the improvements that will give you the largest performance boost. To do that, go to the Site Structure > Pages, where you can view all of your technical issues split by page:
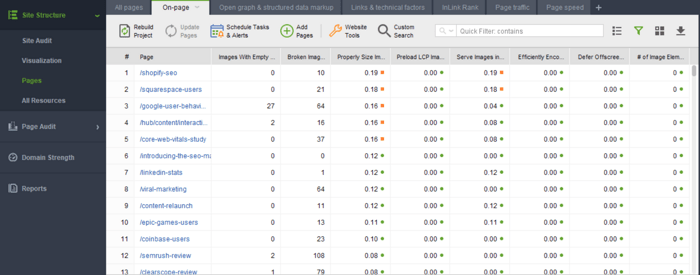
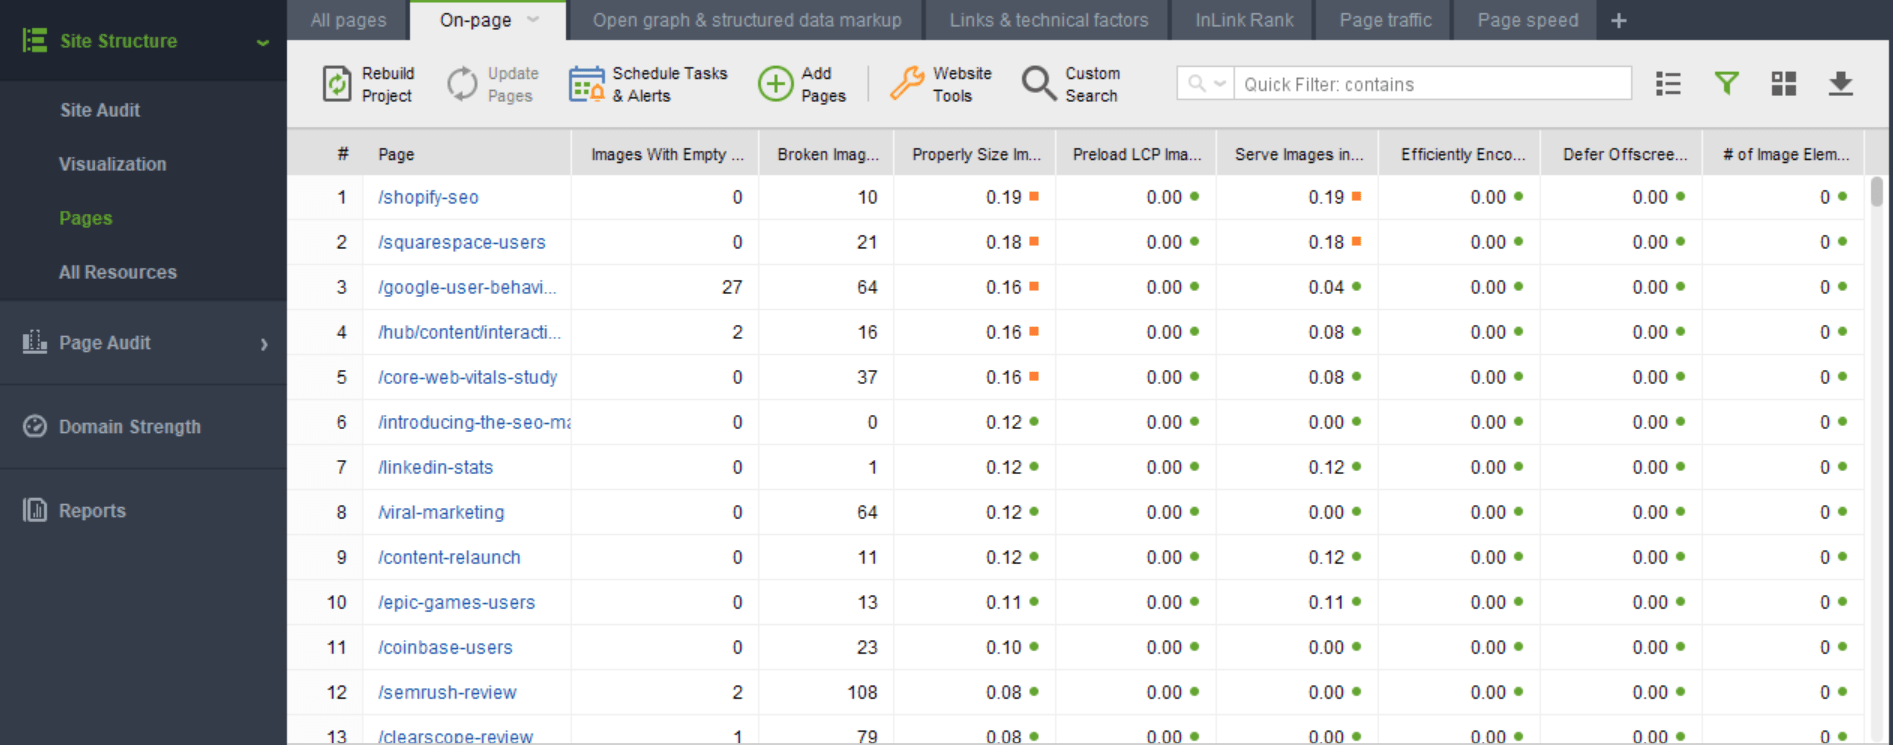
You can actually modify this workspace or create a new workspace and choose to view only the issues related to images:

Once your workspace is all set, you can sort the table from the highest traffic pages to the lowest traffic pages and start optimizing images on those pages that matter most. You can also sort the table by the estimated performance improvement and start from those pages where image optimization would have the largest impact.
If you've read everything in this article up to this point — congratulations! You now know almost everything you need to know in order to start getting some serious ranking boosts from your images.
If you picked certain chapters and only read them — that's cool too, glad you found at least something useful.
There's a reason image optimization is overlooked — it's tough, and time-consuming, and difficult. But if you take all of the advice here to heart, and go that extra mile to implement it, the ranking dividends will follow soon.