30-Minute Daily Activities for Boosting Your SEO


I'm sure you had a situation in your life when the task you needed to accomplish was the size of Titanic and it got you thinking: “There's no way I’m going to finish this before 2057, so why even bother starting?”. Sadly enough, there are a lot of website owners out there whose dreams of conquering Google are broken because the whole topic of SEO seems like "mission impossible" to them.
If you are a small business owner, for instance, you are probably too busy with other activities and mistakenly think that SEO is what needs to be worked on 24/7. Well, it's nothing but a popular misconception. The first and the last thing I want you to know is that SEO is not THAT hard and it doesn't take up much time when done right, for example, by learning the right SEO tips or using effective webmaster tools.
Elvis Presley once sang "only fools rush in", so let's not rush, but bring best practices for ranking to your life gradually by using our guide to SEO. Seriously speaking, I want you to daily dedicate only 30 minutes of your time to SEO accomplishing one particular task or solving a certain issue. 30 minutes a day is a good price to pay for your site to rank higher in the search results, isn't it? If the answer is "yes", keep on reading this article and let me solemnly announce our 30-minutes-a-day training open.
Our SEO Checklist for daily tasks
Day 1
First things first, in order to start optimizing your site and before even thinking about an SEO checklist, it's only right to define where you stand with your rankings, agree? So, what I suggest is kicking off with some simple SEO tasks like defining seed keywords as well as keywords that already bring you traffic.
Basically, seed keywords are the ones that broadly describe your niche, so identifying them won't be of huge difficulty for you. For example, you may go through your website's navigation and divide each section into a few broad topics. After that, just think of some seed keywords that would reflect each section you've just defined.
Well, now let's see how you rank to understand your current state of things.
- So, start Rank Tracker, create a project for your site or open an existing one.
- Go to the Rank Tracking submodule under Target Keywords and hit the Add Keywords button.
- Type in the seed keywords that you've just come up with and hit Next.
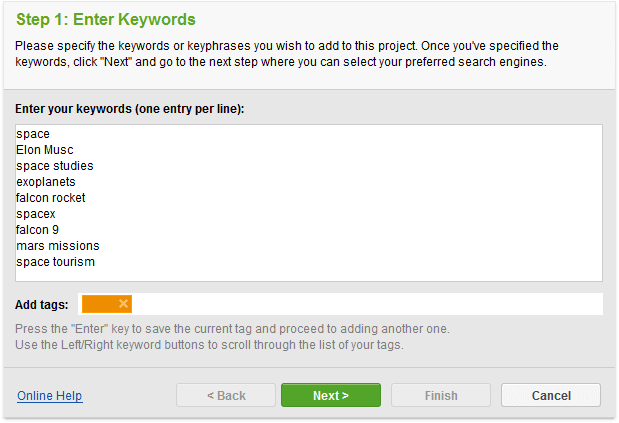
- Specify your preferred search engine and click Finish.
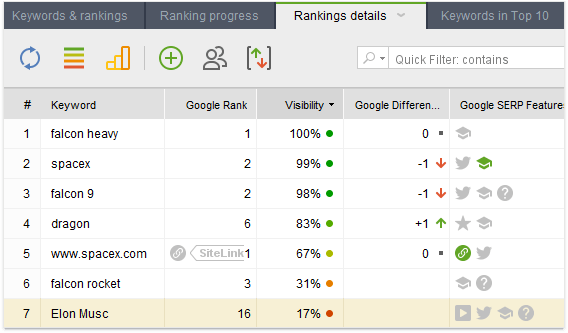
- Now that seed keywords are added to your project, you may go to the Ranking Details section to enjoy a full HD view on your rankings as well as visibility, SERP features, keyword difficulty, and a whole bunch of other metrics crucial for your SEO strategy.
Once you're done with that, it's only right to identify keywords that already bring you traffic. As you may have guessed, the best place to drag them from is our all-time favorite Google Search Console. Luckily, now there's no need to form a separate file and then import it to Rank Tracker.
- Move to the Keyword Research module and pick Domain Research.
- After that, choose Google Search Console in the upper left corner, and hit the Search button.
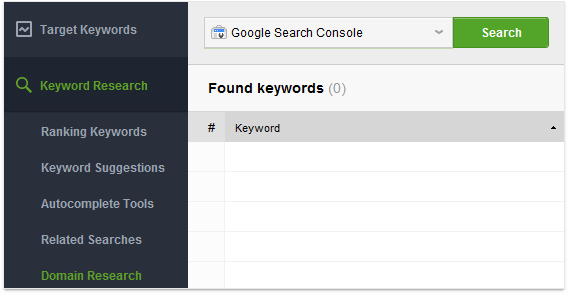
Now the tool is taking some time in collecting the list of keywords that have been bringing you traffic within the last 28 days. So, keep an eye on their performance as well.
Well, now that you have an idea of the current situation rankings-wise, let's proceed with keyword research to collect you some new keywords with great potential.
Days 2-4
If I was to name the biggest and the most controversial SEO topic of all time, I would say keyword research straight away. The reason for all the buzz around this SEO activity is just different SEOs using different SEO tools going for different approaches that normally depend on: an industry, budget, a competitive landscape, a site itself, etc. That is why I myself can totally relate to all the green SEOs out there who just don't know where to start or whom to believe. With that in mind, I've tried to make the following steps as simple as possible for you and, what is more important, applicable to any of the above-listed parameters.
Rome wasn't built in a day, and there's no chance keyword research (or any other multitude of SEO tasks) will fit into one day as well. So, let's not rush and fully dedicate 3 days to this activity. First, we're going to borrow some of your competitors' keyword ideas. And within the next two days, we'll be collecting some brand new ones, deal?
Spot keywords that your competitors rank for

Now we're up to probably the most pleasant keyword research activity – revealing the exact keywords that your competitors rank for. Yes, SEO competitor Rank Tracker now has this feature in its arsenal. So, don't miss a chance to make it the secret weapon for your SEO plan. Ok, time is money, so let's get straight to the steps.
- Open your project in Rank Tracker and go to Ranking Keywords under the Keyword Research module.
- Type in your competitor's URL in the field above. After that, select either mobile or desktop rankings and click Search.
- Wait a bit for Rank Tracker to do its job, and you'll be kindly rewarded with a transparent view of your competitor's keyword profile.
P.S. The most amazing thing is that, thanks to the Keyword Sandbox feature, you can now save keywords from all the searches and get back to your list any time you want without the fear of losing it. So, go ahead and make the most of this feature.
Discover new keywords
When digging for new keyword opportunities, it's only right to try multiple search methods. Otherwise, it's like eating soup with a fork – still possible, but not something I’d recommend in an SEO checklist. Luckily, with Rank Tracker's over 20 search methods, your keyword list has zero chances to be incomplete. Don't you worry, I'm not going to cover each and every one because it'll take us till Christmas. By the way, I’ve written a big old article on keyword research recently, so make sure to give it a good read when you have time.
1. Google AdWords Keyword Planner and Competition TF-IDF Explorer search methods

As you can quite clearly see from the title, now we're going to have a look on Google AdWords Keyword Planner and Competition TF-IDF Explorer search methods. The steps below will make one of the most effective techniques in search engine optimization clear for you.
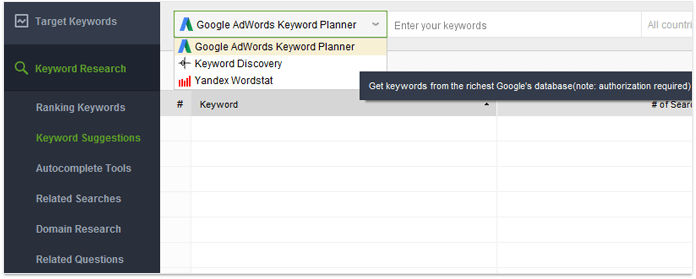
- Open your Rank Tracker project, go to Keyword Suggestions, and select Google AdWords Keyword Planner in the upper left corner.
- Now enter the seed keywords that you've already defined.
- The only thing left to do is logging into your Google AdWords account and hitting Search. Done.
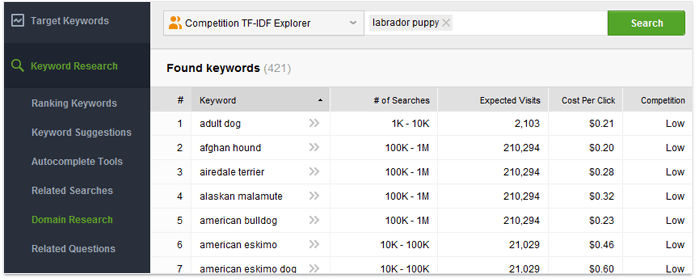
Now on to the Competition TF-IDF Explorer research method. Obviously enough, this method allows you to collect your top competitors' keywords using TF-IDF analysis. If TF-IDF seems to you like a random set of letters, I’ll explain. Putting it simple, TF-IDF is a statistical measure that evaluates how frequent a certain word is used in a set of documents. Obviously enough, the more frequently a certain word is used, the more valuable it is. In our case, the tool analyses your top 10 competitors and collects keywords that at least two of them have in common. This is done to spot and get the most frequently used keywords in your niche.
- To make it all happen, jump to Domain Research under the Keyword Research module, and go for Competition TF-IDF explorer in the drop-down menu, which is in the upper left corner of the tool.
- Type in your keywords, hit the Search button, and wait for it. That's it.
2. Google Autocomplete and Related questions methods

Other two keyword research methods that I simply can't help mentioning are Google Autocomplete and Related Questions methods. These two are just pure gold if you're willing to get into your potential customers' heads and identify what their interests are, or how they tend to put search queries.
- Go to the Autocomplete Tools submodule, which is under the Keyword Research module. Then, you can either type in keywords from your initial list or those that you dragged from Google Search Console.
- Hit the Search button and in a couple of moments you'll be supplied with the list of the most popular Google suggestions.
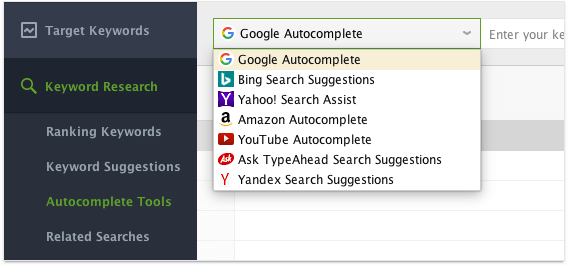
By the way, as you may see from the screenshot above, there is quite a number of other autocomplete tools like Amazon Autocomplete or YouTube Autocomplete, which I can highly recommend checking out in your spare time.
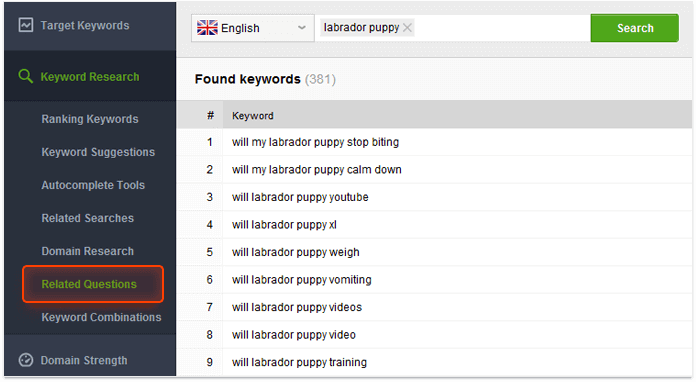
If you want to enrich your list with some gems and find out the most frequently asked questions associated with your product or service, Related Questions is a search method to go for.
- Stay in the Keyword Research module but move a bit down to Related Questions.
- Just as before, type in your keywords and hit the Search button. Give the tool some time for doing its magic, and the list of the most popular questions will be laid nicely at your feet.
Yes, there are lots of other keyword research methods in Rank Tracker and not only, but since we have strict time limits, we'll stop at this point. Besides, you already have a super powerful set of keywords, so let's call it a day.
Day 5
Now that your keyword list is the size of Kanye West's ego, it's high time for us to do a massive casting for the starring roles. By saying that, I mean that we're going to filter out all the keywords that have zero chances to bring you any traffic or conversions.
I suggest arranging our casting according to three major criteria. These are going to be: keyword difficulty, search volume, and keyword length. Practice shows that keywords with search volume below 50 (too rare), keyword difficulty over 66 (too hard to rank for), and those that consist of more than 5 words (too long) should be excluded. Once we've defined the criteria, let me show you how it can be done.
- Click on the funnel icon
in the top right corner in the Rank Tracker's Keyword Research module.


- Go for the all option under Show results matching for you to see only the results that match your chosen filtering conditions.
- Hit Add filter and select # of Searches > Less than > 50, then Keyword Length > More than > 5, and finally Keyword Difficulty > More than > 66.
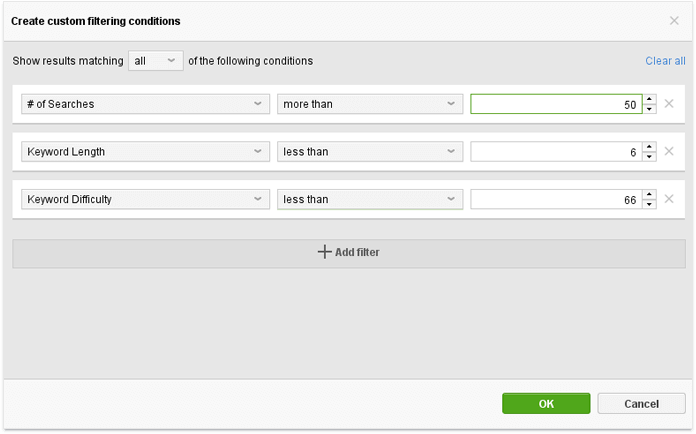
- After that, the tool will supply you with keywords that fit the parameters we've just set.
- Now there're two options to pick from. You can either delete these keyword phrases for good (Ctrl + A in a filtered view > right-click the selection > Remove Keywords) or label them with a tag to your liking (right-click the selection > Add tags to selected records > enter how you like to call them).
Day 6
Well, this is how smoothly we came to the final straight keywords-wise. There's just one last activity from the SEO checklist to be done. Being through with collecting and filtering, it's only right and logical to assign keywords to specific pages of your site. This will make your pages rank for right keywords. Let's do it.
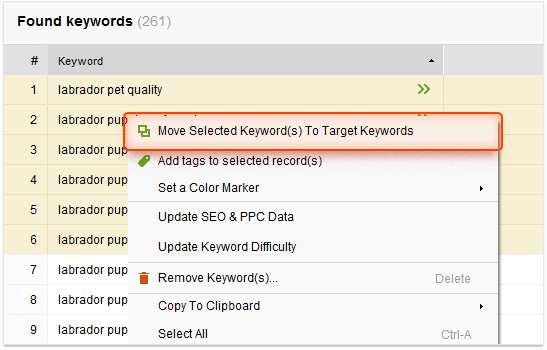
- First of all, we need to move keywords to the Target Keywords module to work with them further. To do that, simply select the keywords, then right-click, and hit Move Selected Keyword(s) To Target Keywords. After that, these keywords will appear in the Keyword Map submodule.
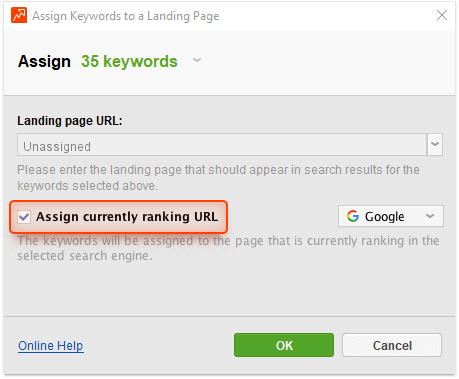
- Move to the Keyword Map submodule, right-click the exact keywords or groups that you're willing to assign to a certain webpage and hit Assign keywords to a landing page.
P.S. At this point, please have a close look at your site's pages and sections and try only to assign highly relevant keywords to them. If you assign keywords that are too far from each other meaning-wise to one page, an overlap will be inevitable. What's more, if you have some unused keywords, you may mark them with a special tag (right-click + Add tags to selected record(s)) or keep them safe in Keyword Archive. Then, you can add some pages to your site especially for these keywords. Ok, let's move on, sorry for the interruption.
- Type in a URL of a webpage to assign your keywords to. Do the same procedure for other landing pages.
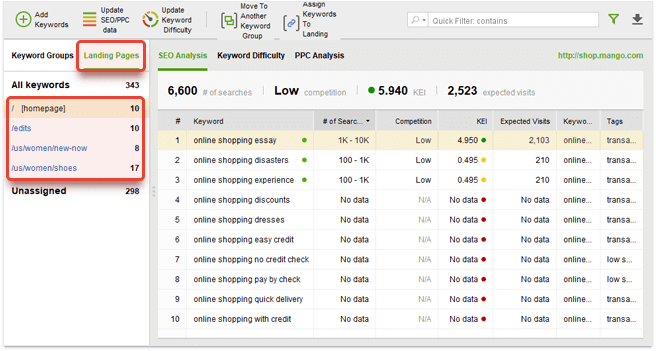
- To look at your newly made keyword map, switch to the Landing Pages tab next to Keyword Groups.
Well, that’s more than enough for keyword research, time to move on to the next set of SEO tasks.
Just a cheeky little reminder: it's better to assign more competitive keywords to "stronger" pages like your homepage, for instance. And, of course, make sure to only assign keywords to webpages that are semantically relevant. Now that we're officially done with keywords, let's dedicate a couple of days to your landing page optimization with regards to crucial on-page SEO ranking factors.
Days 7-11
When your precious keywords are collected, it's high time to proceed with optimizing your landing page. Please don't be scared of the number of days that I've decided to dedicate to landing page optimization. The thing is, the larger your site is, the longer it takes to optimize it. Below, I've described how to optimize one page, so, basically, you will need to go through the same steps but for all of your website's pages. But just before you get down to it, you'd probably want to see how well it's optimized at this very moment, wouldn't you?
- To do that, open WebSite Auditor and jump to the Content Analysis module.
- After that, select your landing page from the list of the site's URLs and type in keywords that you're optimizing the page for.
- In a couple of secs, you'll see an overall optimization score and another bunch of stats such as if it passed the mobile-friendly test—that shows how well your page is optimized in comparison with your top competitors' pages.
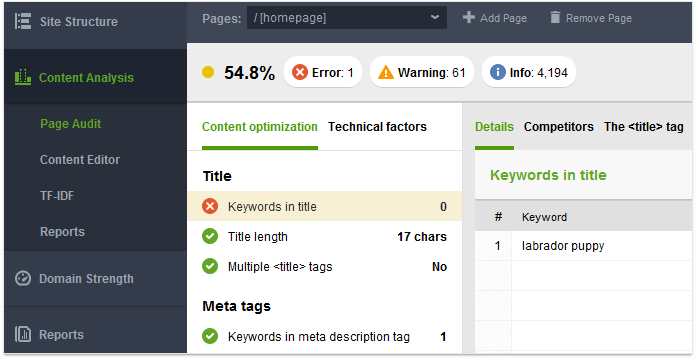
- Have a look at factors with Error, Warning, or Info statuses to spot the exact places that need to be worked on in the first place. Take special note of any crawl errors, they’re the ones that can keep you out of the SERPs altogether.
1. Work on your title, title tag and meta description

With no exaggeration, a title tag is the central element of your landing page. However, if it's not there, a search engine will fill the snippet for you, which may not be relevant enough and cause lower click-through rates, and who wants that? Besides, it needs to be attractive for your potential customers so that they were willing to click it.
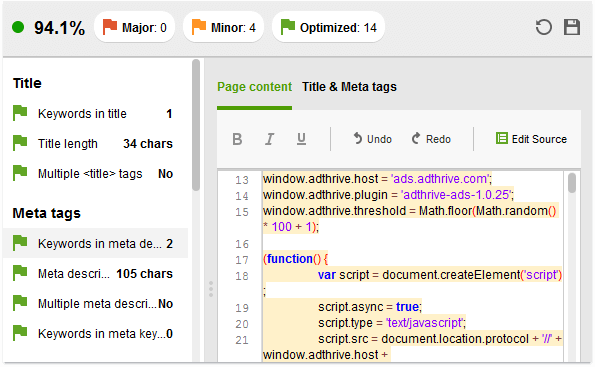
- So, if you're missing a title or willing to change it, go to the Content Editor submodule and switch to the Title and Meta tags tab.
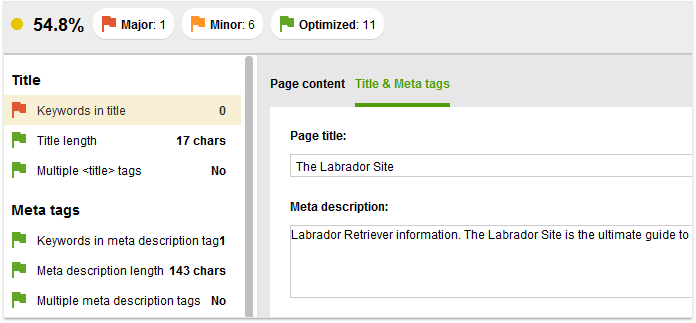
- Once you've decided on your perfect title, please fill free to type it in the Page title field. And don't forget to go through all the title factors on the left to make sure they are all ok and marked with green flags.
Since we're already in the Title and Meta tags section, let's have a look at your meta description as well. Just like with titles, when absent, a search engine will fill it with content to its liking, which is not an option to go for.
- So, while in Title and Meta tags, type in your meta description and make sure it corresponds to all the requirements on the left. Done!
2. Optimize headings

Do I even need to talk about the importance of headings? H1 is your page's king heading. Simply speaking, the more relevant your headings are, the more satisfied searchers will be. The more satisfied the searchers are, the higher your rankings will be. Ok, let's get straight to it.
- Go to Content Editor once again but this time move to the Page content section.
- Click the Edit source button and find your H1 tag by pressing Ctrl + F and running a search for "<h1".
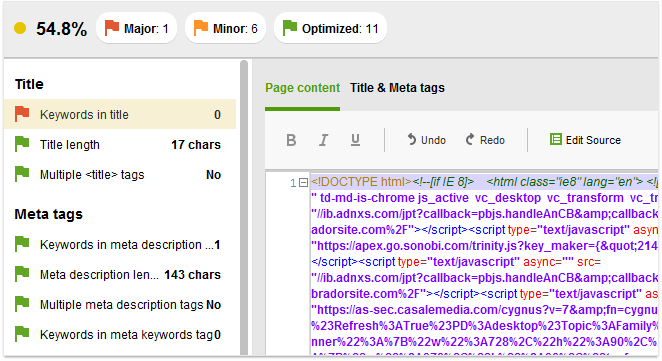
- Now you can edit the contents of your H1 right in the page's source code. And for the sake of SEO, don't forget to include your keywords.
- The process of H2-H6 tags editing is just the same, so go ahead and work on them as well.
Please note that using the same keywords in your headings may cause keyword stuffing, so just don't overuse them, ok?
3. Check alt texts for images

Although, Google is turning its head to machine learning for object recognition and can actually understand what it is in your picture, the power of meta data should not be underestimated. Alt text still plays quite a significant part in telling search engine bots what the image is about and, as a result, improving your rankings.
- To check if you have any empty alt texts, go to the Images section under the same old Content Editor submodule.
The best practice is to have alt texts for all of your images. Of course, with relevant keywords included.
- So, if missing alternative text, hit Edit source to see your HTML and search for "<img".
- Go through your images and spot those that lack an alternative attribute. Ready? Then type in right, keyword optimized alt texts.
4. Take your optimized page live

So far, you've collected the dream team of keywords and optimized your landing page, so you might feel like you’re done with this daily SEO. Well, what I suggest you doing now is showing your freshly optimized page to the world. Let me show you how to take it live, this is the simplest activity ever.
- So, after you're through with optimizing your landing page, hit the Save button for your optimized HTML file to be saved on your computer.
- After that, upload this page to your site just like you would normally do. That's it!
P.S. If you're using WordPress or any other CMS, you won't be able to upload your HTML as a page. What you can do is just copying your optimized content straight in the system and you'll be good.
5. Check if your site is mobile-friendly

I know that I'm probably the 1385th telling you that Google is going nuts about making the Web more mobile-friendly. This is a pretty hyped-up topic, but I just can't resist including it in our 30-minute SEO exercise. You may have already spotted where to check if your site is adapted for mobile devices. In case you haven't, there's a mobile-friendly parameter in the same old Encoding and technical factors section. Check out the status, if it's "Yes", than congrats. If the status is "No", than hit the status button
and make your site mobile-friendly ASAP.
Well, now that your landing page can be exhibited in some SEO museums as a perfect example of on-page optimization, let's turn to your website's technical audit. We need to make sure it's safe and sound or cure it on time to proceed with auditing and collecting some brand new links for you. Out with the on-page SEO and on with the exciting task of Audit.
Day 12
I'm sure that once in a while you go through some medical checks just to be on the safe side, so why not give your site a big old check to make sure it's as sound as a whistle. By saying that, I mean carrying out a proper website audit, of course. Please, don't be scared with the phrase "big check", because, luckily, we’ve been blessed with WebSite Auditor, which will make daily SEO as fun as daily tooth-brushing. Ok, let's do it.
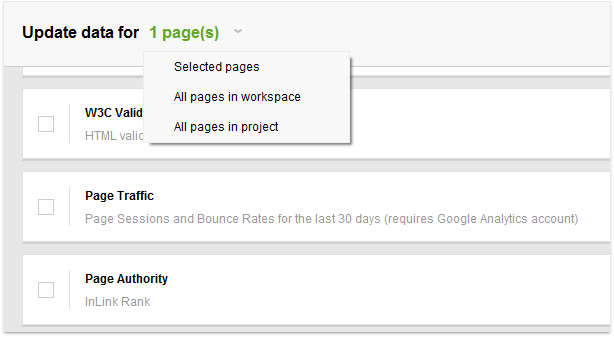
- Open your project in WebSite Auditor, go to the Pages submodule, and hit Update Pages.
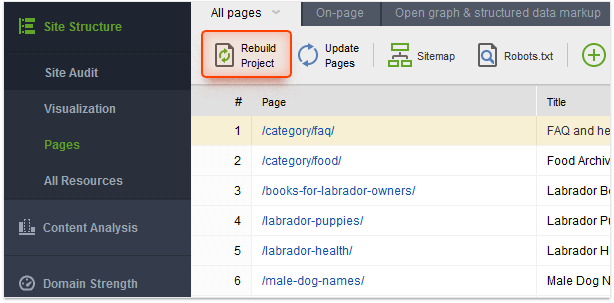
- Then, go for the All pages in project option and check all the parameters (Page Content, Page Traffic, etc.).
- Waiting for your site to be scanned is probably the most time consuming part. Yes, it takes some time, but in the end, you'll be rewarded with an exact diagnosis, which will help us a lot with fixing issues that may occur.
Day 13
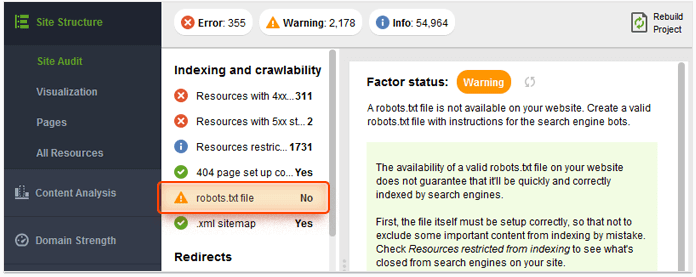
Once WebSite Auditor is done with scanning your site, let's see if it spotted any issues with crawlability, broken links or indexing. So, at this stage, we're going to focus on indexing instructions in your robots.txt file and HTTP response codes.
- First of all, you need to make sure that your robots.txt file is available. If you are in doubts whether you have it or not, check out the robots.txt tab in the Site Audit submodule.
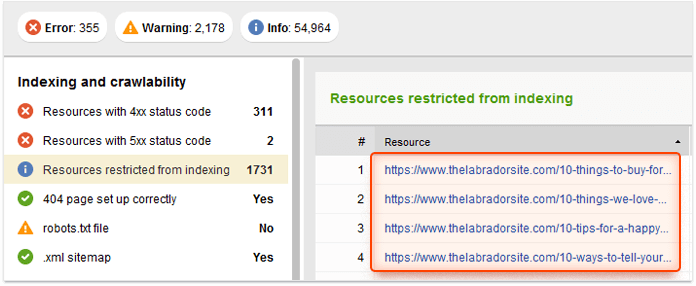
- To make sure that the most important pages are being indexed, go to the Resources restricted from indexing tab under the Site Audit submodule. Turn your head to the right a bit and you will see the exact pages and resources that are left out because of:
- the robots.txt file itself
- the "noindex" tag in the <head> section of pages
- the X-Robots-Tag in the HTTP header
Now that you know where the shoe galls, it's only right to fix robots.txt or create it from scratch. I know it may sound complicated, but in reality, it only takes you a couple of clicks.
- All you need to do is to switch to the Pages submodule and click. Now you need to pick from two options: you can either create a robots.txt file from scratch or fetch it from server to revise.
Now let's have a look at your pages' response codes. Spotting HTTP response codes errors will only take up 5 minutes of your time, but it will give you clear understanding of what causes indexing issues.
- We're running out of time, so quickly run through Resources with 4xx status code, Resources with 5xx status code, and 404 page set up correctly tabs in the Indexing and crawlability section.
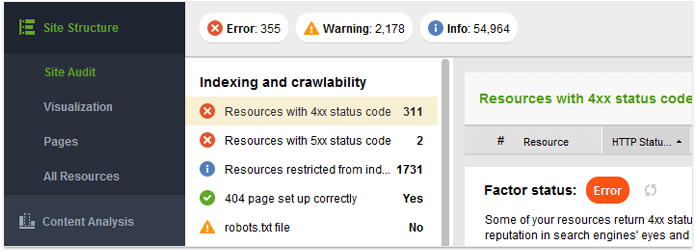
- Make sure that none of the above listed factors have error statuses. In case they do, have a look at the Factor status box in the right half of your screen to see recommendations on how to fix your pages.

Day 14
Basically, a redirect is a way of sending users to a URL that is different from the one they originally requested, avoiding the user trampling on those dreaded broken links. As a rule, the most frequently used redirects are 301, 302, and Meta Refresh. All in all, redirects are not bad guys, however, if implemented badly, they can slow down your site and cause indexation troubles.
The thing is, a 301 redirect is a permanent one, and it passes about 90-99% of its link juice to the redirected page. When it comes to a 302 redirect, which is temporary, it may not pass its link power to the addressed page. That is why, as long as a redirect is really temporary, I would massively suggest replacing 302 redirects with 301s.
Speaking of meta refresh, it's strongly associated with Google's Quality Guidelines violation, so you'd better remove it for good or set up permanent 301 redirects instead.
All you need to know redirects-wise is right there in the Site Audit submodule under the Redirects section, or for some rather heavy bed-time reading, check out the Bing webmaster guidelines.
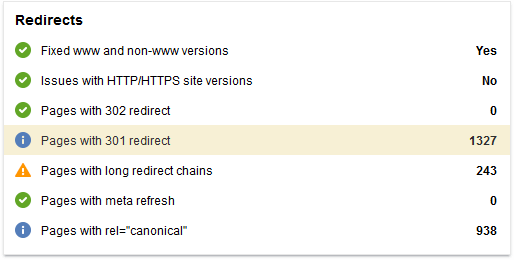
Ok, moving on to HTTP/HTTPS and www/non-www versions of your site, we need to make sure that everything is set up correctly. So, just go to the same old Redirects section and have a close look at the Fixed www and non-www versions and Issues with HTTP/HTTPS site versions tabs. If the tool hints you at some troubles, just as before, have a look at the right-hand part of the screen, where you can find some advice on how to fix the issues occurred.
1. Check your code
In harsh SEO reality, it happens sometimes that even the slightest issue may evolve into a big trouble and a whole bunch of unpleasant consequences. As you may have figured out, coding issues are what we're going to talk about now. Like I said, they can negatively affect a lot of parameters like: pages' load speed, crawlability, the way that your site is displayed in different browsers, etc. So, let's see if there are any errors on your pages.
- To do that, just go down to the Encoding and technical factors section to spot any that have Info, Warning, or Error statuses.
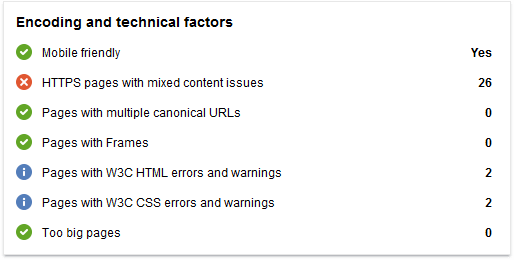
- If there are some, simply press the status icon
to see how you can deal with an issue. And that's, basically, it.

Days 15-16
From website's audit straight to a backlinks' one, how about that? If there's anything I know for sure SEO-wise, it would be: never skip the most important step of any SEO checklist. Whether you like it or not, they firmly stay one of the most important SEO ranking factors of all time. Full stop. In this light, running an in-depth SEO backlink audit can be proudly called a very important SEO activity. It's even prior to link-building itself because you can spot links that harm your SEO, eliminate them, and start collecting new ones.
Ok, let's hit it off with getting the full list of webpages that link to your site.
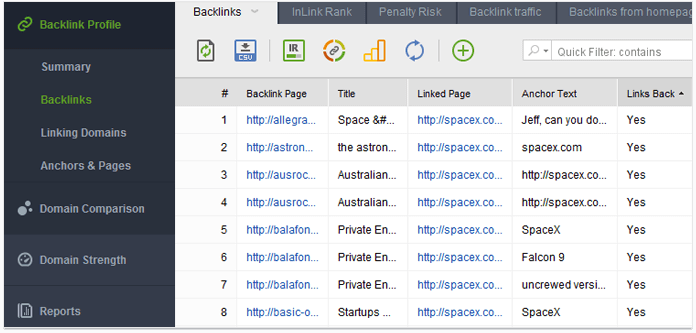
- Just start SEO SpyGlass, enter your website's URL, and wait for the tool to collect all the backlinks.
- At this step, we need to make sure that all the links are still present. So, in the Backlink Profile module, have a look at the Links Back column to spot any links with No statuses. Basically, it means that those links were removed, so don't hesitate to remove them for good (pick a link, right-click it, and hit Remove backlink(s) from project).
Another thing that is definitely worth checking is the dofollow vs nofollow ratio. Bear in mind that there's no way nofollow links can improve your SEO, but it's also wise to say that a normal backlink profile can't consist of dofollow links only.
- Stay in the same Backlink Profile module, but this time move to the Summary section. There you'll see a diagram that clearly shows the exact percentage of dofollow links in your profile.
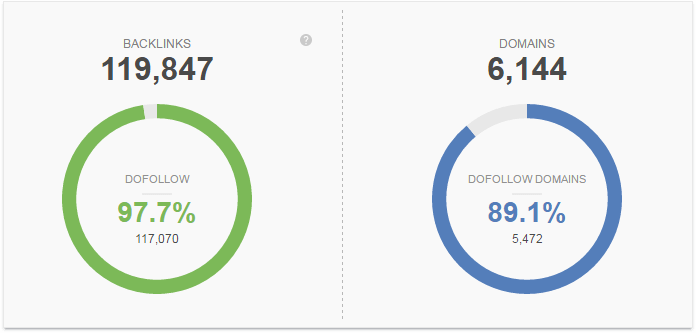
Just a cheeky little reminder: if the number of nofollow links exceeds the number of dofollow ones, it's a flagger that it's high time for starting to hunt for more SEO-valuable dofollow links for improved organic traffic. And on the contrary, if your backlink profile can't boast of any nofollows at all, it may signify that these links were acquired in an unnatural manner and deserve being further investigated.
What's more, in this very Summary submodule, you can check lots of other parameters in your backlink profile like:
- Backlink progress
- Domains linking from homepage
- Backlink countries
- Linked Pages
So, go ahead and analyze these parameters to get more familiar with your backlink profile on the whole and spot its strengths and weaknesses.
1. Calculate penalty risk, get rid of harmful links

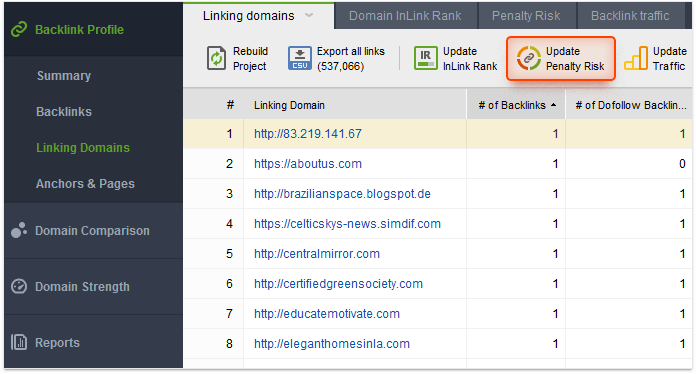
Now that we got a bird's-eye view on your backlink profile, let's move on to the next step of our off-page SEO plan, which is spotting potentially harmful backlinks. A small disclaimer straight away: the activity may take up pretty much time, as the tool needs to collect tons of information for you. So, what I suggest doing is starting the process right now and getting back to it tomorrow, deal?
In SEO SpyGlass' Linking Domains section, which is in the Backlink Profile module, hit the Update Penalty Risk button. That's it, now you only need to wait.
2. Remove harmful links

Now that SEO SpyGlass has kindly provided you with all the needed info, it's time to get rid of all the junky links. Just for your information, links that are from 0 to 30% risk value are safe. Those that vary from 30% to 70% can be potentially harmful and should be investigated. And those of 70% and higher penalty risk can be hardly called our bros and definitely shout for your attention.
But just before we start cleaning up your backlink profile, let me warn you that removing too many links may be the reason of a significant traffic drop. So, keep an eye on that and try not to overdo it. The best way (according to Google) to throw away unwanted links is through contacting webmasters of sites that link to you asking to take down those reputation damagers. To get your hands on contact emails, you just need to add the Contact Info column (right-click any column).
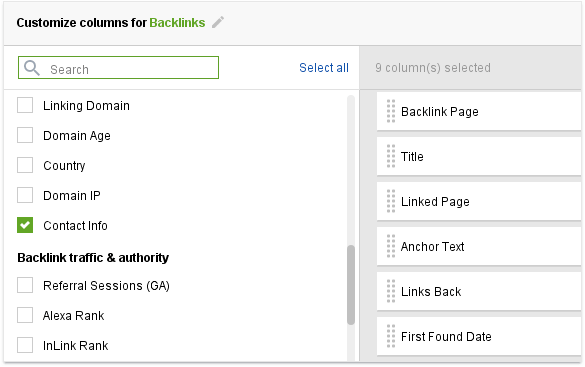
After the column is added, hit the Update button, which is next to the column's header. Congrats, the full list of e-mails is on the way, just wait for a few moments.
That's it, now you only need to contact them and ask politely to remove unwelcome links.
3. Disavow links that can't be removed

Sometimes (very often) webmasters that you've contacted may not show any signs of life. If that's exactly what happened to you, and it’s hardly an uncommon situation from many SEO tasks, then you’ll have to disavow the link. This one is especially important for local SEO, if you’re targeting a particular area but get a sour link from that region, it could jeopardize all your efforts.
So, that's what we got to do:
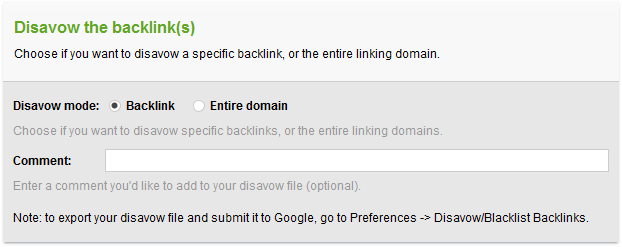
- In your SEO SpyGlass project, go to the Backlinks submodule, right-click the links that you are saying "goodbye" to, and hit the Disavow backlink(s) button.
- In the pop up window, you'll be suggested to either go for the Backlink or Entire domain options. You can also add a comment to your liking.
- After you've done the above-described step to all the links that don't deserve being noticed by Google, go to Preferences and hit the Disavow/Blacklist backlinks button.
- Have a look at your blacklist once again and, if you're happy with it, hit the Export button. Then, pick a folder to save the file.
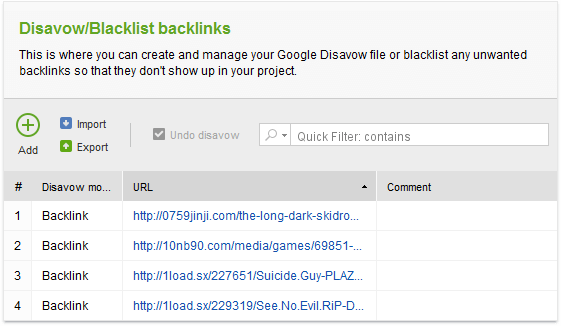
- At this step, go to the Google Disavow Tool, select your website and upload the disavow file you've just made up.
Yay! Now those harmful links won't damage your backlink profile in any way, and you’ll be clear of obstacles in your path of local SEO strategy. This is how we smoothly came to the end of the backlink section. So far, you've done a lot of good to your SEO, keep going.
Days 17-29
According to the Samsara concept, everything in life needs to be in balance, after we lose something, we should get something in return. What I’m figuratively trying to say there is that once we got rid of a big bunch of backlinks, it's high time to fish for new ones to keep the balance. But just before we start, I want to remind you one more time that quality link building is exactly what can skyrocket your website in search engines because that's what influences rankings directly. By the way, I’ve written a whole article fully dedicated to link building, so if you want to dive deeper into the topic, please go ahead and read it. Inspired? Then let's get straight to it!
P.S. As you may see, I've decided to dedicate quite a number of days to this activity. Although, with the generous help of LinkAssistant, link building opportunities became quite easy to find, I realize that getting in touch with website owners, negotiating, and writing quality content is surely not done in one day. So, take your time.
1. Reveal your competitors' backlink profiles

Without any exaggeration, the best way to spot your backlink's profile Achilles' heel is to compare it to the one of your competitor's. You’ll also have an idea of their content marketing strategy too, what kind of content or market they’re aiming for. This is how you can nicely watch your rival's link building process through a keyhole:
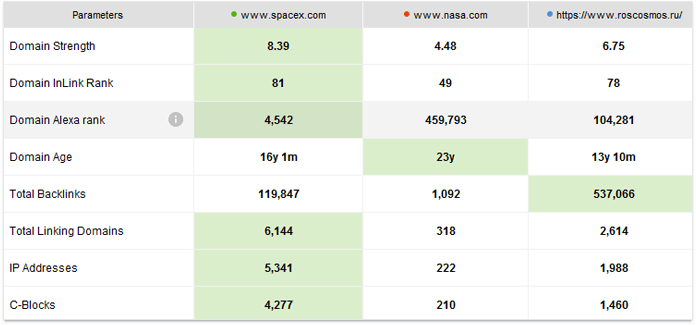
- Open your project in LinkAssistant, move to the Domain comparison module, press Add Domains, and fill in the URLs of competitors that you want to unmask.
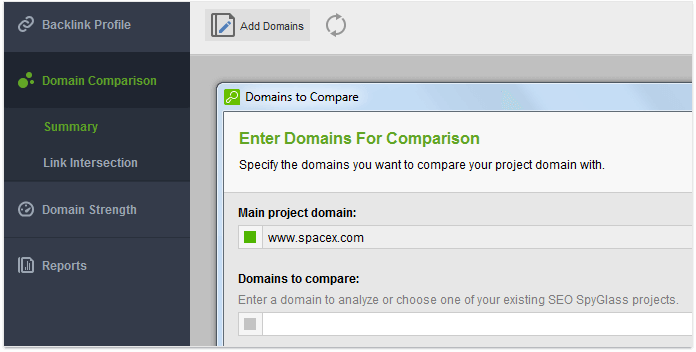
- Wait for it and you'll be rewarded with a comprehensive list where your and your competitors' domains are compared according to lots of helpful parameters.
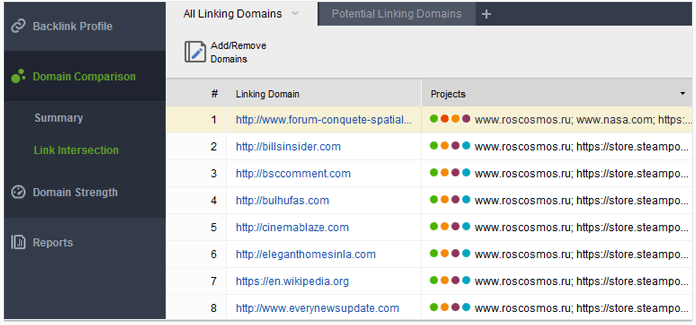
Now let's have a look at the intersection in your competitors' backlink profiles. Why? That will give us some priceless insights into their local SEO link building strategies and help to acquire some new backlink opportunities for your own. Roughly speaking, the feature collects domains that link to two or more of your competitors but not yet to you.
- Just go down to the Link intersection submodule to spot such domains and use them for the sake of your own SEO.
2. Guest blogging

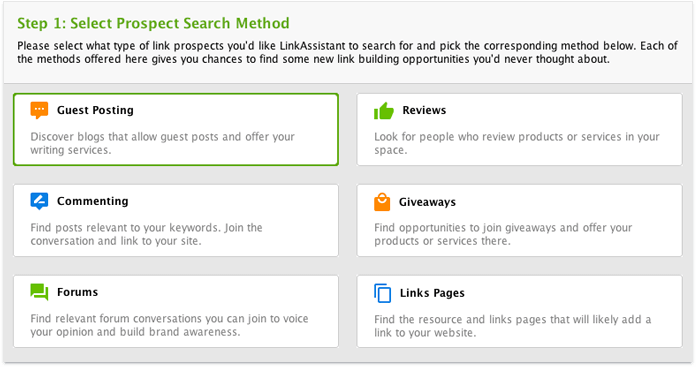
Like it or not, guest blogging still remains one of the best tactics for acquiring new links. The only pretty obvious BUT here is that to get quality links, your guest blogging needs to be of quality as well. You're probably thinking now "OMG, finding those blogging opportunities would take ages". Let me show you how to find brilliant places to guest-post in a couple of clicks with the help of LinkAssistant, of course. Just follow me through these steps:
- Open your LinkAssistant project, go to Look for Prospects
in the left corner, and choose Guest Posting as a research method.

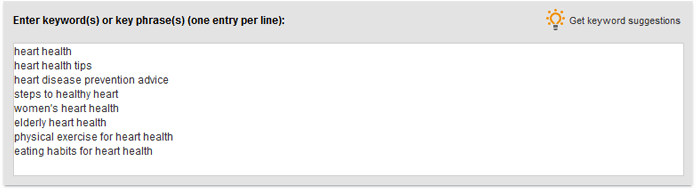
- At this step, you need to enter some keywords on which the search for guest blogging opportunities is going to be based. In this light, it's better to go for industry-specific ones.
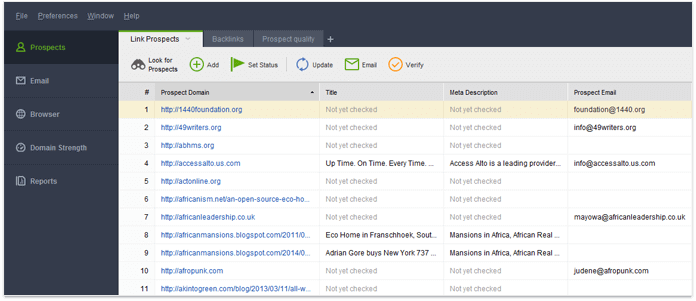
- Now comes the most pleasant part of enjoying the freshly collected list of guest blogging spots accompanied with contact emails. So, reach out, offer your content, and get your link.
3. Blog commenting and forum backlinks

Now let me share with you two other battle-proven sources of acquiring quality links. As you may have understood from the title, these two are going to be blog and forum commenting. I've decided to put them together because the whole concept is pretty similar. Luckily, thoughtful LinkAssistant has two separate search methods to minimize your efforts.
- Open your recently created project, hit Look for prospects
and pick Commenting as your research method.
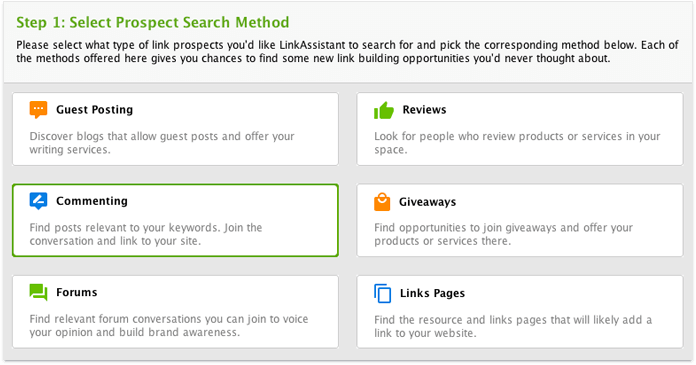
- Just as before, enter your seed keywords and hit Next.
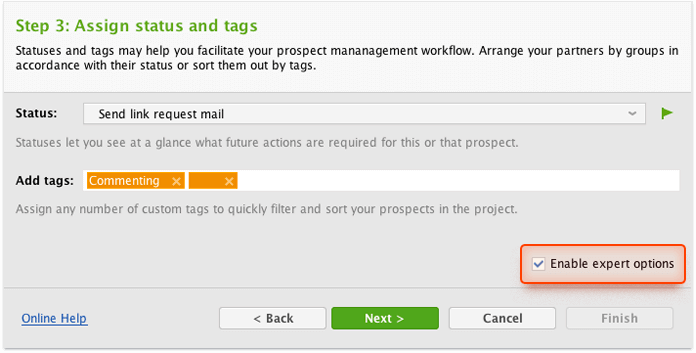
- At the third step, make sure to check Enable expert options like on the screenshot below and click Next.
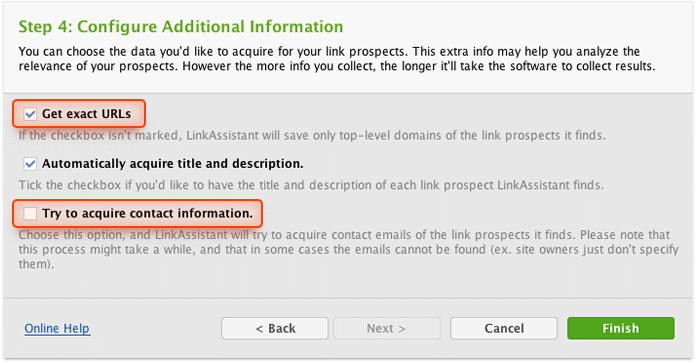
- Moving on to Step 4. There you will need to enable the Get the exact URLs option and disable the Try to acquire contact information one. When done with that, hit Finish.
- Now that you are armed to teeth with newly generated blog commenting opportunities, you can start commenting. By the way, this can be done directly in the tool.
A cool thing about forums is that the steps are all the same, just pick Forums as a search method and you're good to go. More often than not, comments and posts will appear in the search results too, so if you’ve managed to post without getting banned, your name might get free exposure in Google’s search results.
Just a tiny reminder: in order to encourage users to visit external links you are promoting, make sure that your comments add value or answer some questions.
4. Business directories

So, today we're going to deal with business directories. The strategy can be hardly described as new, but you can still benefit a lot from using it. What I want to warn you about is that directories that we aim to need to be niche-specific. What is more, I can highly suggest going through all the sites that a certain directory includes to check their quality. And yes, LinkAssistant has a separate search method for business directories as well.
Basically, the only thing that differs from other search methods is that you need to set up the preferences the following way:
When the list of directories is in your hands, just check them all out to decide which ones deserve having your website and that's it.
P.S. If you are a small business owner, whatever link building method you pick, you can always go local by specifying your region. Just choose a search method and go through the steps below.
- In the Search engine field, click these three dots and go to Manage search engines.
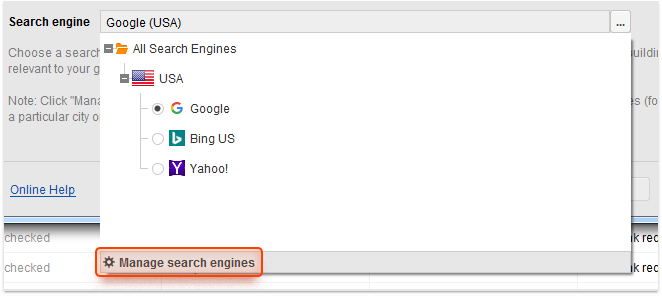
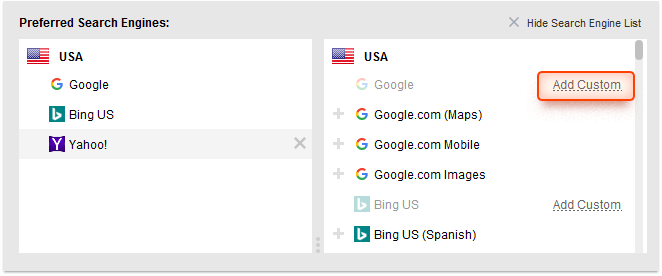
- Now hit the Add custom button.
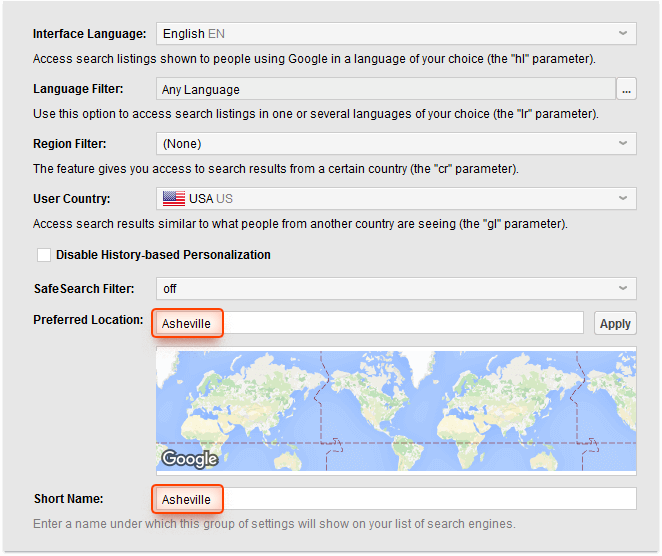
- In the Preferred Location field, type in your geographical location, give it a short name, and hit Apply. It all should look somewhat like that:
- Once you've done that, your location will appear in the Search engine's drop down list. And please don't miss the "plus" icon to open up Google Advanced Search options.
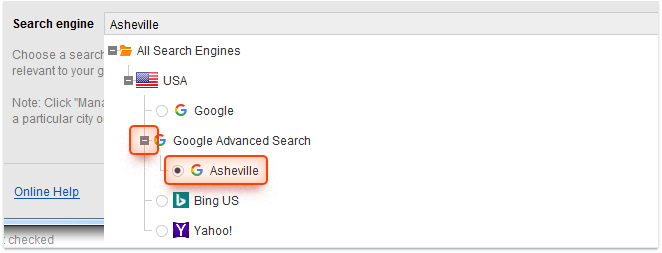
- The only thing left to do is going through the same old steps like in case with ordinary business directories. Just don't forget to specify your location at Step 2.
Phew, this is, basically, how you can narrow your search for link opportunities to a particular location. And that's it with link building. Champagne for everyone on me!
Day 30
Well, this is how we've gradually come to the final straight of our 30-day SEO-marathon. You've already done a lot of good to your SEO, so let's see how it's paying you off. So, get your Rank Tracker started and let's do it.
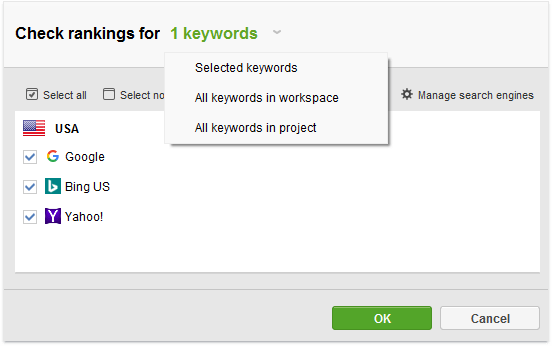
- Open your project, go to the Rank Tracking submodule under Target Keywords, and hit the Check Rankings button.
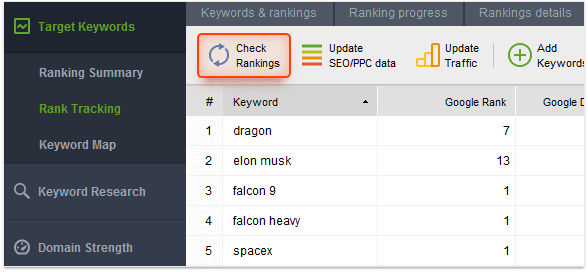
- Then, you need to specify what keywords you want to check rankings for, pick search engines, and hit OK.
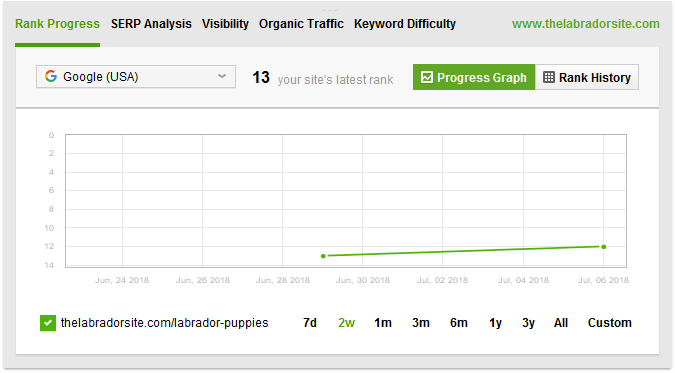
- Now you can plainly see your rankings. What's more, if you've checked your positions more than once, you'll see your ranking progress in the Google Difference column.
If you prefer seeing your ranking progress in a visual form, go have a look at the Progress Graph to see how it's going. Or if you’re keen on some cross examination, try out Google Analytics to get a slightly different angle.
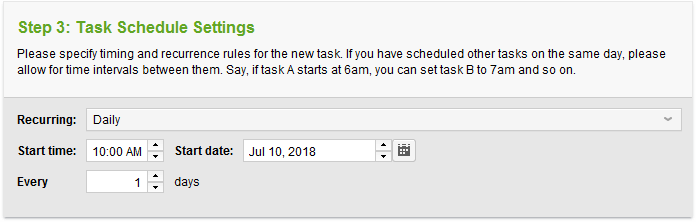
1. Schedule ranking checks
Why checking rankings manually if that can be done automatically without you having to raise a finger? Scheduling your ranking checks is a brilliant time-saving feature that saves you from running your checks manually all the time.
- All you need to do is going to the Preferences tab, picking Scheduler and hitting the Add button.
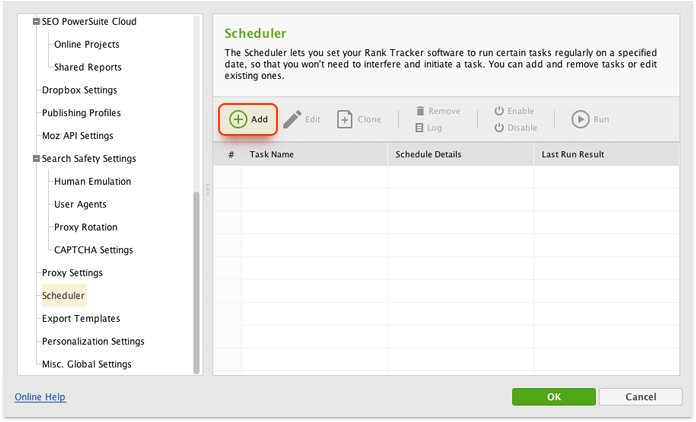
- Then adjust all the necessary parameters to your liking: the type of the task/time/regularity and that's, basically, it!
Congrats, now your progress will be tracked automatically and you won't need to raise a single finger.

Well, these were long 30 days, weren't they? However, I’m sure that if you properly went through all of them, at this point, your rankings are saying you a massive "Thanks". But there's always room for improving, especially when it comes to on-page SEO. The point is, this 30-day guide you've (hopefully) managed to read has no sell-by date, it's like a closed circle. So, you can always get back to it and go through all the steps whenever dissatisfied with your SEO.
I would really appreciate your feedback on this article, so see you in the comments. And may the force of SEO be with you.

| Linking websites | N/A |
| Backlinks | N/A |
| InLink Rank | N/A |