Let's get SEO PowerSuite in your native language fast!
We are working to create local versions of SEO PowerSuite tools, but we are sure that users like you can do this better, because you know this software from your specific side. Besides, if you decide to do some translation and share your translated files, the localized versions will come out much faster.
As long as several people do the translation, we can pull all translated files together much faster and choose the best wording for different phrases.
This is your chance to join efforts with us and other SEOs and have SEO PowerSuite in your native language fast — and to enjoy the best quality of this local version.
What translations are needed?
We are differentiating between software user interface (menus, wizards etc.) and Report Templates.
The software has already been fully translated (both user interface and reports) into German, Russian, Dutch, Spanish, Slovak and French.
We'd like to thank everyone who took part in the accomplished translations. At the moment we don't need any other interface translations.
As for Report Templates, we will gladly accept translations into any languages for our report gallery. This way, besides having the translated reports for your own good, you can share them with other SEO PowerSuite users, gaining credit as an author and inviting others to visit your website through a link from the gallery. The instructions on translating report templates are here.
Using the built-in localization facility
Below are the instructions, telling you how to do the translation right inside the tools, immediately apply it in the software — and how to deliver translated files to us if you wish. We will be assisting you if there are any questions, and will help you put all files together if any problems arise.
Starting a new translation
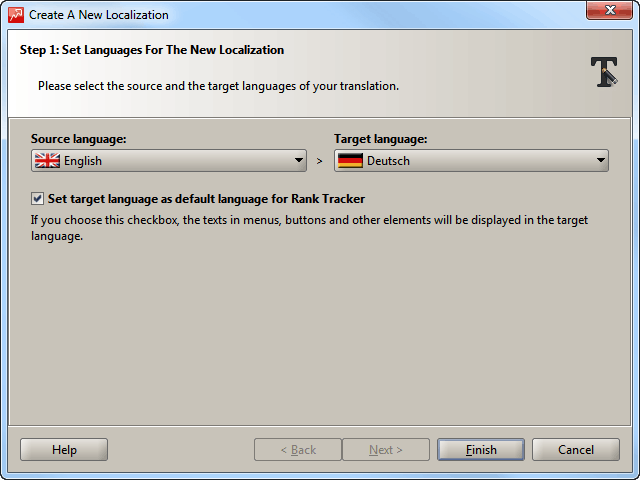
To start working at the translation, you need to create new language files for the software. To do this, launch your software, go to Help -> Translate (Localize) -> Create a new localization
Click the image for a bigger screenshot
Set the source language (Most probably English) and the target language (the one into which you want to translate).
If you tick the checkbox Set target language as default, the software will display its texts in your target language (if they are already translated, of course).
Click Finish — and you will see the window where you can start translating.
Click the image for a bigger screenshot
Working with the translation
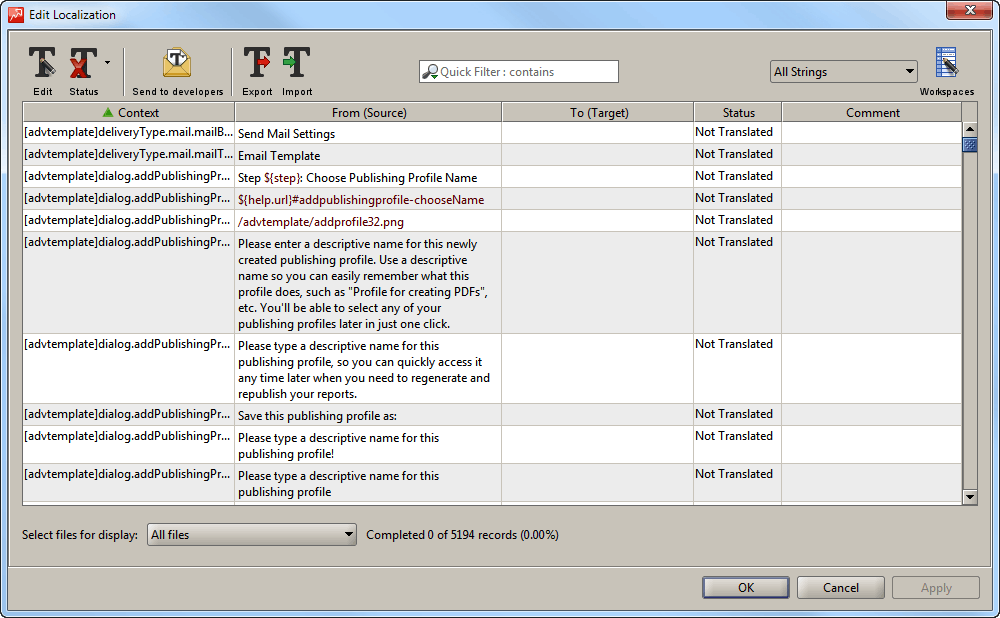
What each column in the translation window means
Context — ID of the string, used in the software
From (Source) — The text that needs to be translated
To (Target) — This column is for your translation
Status — The status of the translated string.
- Complete (sets automatically when the To column is filled out)
- Not translated (sets automatically when the To column is empty)
- For review (sets automatically when the Comment column is filled out)
You can change statuses manually if you wish. Set Complete when you have no doubts on your translation of a string. Set Not translated if the string is not translated. Set For review if you are not sure about your translation of a string.
Comment — You can type in your comments in this field. If you fill out this field, the Status automatically becomes For review.
How to enter translation
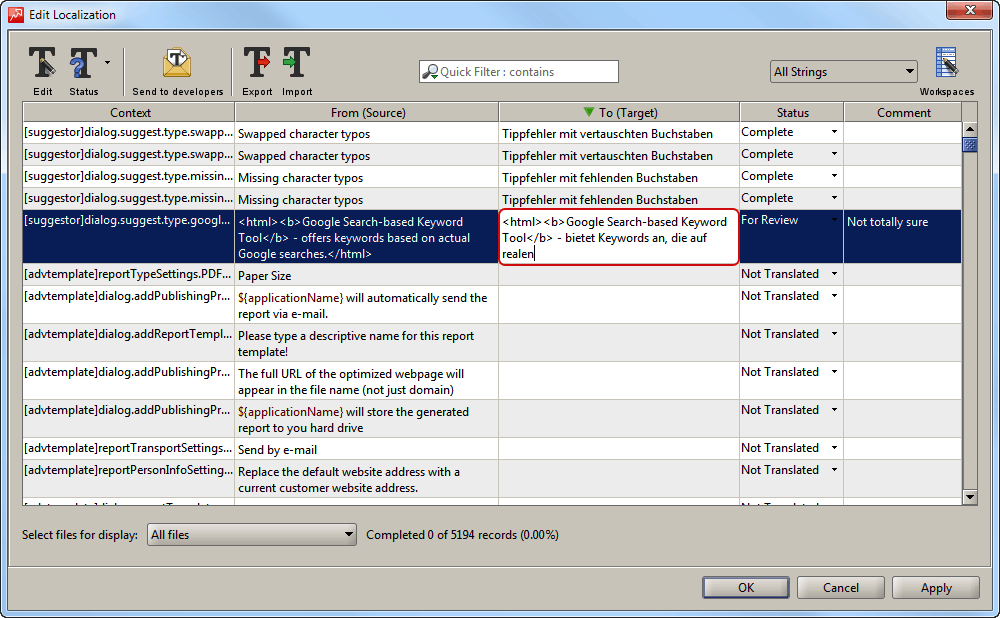
Select the row you want to translate (use the mouse or the 'up' (↑) and 'down' (↓) arrow keys) and start typing. Your text will be entered into the To column.
Click the image for a bigger screenshot
When you're finished with the current string, press the Enter keyboard button and move to the next string.
How to make a new passage or start a new line
If you need to go to a next line in the same cell, press Alt+Enter. To create a new passage, press Alt+Enter twice.
For example, to have a cell looking like this:
|
Please enter a descriptive title and name for this newly created report template.
Use a descriptive name so you can easily remember what this report template does, such as "Complete Report with Afterwords (Green)", etc. |
You need to make the following steps:
| Step 1 | Type in: Please enter a descriptive title and name for this newly created report template. |
| Step 2 | Press Alt+Enter twice |
| Step 3 | Type in: Use a descriptive name so you can easily remember what this report template does, such as "Complete Report with Afterwords (Green)", etc. |
| Step 4 |
You will see:
Please enter a descriptive title and name for this newly created report template. Use a descriptive name so you can easily remember what this report template does, such as "Complete Report with Afterwords (Green)", etc. |
How to enter comments
Select the row in which you want to enter a comment, and move the selection to the Comment cell (use the arrow keys of your keyboard). You can also double-click the Comment cell to make it active. Once the cell is selected, you can start typing your comments. Press Enter to finish.
Why are some expressions highlighted in red?

This means that these are service parameters that must not be translated and must not be removed from the string. These are mostly variables, though can also be images or URLs. Quite often you can guess what kind of variable it is and therefore place it in the right place in your translation, so that it corresponds to the grammar of your language. If you are not 100% sure about the right place for a variable, just leave it where you think it fits best.
Copying texts
If you select a row and right-click it, you will have three options:
Move>> — this will immediately copy source text from the From (Source) column to the To (Target) column
Copy source — this will copy source text to clipboard
Paste source — this will paste the contents of your clipboard to the To (Target) column.
Working with translation files
What are the standard language files?
All texts in the software are stored in the special *.properties files. Generally, each file is responsible for a particular module, for example the file scheduler.properties contains all texts for the Scheduler module — the ones that appear in the wizards, on the buttons and in menus, in error messages etc.You can choose to work at all modules at once (in this case you will have more than 5,000 strings in your view). Alternatively, you can translate *.properties files one by one. In this case you will be logically completing one module after another.
Selecting files for translation and switching between files
You can choose All files, or any one file to work at. To do this, use the dropdown at the bottom of the translation window.

Click the image for a bigger screenshot
Supported file names
The original files are the following:
Commons.properties
Searchengine.properties
Scheduler.properties
Etc.
When you export localized files, they will have a language marker in the filename, for example:
Searchengine_de.properties
Searchengine_es.properties
Scheduler_nl.properties
Etc.
You can only import files that comply with this standard: either *.properties (without a language marker) or *_*.properties (with a language marker)
Importing localization files
To Import localization files, use the Import button in the Localization window. You can only import files that correspond to the above pattern (*.properties or *_*.properties). When you import a localized file, it is used in your local version instead of the file in the source language.Example: Let's say you have created a German localization, and then imported the file scheduler_de.properties. Now if you set the language for your software as German, this file will be used for the Scheduler module. If you switch back to the English version, it will show texts from the original file (scheduler.properties).
Exporting files
You may want to export localized files — for example, if you want to use them in any third-party translation programs like Trados. To do the export, simply click the Export button and specify the place on your computer where to store the translation. After you've worked at the translation in a third-party program, you can import the files back, using the Import button.
Sending your translation to us
As soon as your translation is ready, you can share it with us. Even if you've taken the time to translate only a couple of files, this will be useful. To send your translation to us, use the button Send to developers. This will upload the translation to our servers.
Using common files in different applications
Some language files are common for all four applications. Therefore, once they are translated in one tool, you don't need to translate them once again in the other one. You can simply export the files from one tool, and then import the necessary files into the other tool (check the above sections "Exporting files" and "Importing files" for instructions).
Here is a list of all language files and the tools in which they are used
| advtemplate.properties | Rank Tracker, WebSite Auditor, SEO SpyGlass, LinkAssistant |
| browser.properties | LinkAssistant |
| categories.properties | LinkAssistant |
| commons.properties | Rank Tracker, WebSite Auditor, SEO SpyGlass, LinkAssistant |
| commonsreport.properties | Rank Tracker, WebSite Auditor, SEO SpyGlass, LinkAssistant |
| export.properties | Rank Tracker, WebSite Auditor, SEO SpyGlass, LinkAssistant |
| free.properties | SEO SpyGlass |
| ftp.properties | Rank Tracker, WebSite Auditor, SEO SpyGlass, LinkAssistant |
| history.properties | LinkAssistant |
| import.properties | LinkAssistant |
| linkassistantproject.properties | LinkAssistant |
| linkassistantreport.properties | LinkAssistant |
| linkassistanttemplate.properties | LinkAssistant |
| linkinfo.properties | Rank Tracker, WebSite Auditor, SEO SpyGlass, LinkAssistant |
| mail.properties | Rank Tracker, WebSite Auditor, SEO SpyGlass, LinkAssistant |
| partners.properties | LinkAssistant |
| popularity.properties | LinkAssistant |
| project.properties | Rank Tracker, WebSite Auditor, SEO SpyGlass, LinkAssistant |
| ranktracker.properties | Rank Tracker |
| ranktrackerreport.properties | Rank Tracker |
| scan.properties | SEO SpyGlass |
| scheduler.properties | Rank Tracker, WebSite Auditor, SEO SpyGlass, LinkAssistant |
| searchengine.properties | Rank Tracker, WebSite Auditor, SEO SpyGlass, LinkAssistant |
| spyglass.properties | SEO SpyGlass |
| spyglassreport.properties | SEO SpyGlass |
| status.properties | LinkAssistant |
| suggestor.properties | Rank Tracker |
| template.properties | Rank Tracker, WebSite Auditor, SEO SpyGlass, LinkAssistant |
| websiteauditor.properties | WebSite Auditor |
| websiteauditorreport.properties | WebSite Auditor |
Translating Report Templates
To translate reports, you need to work with the following files:
ranktrackerreport.properties in Rank Tracker
websiteauditorreport.properties in WebSite Auditor
spyglassreport.properties in SEO SpyGlass
linkassistantreport.properties in LinkAssistant
These files are available for selection in the dropdown menu of the localization module in each particular product.
Switching the language of your software
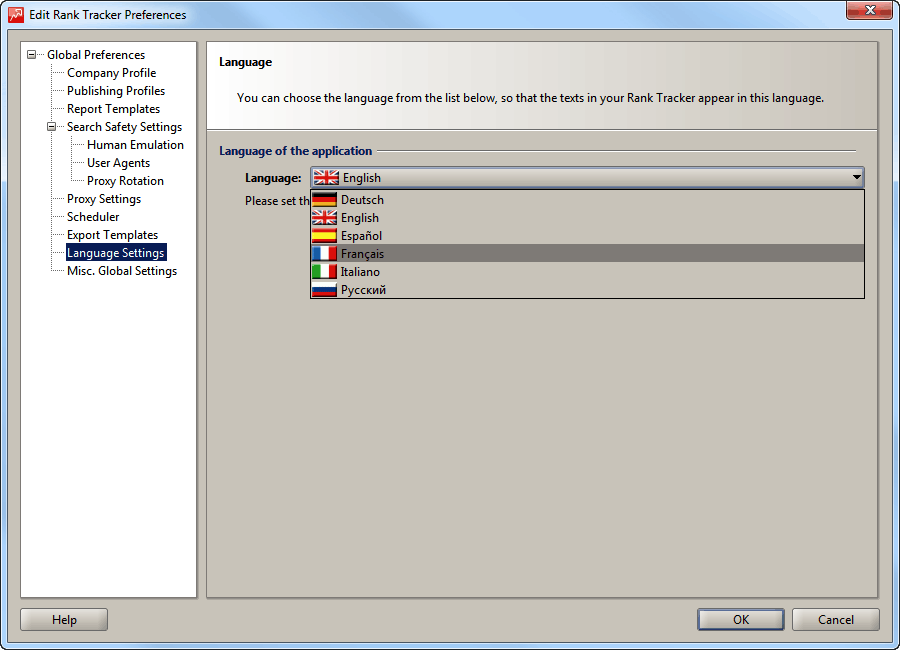
If you have created at least one localization, you can switch between different languages in your software.
Click the image for a bigger screenshot
To do so, simply go to Preferences -> Language Settings and use the dropdown to select the language you need.
If you have any questions while translating, feel free to write to support.