•
15-minute read


I’ve been dealing with link building here at SEO PowerSuite for quite a while now. While this part of SEO is crucial, it’s also the most time-consuming one.
So, to make the whole process more efficient, I've recently made up my own automated link-building template. It allows to combine different sets of data in one place and never lose anything important.
The best thing about this automated link-building template is that it works great with any kind of tools you're currently using, be that SEO PowerSuite or any other SEO tool.
In today's blog post, I'll skip the big theory part and will explain in detail the exact workflow I've built around this automated link-building template. Hope it will save you tons of time and will help get hundreds of high-quality backlinks.
Let’s go.
If you need to brush up your memory on link building first, make sure to check our extensive collection of link-building guides.
Download the link-building template now as we’ll be using it right from the beginning of this guide. After you follow the link, click Make a copy and save the template to your Google Drive.
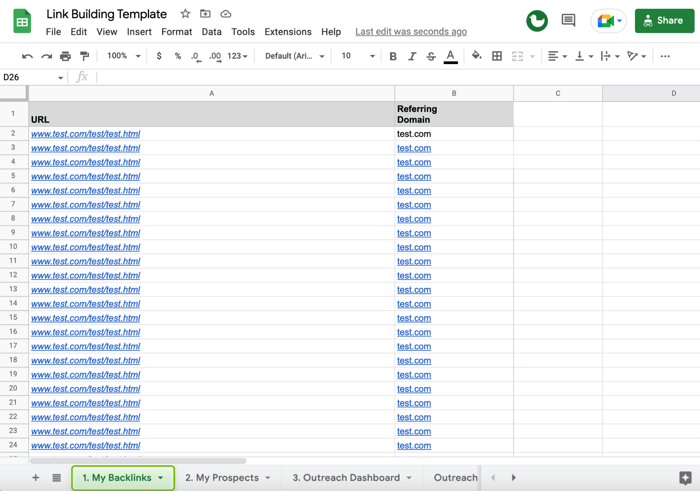
The link-building template we'll be using consists of the three major tabs.
The first tab is called 1. My Backlinks. Here, you’ll be adding all the links your website already has. So to eliminate probable cases when you’ll be reaching out to your current link-building partners.
.png)
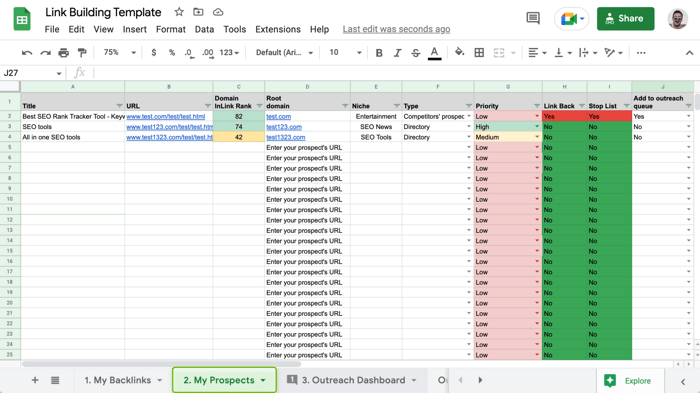
The second tab 2. My Prospects will be used to collect all the potential prospects for your link-building campaigns. Here, we will also be filtering those prospects that already link to your website, as well as those who are not good enough to get a backlink from.
.png)
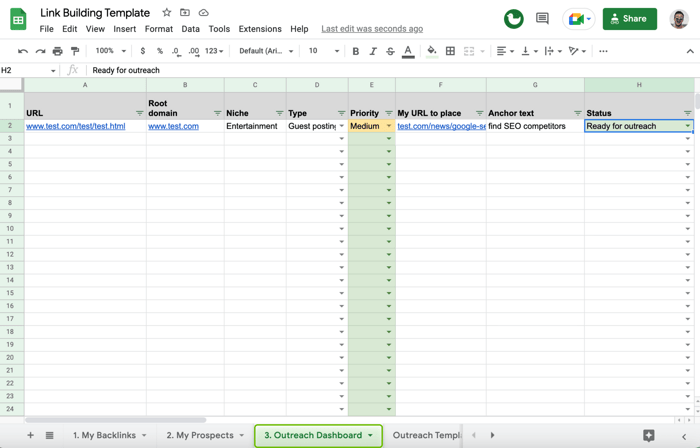
The third tab 3. Outreach Dashboard is where you’ll be keeping track of your outreach efforts.

In addition to the three major tabs, the link-building template also has these minor tabs:
For the template to work properly, you need to make a quick adjustment to your template’s copy:
1. Copy the URL of your template from the address bar. Up to the first question (?) mark. It should end with /edit.
2. Go to tab 3. Outreach Dashboard and click twice on the A2 cell. You’ll see this formula:
=query({IMPORTRANGE("DOCUMENT URL","2. My Prospects!B2:J")},"select Col1, Col3, Col4, Col5, Col6 where Col9='Yes'")
3. Replace the placeholder DOCUMENT URL with the link to your template.
4. Hit Enter. You'll see a warning telling you to connect the sheets – simply click Allow access.
5. Repeat the same process with the tabs Placed Backlinks and Stop List.
Now that we briefly walked through the contents of the template, let’s move to the link prospecting itself.
The workflow I’ve built around this template is the following:
For starters, you need to collect all the existing links pointing to your site. Gathering them now will help avoid the situation when you’ll be reaching out to those who already link back to your site.
You can collect existing backlinks via:
We’ll start with the easiest way – Google Search Console.
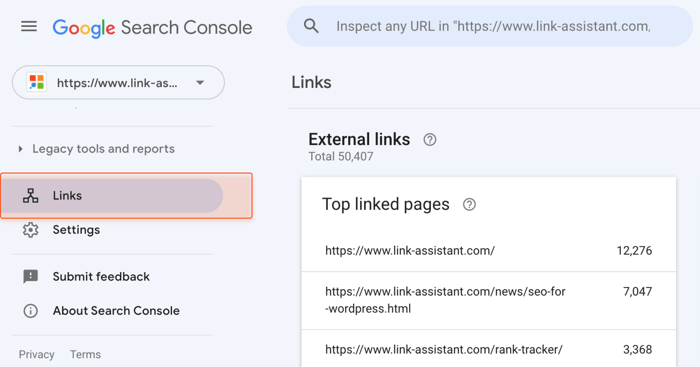
If you have your site connected to Google Search Console, you can then quickly extract the backlinks you already have. Note though that Search Console is often missing a portion of backlinks so the number of links your extract can be lower than it actually is.
To extract the list of your site’s backlinks, open Search Console and go to the Links tab.
.png)
There, click EXPORT EXTERNAL LINKS, choose More Sample Links, and pick the format you like.
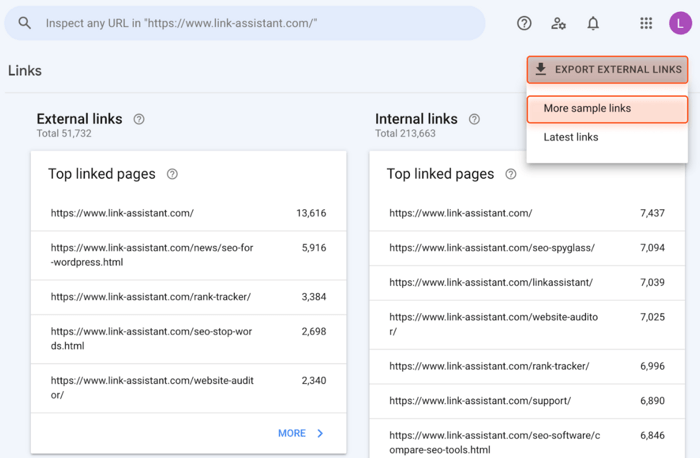

Now, you need to copy all the extracted backlinks to the column URL in the 1. My Backlinks tab of your link-prospecting template. The template will automatically extract the domain name from the long URLs and will fill the Referring Domain column.
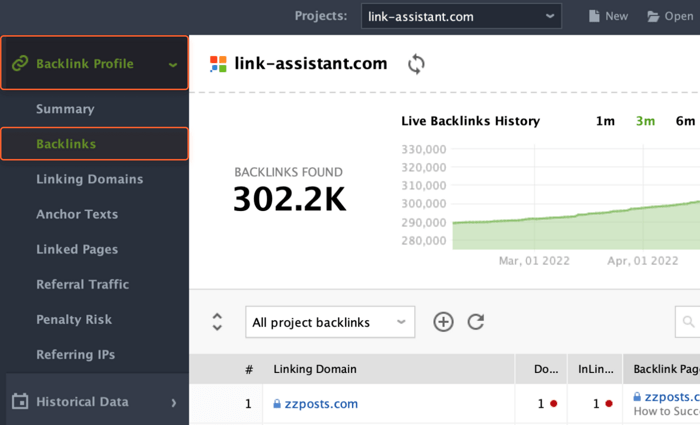
If you’re using SEO SpyGlass and have a paid plan, you can easily extract all the existing backlinks using the tool. Compared to Google Search Console, SEO SpyGlass knows all your backlinks, so you’ll have a full list after the check. In addition to the backlinks themselves, you’ll get a huge set of data about each one.
If you’ve already been using SEO SpyGlass, your site’s backlinks can be found under Backlink Profile > Backlinks.

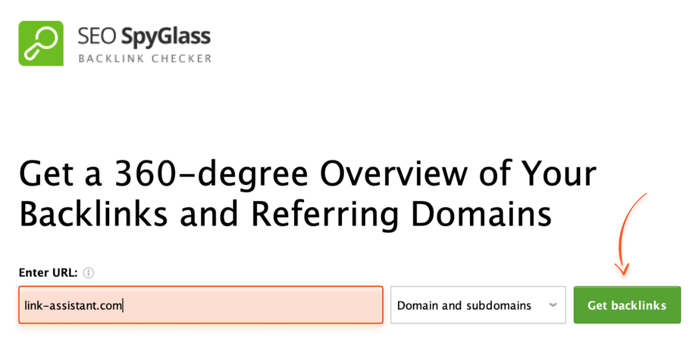
If that’s your first time opening the tool, just enter your site’s URL and wait till SEO SpyGlass finishes collecting your backlinks.

Then, head to the same Backlinks tab in the Backlink Profile module. At the bottom of the screen, you’ll find the button Export all links – you need to click on it and save all your backlinks as a .csv file.
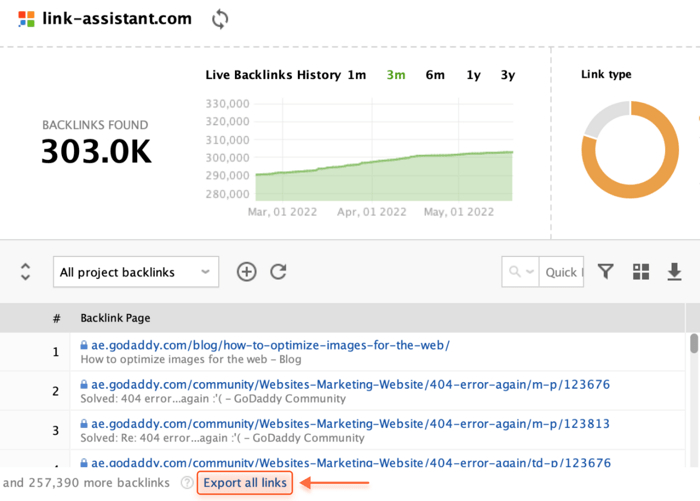

Once done, open the file and locate the Source URL column. All you need to do is copy the contents of this column and paste them to the URL column in the 1. My Backlinks tab of your link-prospecting template.
The backlinks are collected and that’s basically it for the first step of our link prospecting workflow.
You can now switch to the second tab of your template – 2. My Prospects – as we’ll be further working with it.
In this step, we will fill our template with link-building prospects that will eventually get you high-quality links. But first, I’ll share some of the great ways to find them. Just as in the previous step, you can use either free means or paid SEO tools for that.
Let’s start with the free one – Google.
There’s one thing few people use when searching on Google — it’s called advanced search operators. These are the set of special characters and combinations that make your search request more precise.
By using these advanced search operators, you can easily find hundreds of link-building opportunities in many categories right from Google.
To start your advanced search, just think about several keywords that best describe your business and use them with the following search queries:
Those are just a few advanced search queries you can use to find link-building opportunities. You’ll find a huge list of all search operators in the Advanced Search Operators tab of your link prospecting template.
You can also leverage search engines like Google in combo with this Chrome add-on. Install the add-on, go to Google and enter a few keywords describing your business. Visit the pages you want to get quality links from and launch the Check My Links add-on on each.
If the tool catches a broken link — voila, you just found yourself a link prospect. These broken links may be well replaced with a link to your content if it’s relevant and you find the right way to pitch to the website owner.

We will be adding all found link-building prospects to the 2. My Prospects tab of the link prospecting template (the URL column).
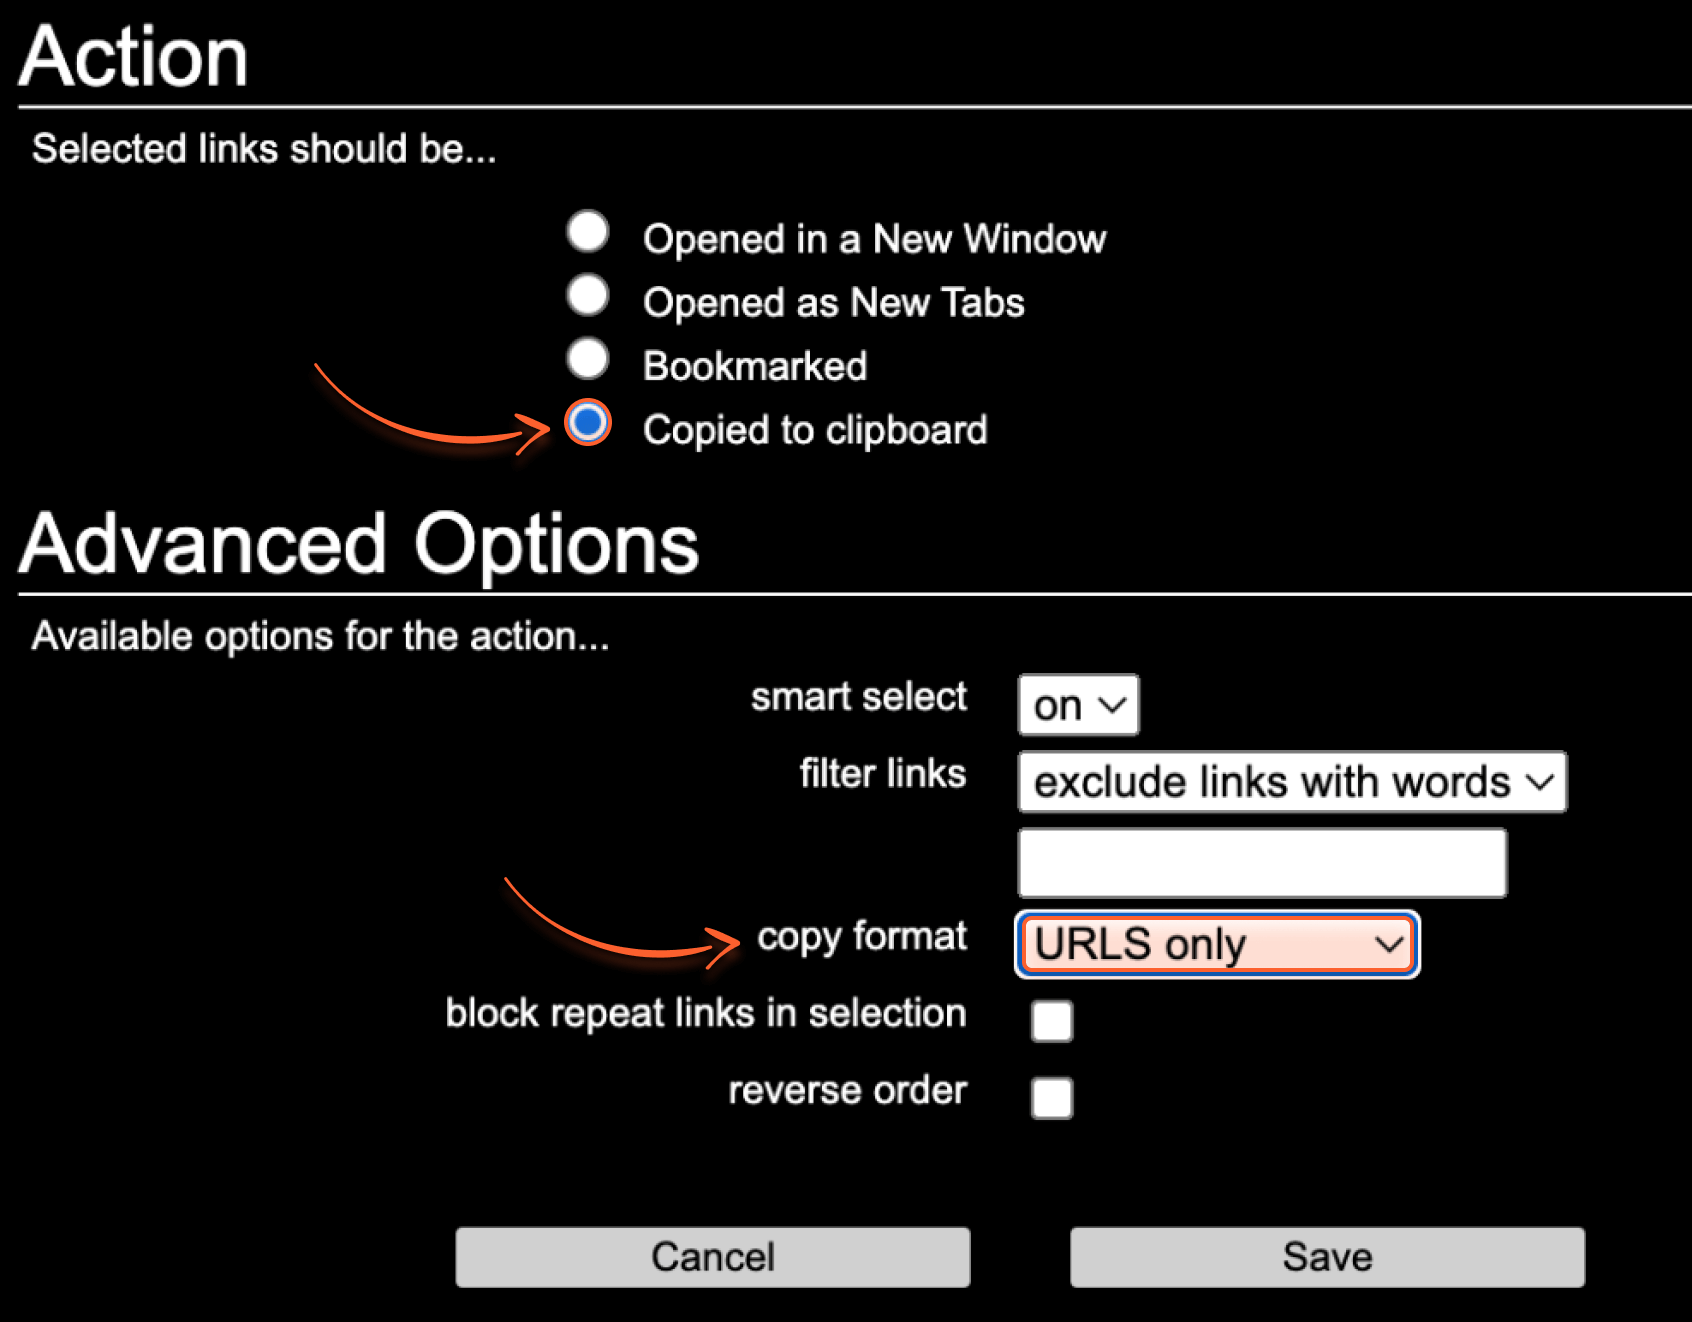
To copy and paste all the prospects from Google’s SERP in bulk, I use the LinkClump add-on. But if you prefer, you can add them one by one manually.
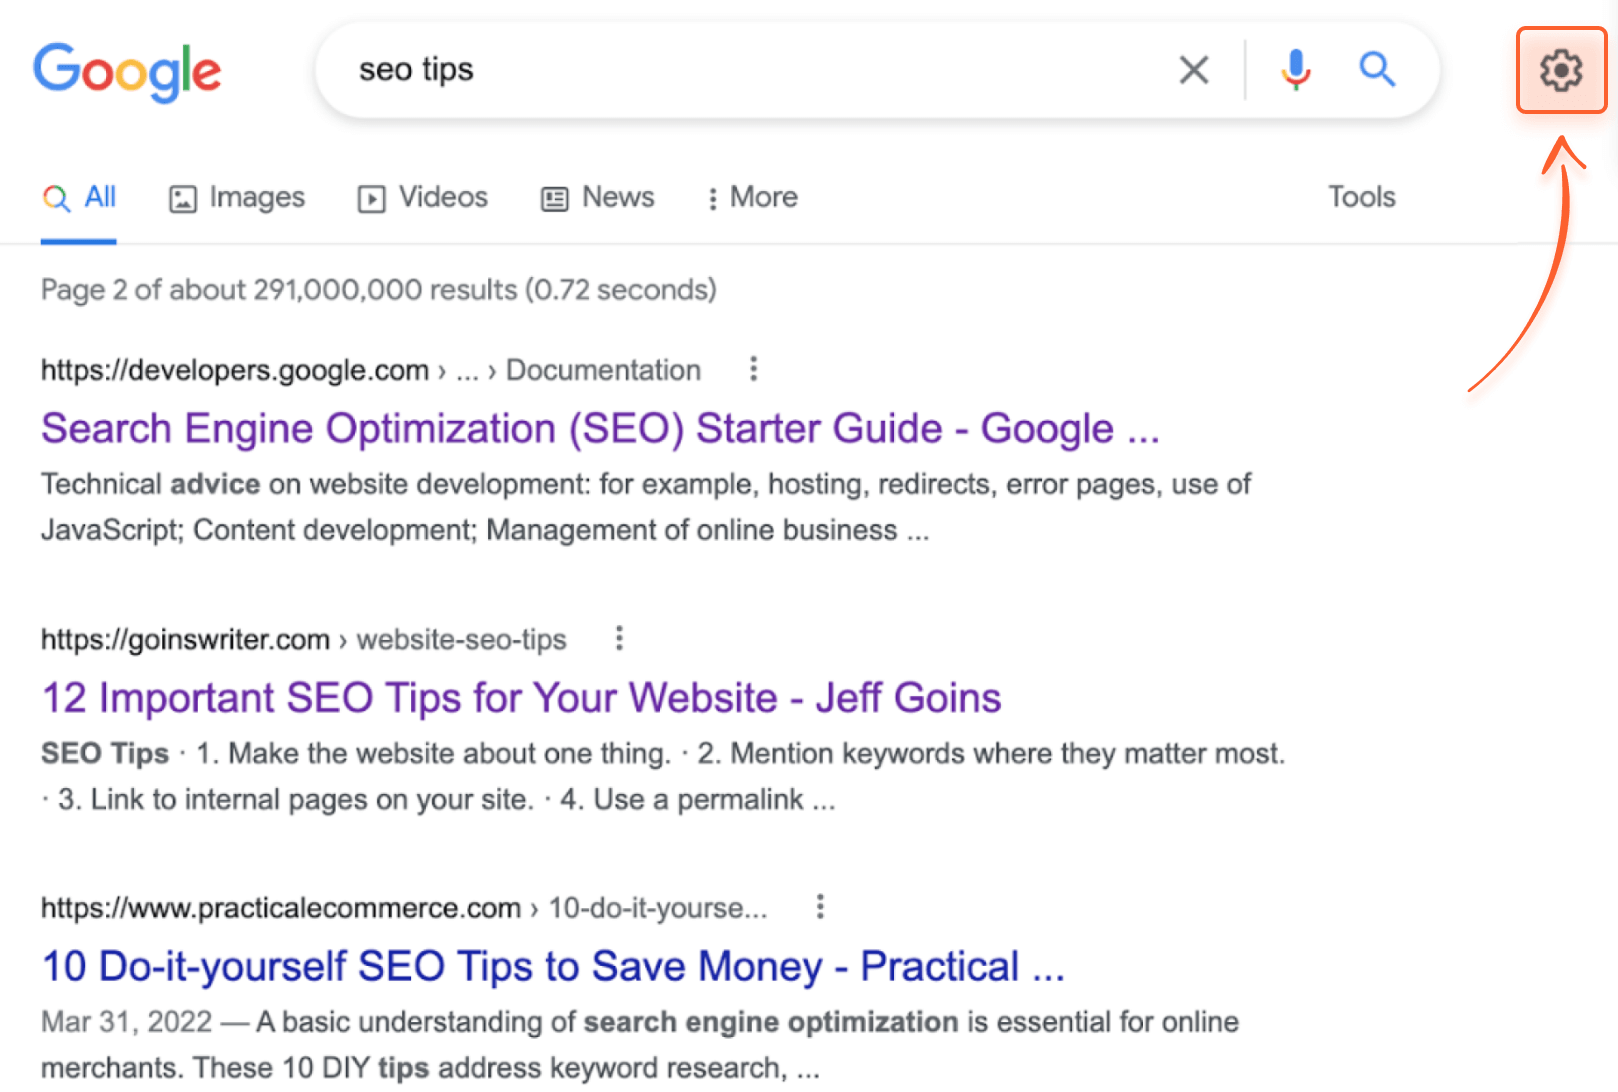
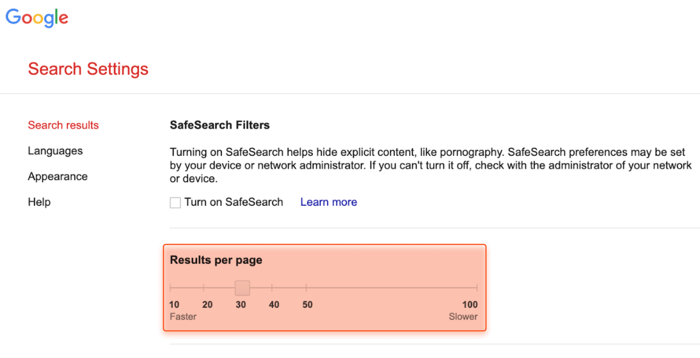
If you want to add URLs in bulk as well, first adjust Google and LinkClump. Go to Google, click the gear icon > See all settings.


Tab 2. My Prospects also has a few additional columns that will help you better navigate through your prospects. I recommend that you fill them out now:
The remaining columns will be covered later as we don’t need them yet.
In addition to searching for link-building prospects manually, you can also leverage LinkAssistant.
The functionality of the free version will suffice for finding link-building prospects and their contact details. However, if you want to copy and export the results to your link-prospecting template, you’ll need to switch to a paid plan.
First, we’ll go and check the backlink gap between you and your closest competitors. This is a great tactic that will help you find the websites that already link back to your competitors but not yet to you.
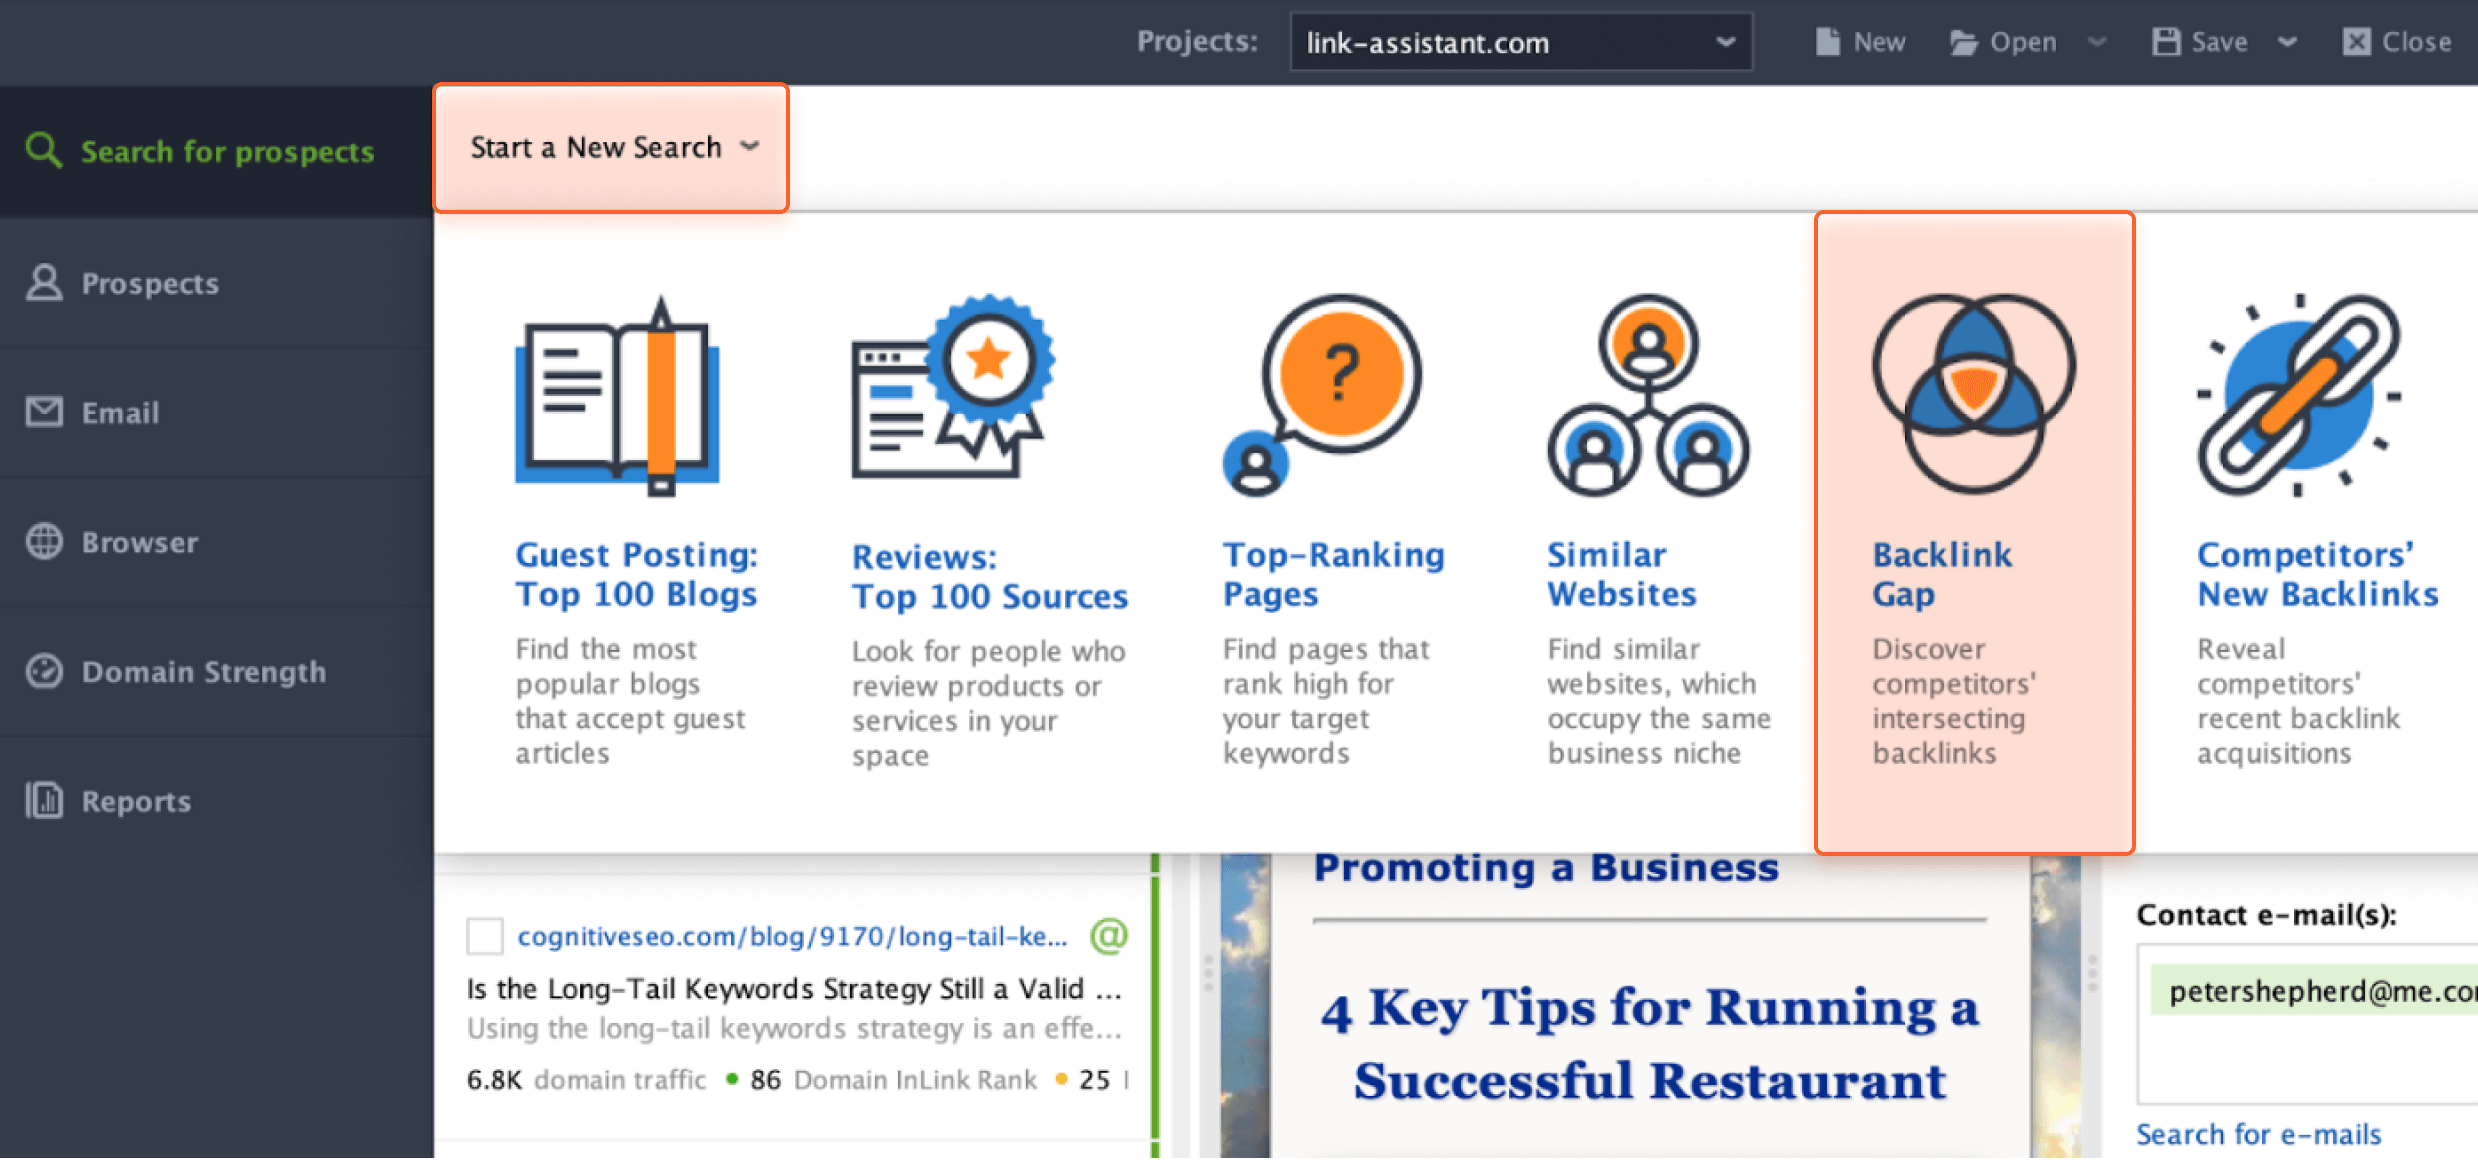
To do this, open LinkAssistant and enter your website’s URL. Then click Start a New Search and choose Backlink Gap as your link-prospecting method.

On the popped-up wizard’s screen, you need to enter a few URLs of your competitors and then hit Find.
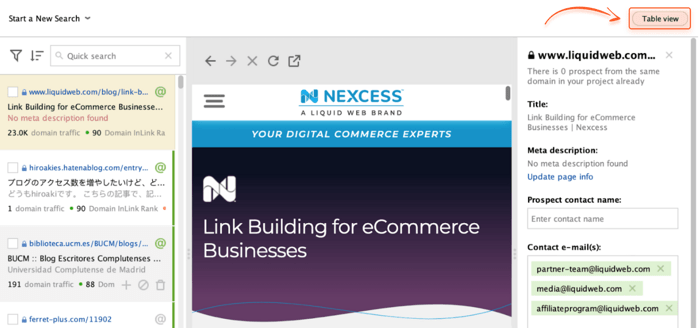
Once the tool collects all the link-building prospects for you, you’ll need to do a few more things. First, switch to the Table view in the top right corner of the screen.

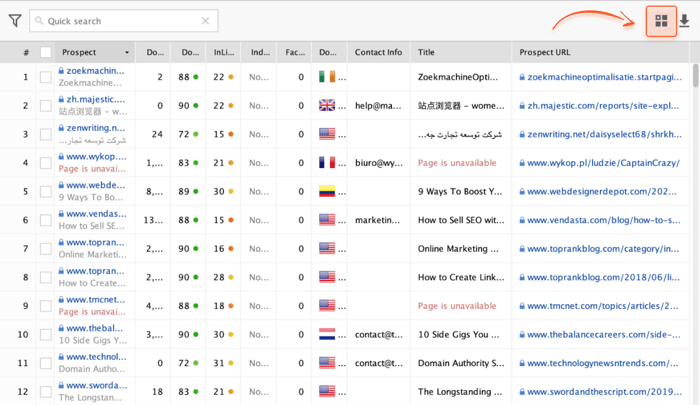
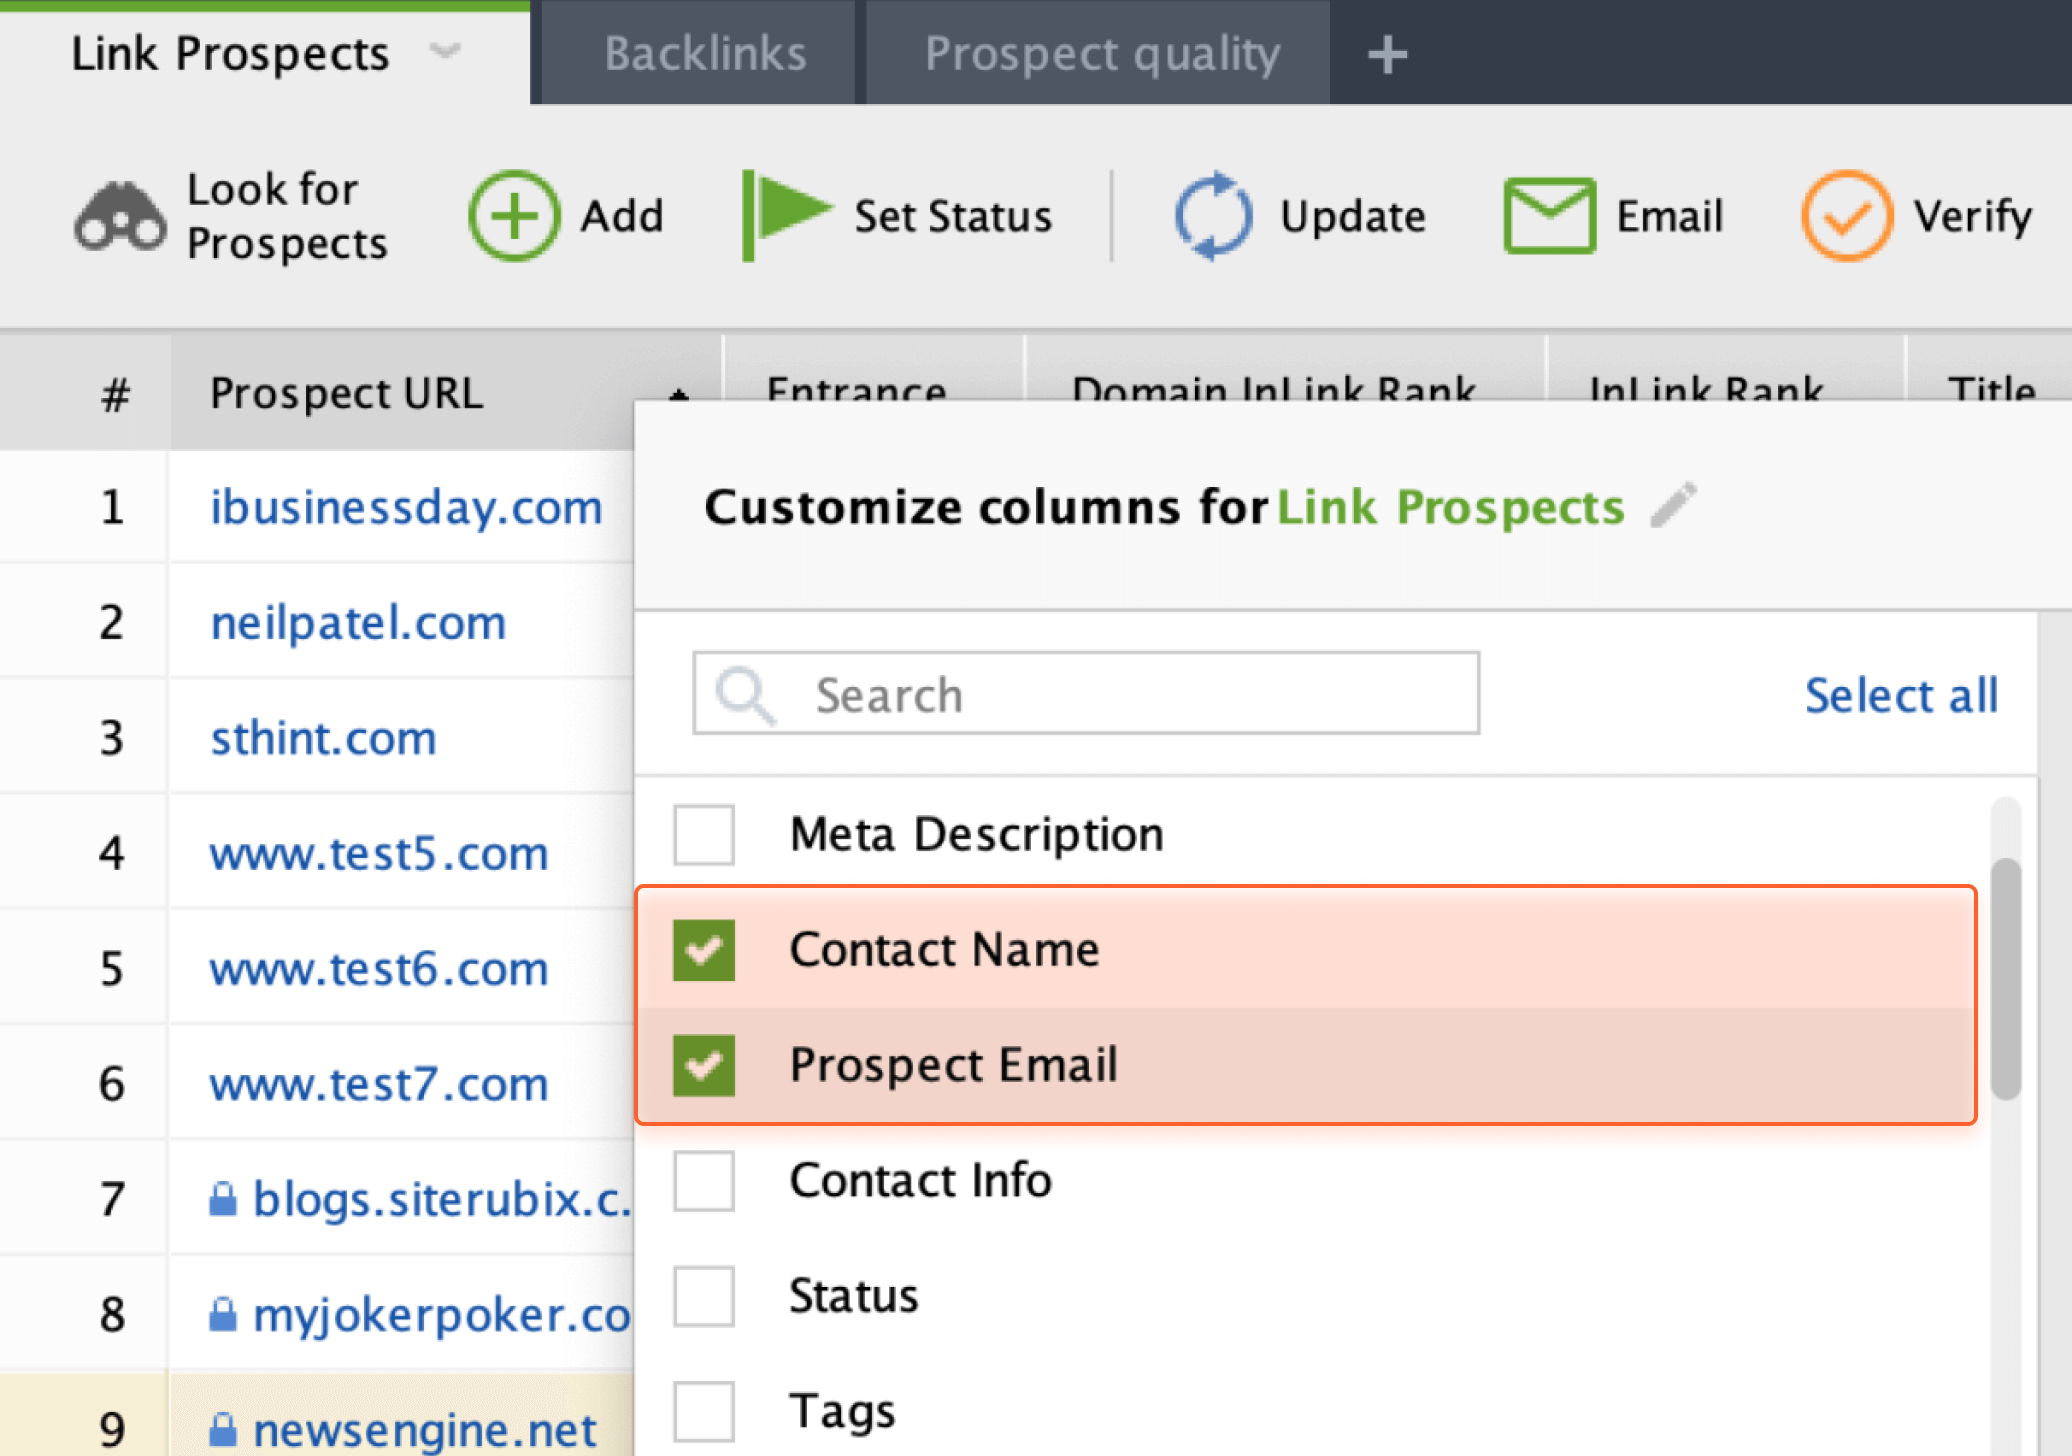
Now, you’ll have to customize and arrange the columns in the order they appear in your link-prospecting template.
To do this, find the Edit Visible Columns button in the top right corner of the table and click on it.

Make sure that the following boxes are checked:
Before hitting OK, arrange the tiles in the same order they go in the above list.


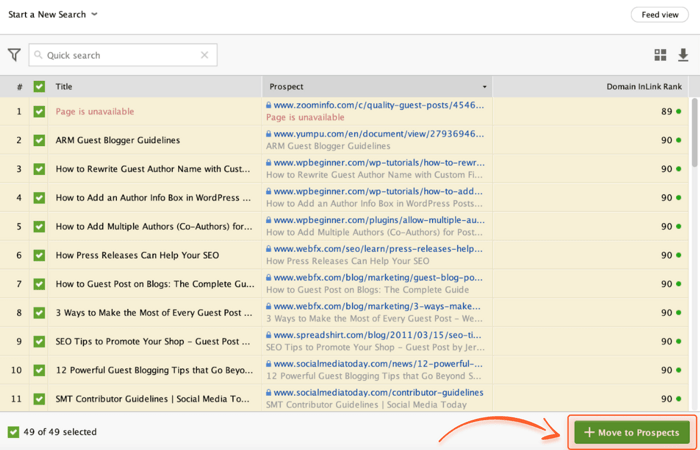
Now, simply select all your prospects (Ctrl + A / Cmd + A), copy and paste them to the first column of 2. My Prospects tab in your link-prospecting template.
Not to mix these newly found prospects with the ones you’ll find later, click Move to Prospects in the bottom right corner of the table.

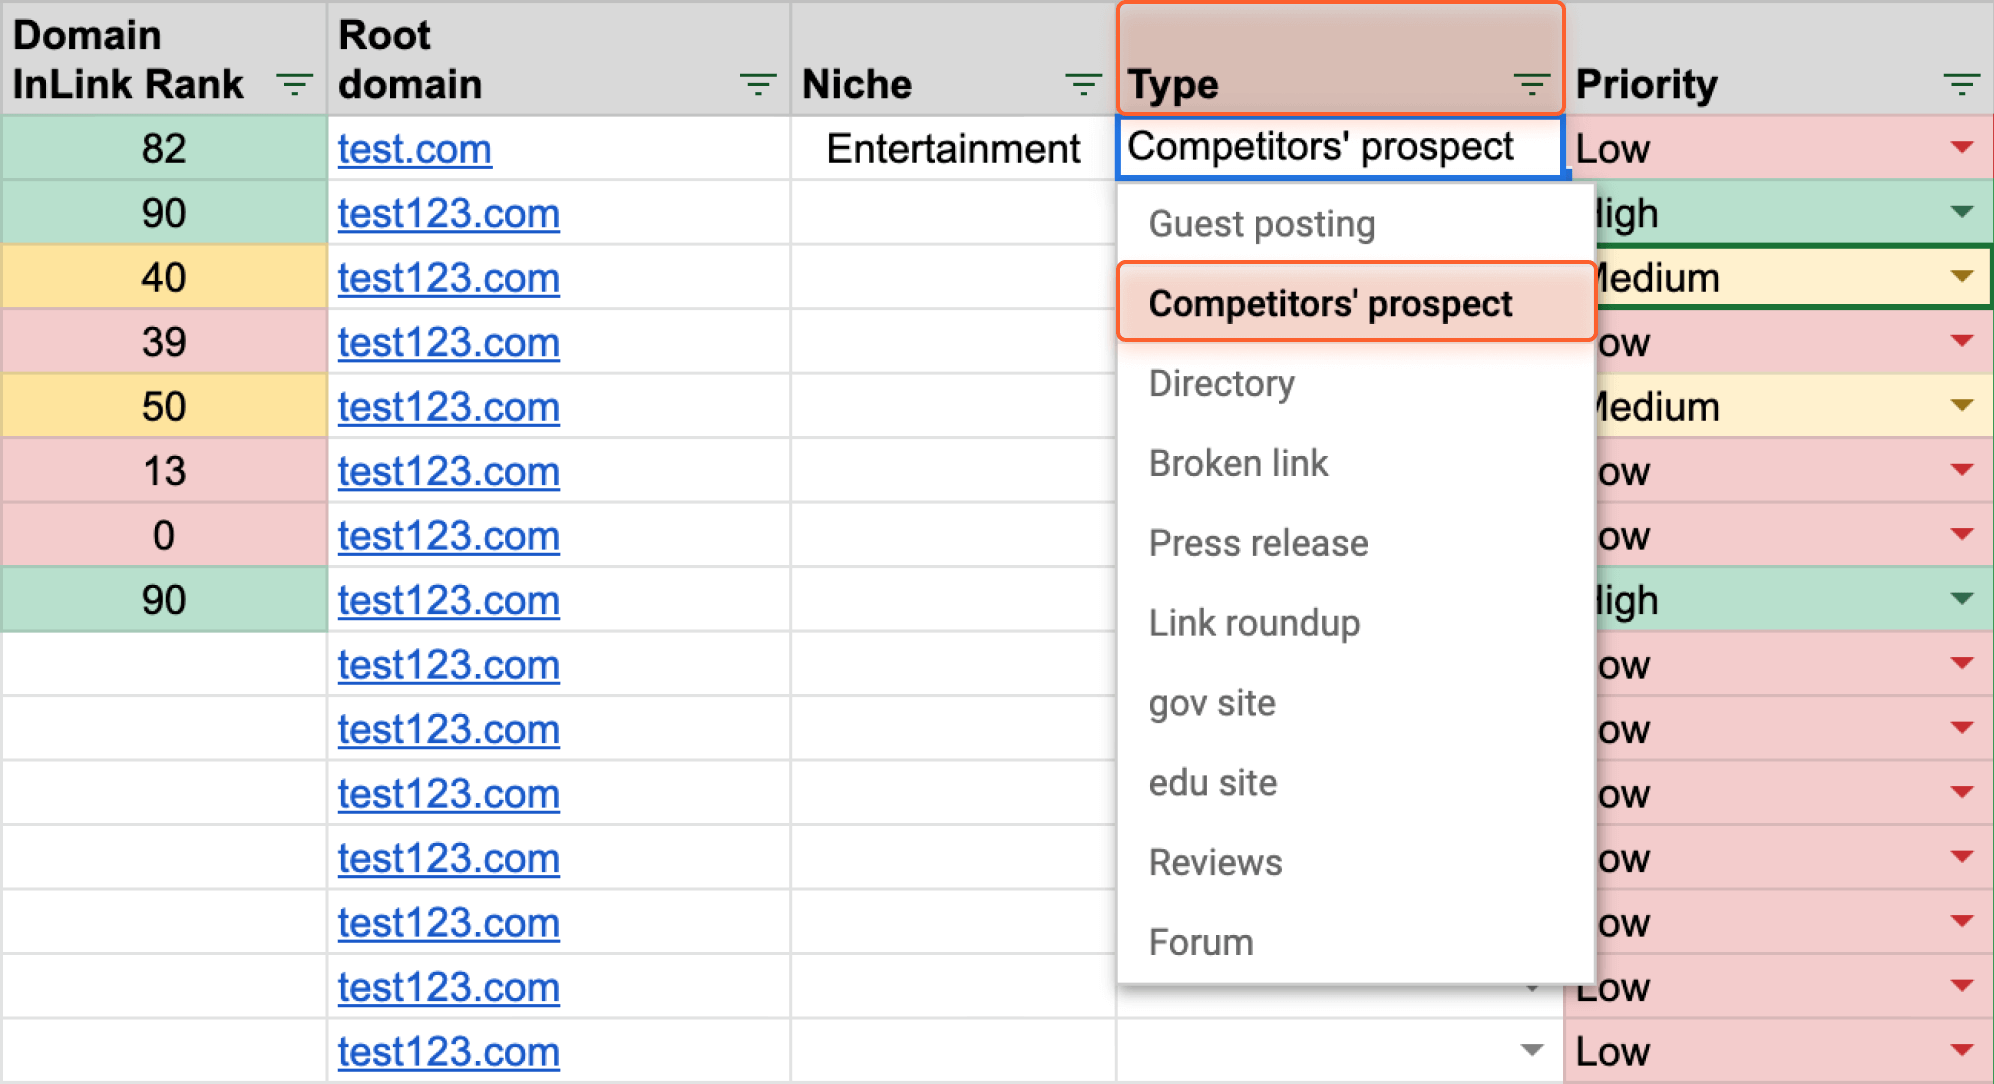
Also, in your template, don’t forget to specify the type of these prospects. Since those were the prospects of your competitors, pick Competitors’ prospect in the drop-down list under the Type column, and then drag down the cell selection up to the last prospect you’ve just added.

Apart from the Backlink Gap method, LinkAssitant can help you with finding link-building prospects in such categories as:
You can find all the methods under the Start a New Search button. The mechanism is similar to what we’ve just been doing when looking for competitors’ prospects.
In case none of the above methods provided enough link-building prospects for you, check this guide on the best link-building tactics.
Your list of prospects is likely huge by this moment. However, not all prospects are good for you to place a backlink there.
If I were to name a combination of aspects that describe an ideal link partner, this would be the one that:
A. Fits your niche
B. Has an authoritative site
To address point A, simply go to your link prospecting template, tab 2. My Prospects, and locate the Niche column. Go through the list of prospects you collected and see if there are any who don't fit your niche. Say, if your site is all about coffee, the prospect that focuses on automotive topics is definitely not a good match for you. Delete such prospects from your list right away.
To see if your prospects are authoritative enough, we’ll need to do some quick checks. You have two options here:
If you’ve been using LinkAssistant as a link prospecting tool, then you’re good to go – the InLink Rank metric was copied to your template during the previous step. You can freely jump to the outreach step.
In any other case, you’ll need to get the InLink Rank metric for all your prospects. And then manually copy the values to your link-prospecting template:
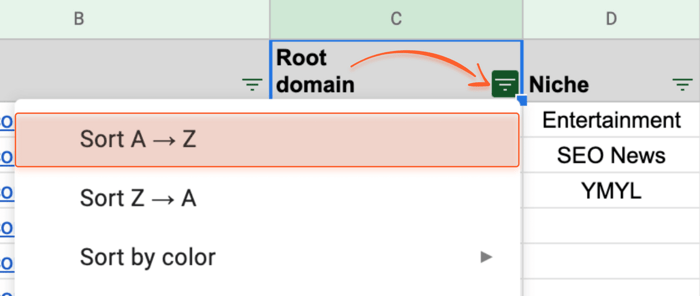
1. Organize your prospects in the template in alphabetic order. To do this, find the Root Domain column (tab 2. My Prospects) and click on the filter icon. Choose Sort A → Z.

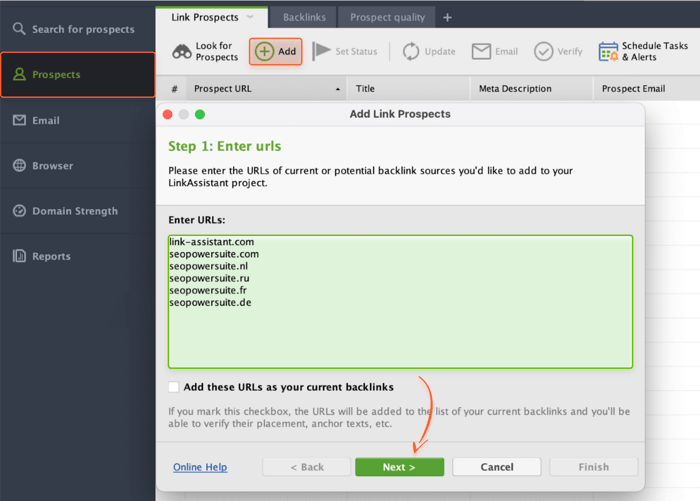
2. Open LinkAssistant, enter your website’s URL, and go to the Prospects module. Click Add and paste all the URLs from the Root Domain column. Hit Next two times.

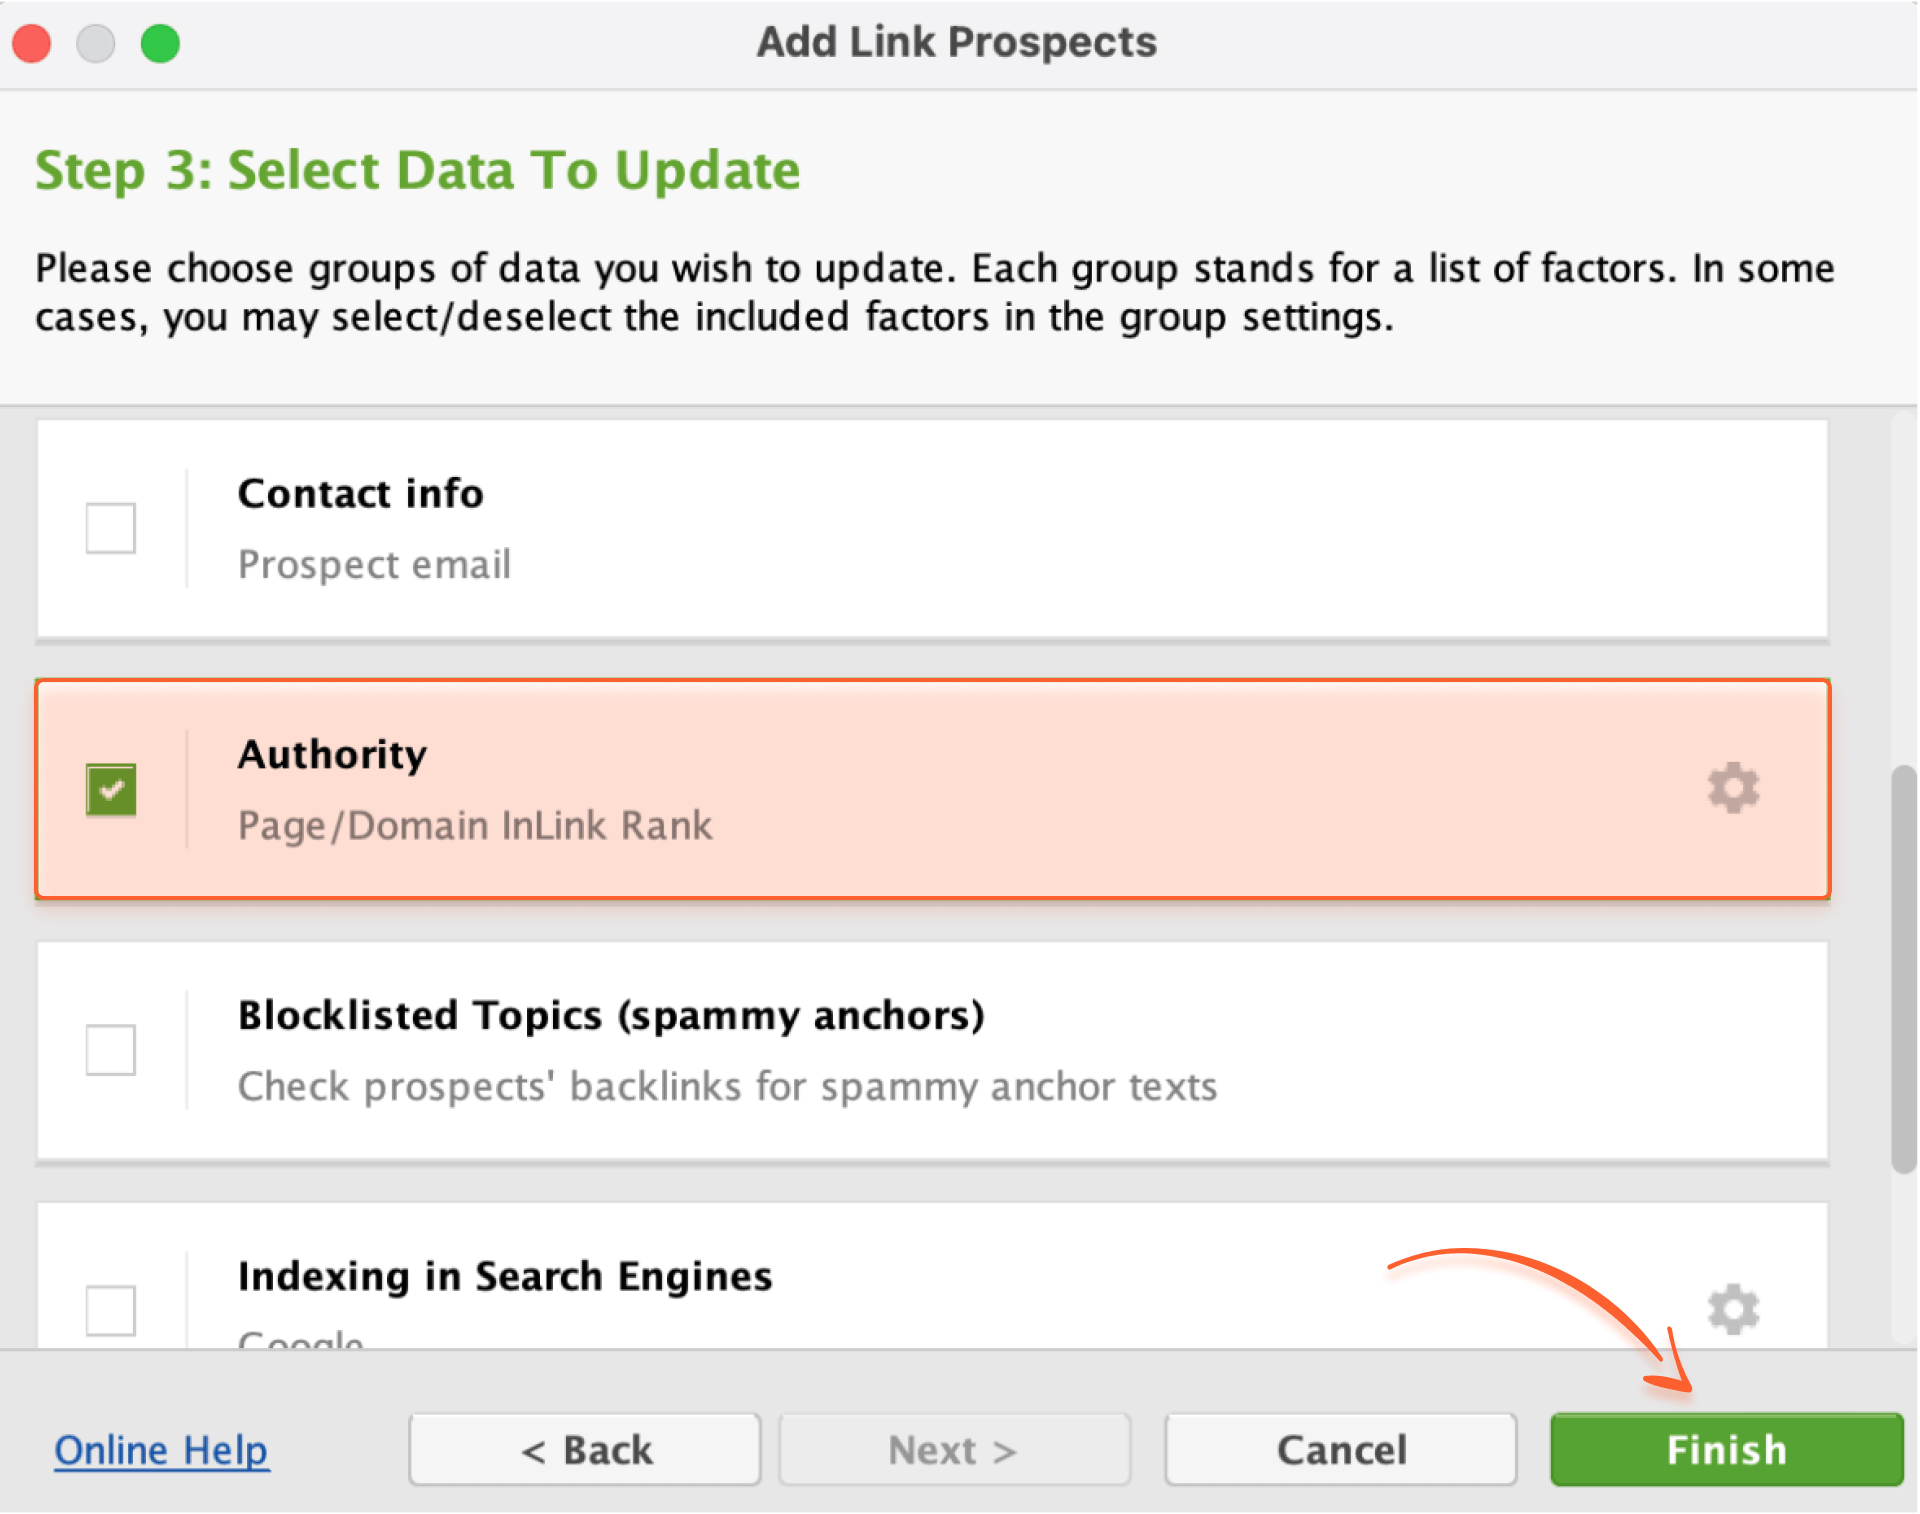
3. On the next screen, find and tick Authority and click Finish.

4. Right-click any table column and tick Domain InLink Rank.
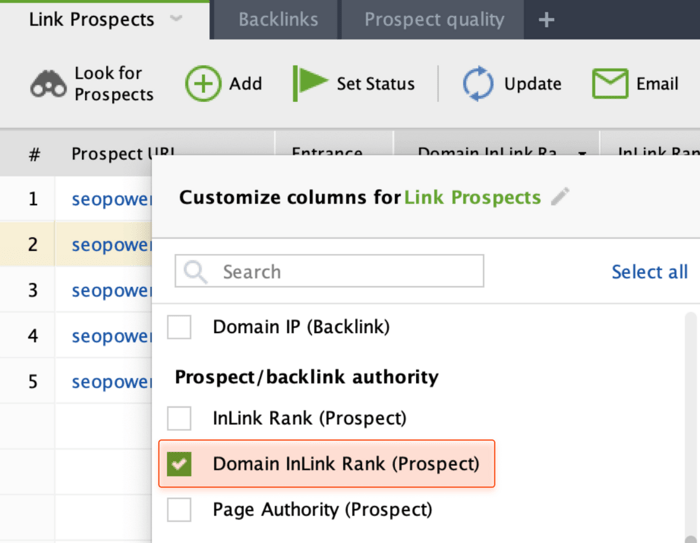

5. Sort the Prospect URL column in the same order (A to Z) and that’s it.
Now you have to write down the values in your template manually for each prospect.
InLink Rank is a trustful metric we use here at SEO PowerSuite. But I do understand that some of you may be using other tools, and other metrics to assess the authority of other websites.
If you’re using any other tools, feel free to use the equivalent of the InLink Rank metric to filter your link-building prospects. However, I cannot guarantee that the template will correctly set the priorities for your prospects with metrics other than InLink Rank.
After you fill the Domain InLink Rank column, the template will automatically calculate the priority for all prospects, ranging from Low to High. Also, if you already have a backlink from this prospect, you’ll see this in the Link Back column. Prospects that already link back to you will be given a low priority by default.
All that is left is to add good prospects to the outreach queue. You can do this by picking Yes in the last table column.
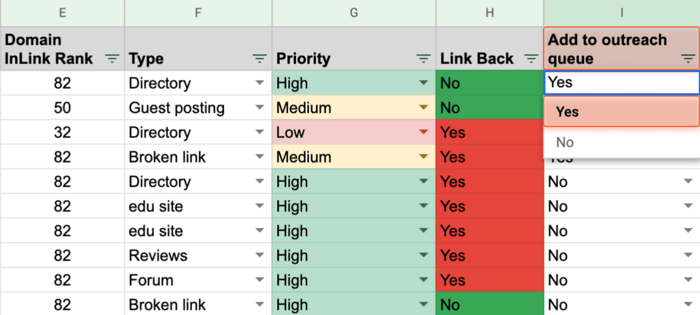

If you need to add multiple websites to the outreach queue in bulk, simply drag down the cell selection up to the last prospect you want to add.
Once you do this, the prospect will automatically get copied to tab 3. Outreach Dashboard, with which we’ll start working right away.
So the prospects are collected, filtered, and added to the outreach queue.
If you jump to tab 3. Outreach Dashboard, you’ll see that there are some empty cells that you’ll need to fill:
The first two are quite obvious. The remaining three are what we’ll discuss in more detail.
You can leverage various methods to find prospects’ contact data:
Manual lookup boils down to checking every single prospect’s site for contact details. As a rule, those details can be found on the Contact us or About pages.
With LinkAssistant, in turn, you can check all your prospects at once.
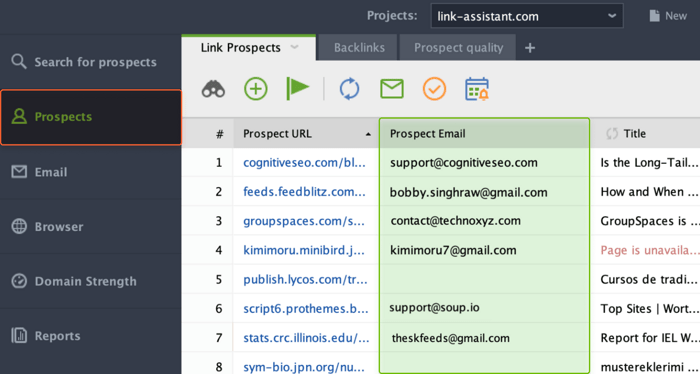
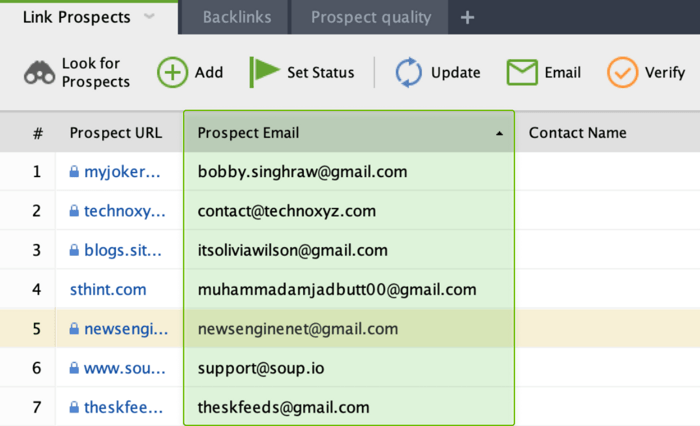
If you’ve been using LinkAssistant to collect your prospects, the contact data is already available in the Prospects module. In case you don’t see the Prospect Email and Contact Name columns, right-click any other column, and make sure the corresponding boxes are checked.

If you’ve been using any other method of collecting link-building prospects, you can still use LinkAssistant to quickly find contact data for your prospects.
To do this, open LinkAssistant, go to the Prospects module, and click Add. Copy and paste all your prospects from the outreach queue and hit Next two times.
On the next wizard’s screen (Step 3), find and tick Contact info. Click Finish.
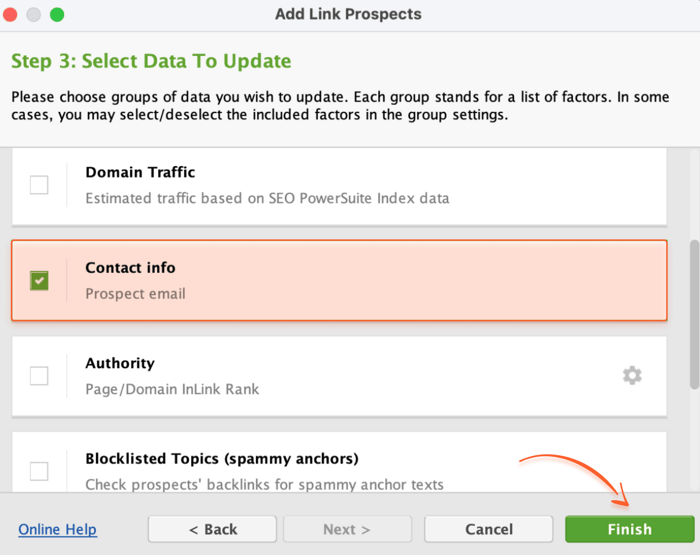

Then right-click any table column and tick the boxes Contact Name and Prospect Email.

That’s it! The tool has just found the email addresses of your prospects. All you have to do is just copy them to your link-prospecting template.

In case the previous two methods didn’t help with finding prospects’ contacts, you can turn to third-party apps, such as Snov.io, Rocketreach, and Hunter.io.
In addition to prospects’ email addresses, you can also go and find links to their social accounts. Sometimes, prospects are more willing to respond to your link-building requests there. This information is easy to find on any prospect’s website. Make sure you also copy the found accounts to your link prospecting template.
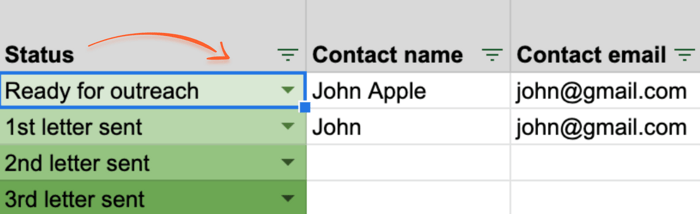
When you add a prospect's contact data, the status of a prospect in your template will automatically change to Ready for outreach.
.png)
Your next step is to actually send your first outreach letter to a given link-building prospect.
To help you ease your outreach efforts, I've collected all the best link-building outreach email templates in the Outreach Templates tab. They will greatly help you with your outreach process. Choose the one that fits your specific case and send it to the prospect. After that, don’t forget to jump back to the template and note the date of your first outreach. Once you do this, the status of a given prospect will automatically change to 1st letter sent. In the same way, when you send further outreach emails and follow-ups and note the date, the status will change accordingly.
If you manage to get a backlink from any prospect, change the status to Link placed. This prospect will automatically be added to the Placed Backlinks tab so to eliminate the probability that you will contact the same prospect again.
Likewise, if too much time passed and the prospect didn’t respond to you, or if the prospect refused to place your backlink, change the status to Delete from prospects. This prospect will be automatically added to the tab Stop list. So if you stumble upon such prospects again, you’ll see a corresponding mark in your template indicating you don’t need to contact them again.
As you might already know, the backlinks you’ve managed to acquire are not permanent. Your link-building partners may take them down at a certain point in time. So it’s important to keep an eye on your link profile.
For a regular backlink audit, I recommend that you use SEO SpyGlass. It’s free.
To check your backlinks in SEO SpyGlass, go to the Historical Data > Backlinks. Here, you’ll see all your new and lost backlinks. To check lost links, choose the corresponding tab next to the date range section.

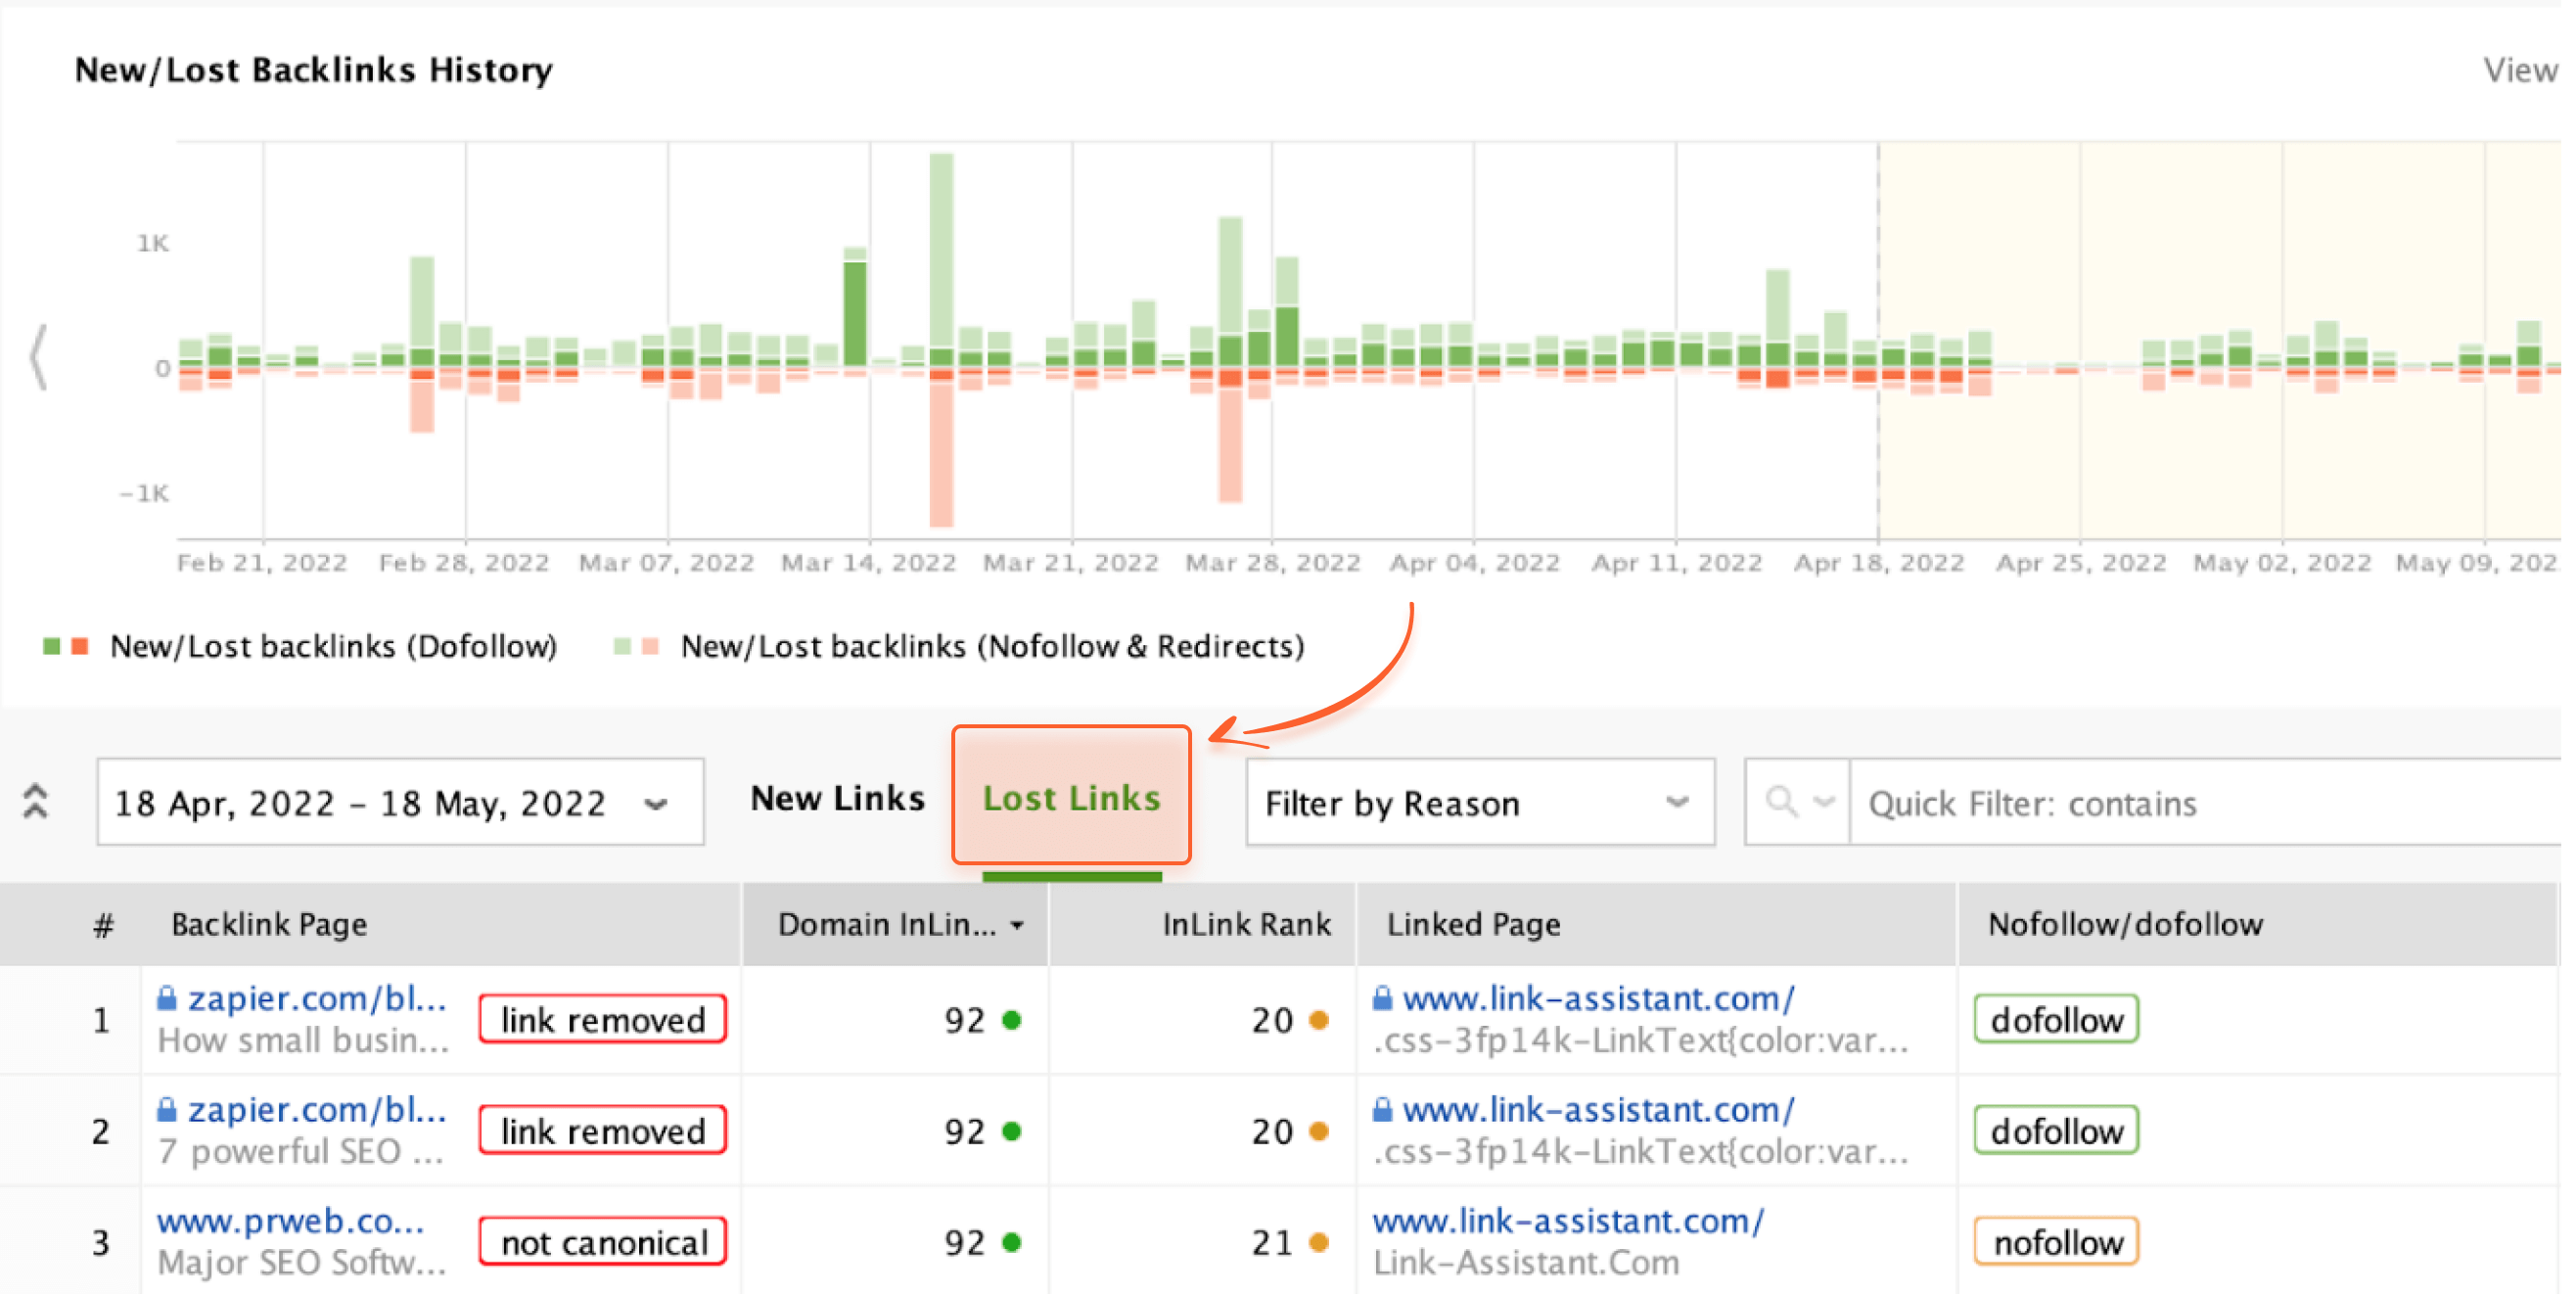
If you see the note link removed, this means that your link-building prospect has taken down your backlink. Oftentimes, you can simply contact the prospect again and politely ask to fix your backlink.
Hope you’ve found my automated link-building template and the workflow around it useful. If you need to make any adjustments to the existing template, feel free to change it to your needs. But keep an eye on automated cells with formulas – they can break, but you can easily fix them by simply changing the values inside the formulas.
Have questions or ideas on how to improve the link-prospecting template or want to leave a comment about this blog post? Welcome to our Facebook group!
| Linking websites | N/A |
| Backlinks | N/A |
| InLink Rank | N/A |