5347
•
15-minute read


Spring has come, and big scary Google updates have come, too.
And, of course, we at SEO PowerSuite have been very busy thinking about how to enhance your SEO experience and make it easier for you to recover from any search update, now and in the future.
So, we’re excited to unveil a great set of 11 new features designed to simplify your SEO routine. Moreover, these new features will help you fine-tune your site’s SEO strategy in a couple of clicks, bringing new insights into search performance and ranking progress.
Ready, steady, go.
Meet a new big pack of Google Search Console integrations with SEO PowerSuite’s WebSite Auditor and Rank Tracker tools. All to give you more data, more customization, and more ways to grow your rankings and improve your site’s technical performance.
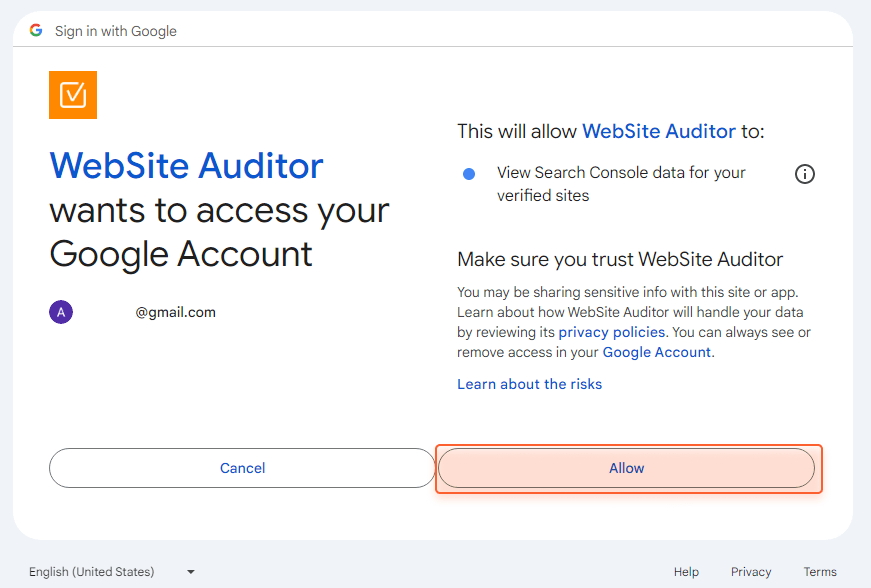
One of the most long-awaited and big updates — WebSite Auditor now lets you connect your GSC account to the site’s project, giving you all the data in one tool.


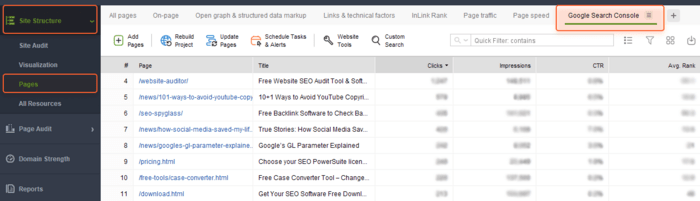
No need to switch between Google tools and WebSite Auditor anymore, as all the organic performance stats are now shown in a separate workspace inside your WebSite Auditor’s project.
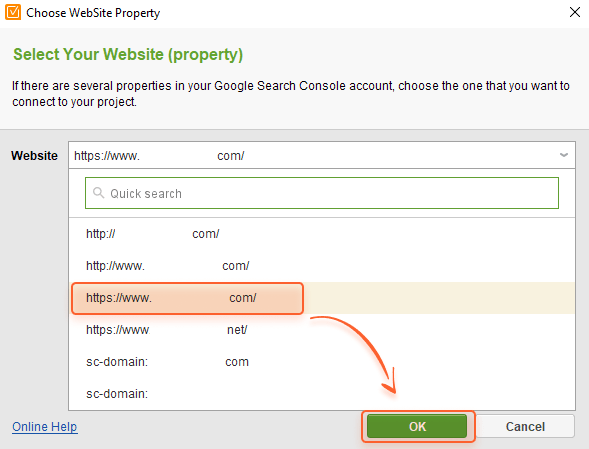
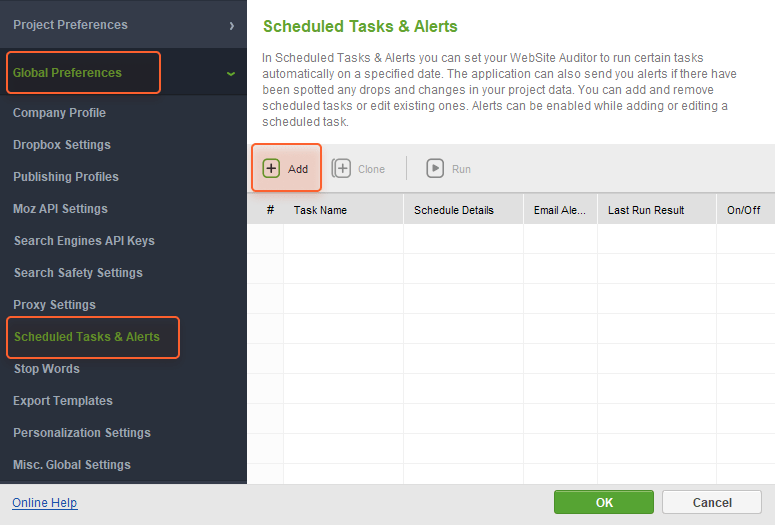
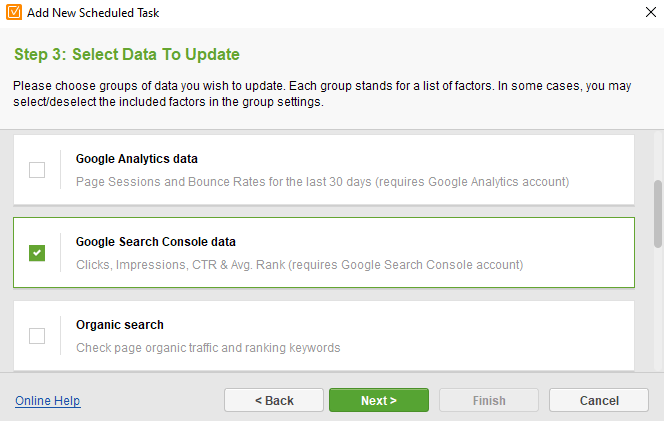
Here’s how to connect Google Search Console to WebSite Auditor:
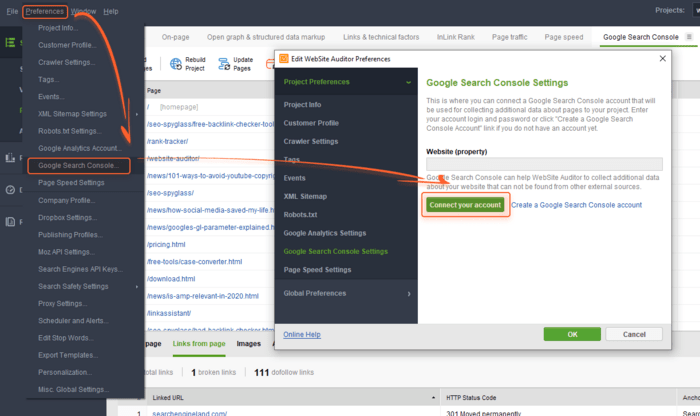
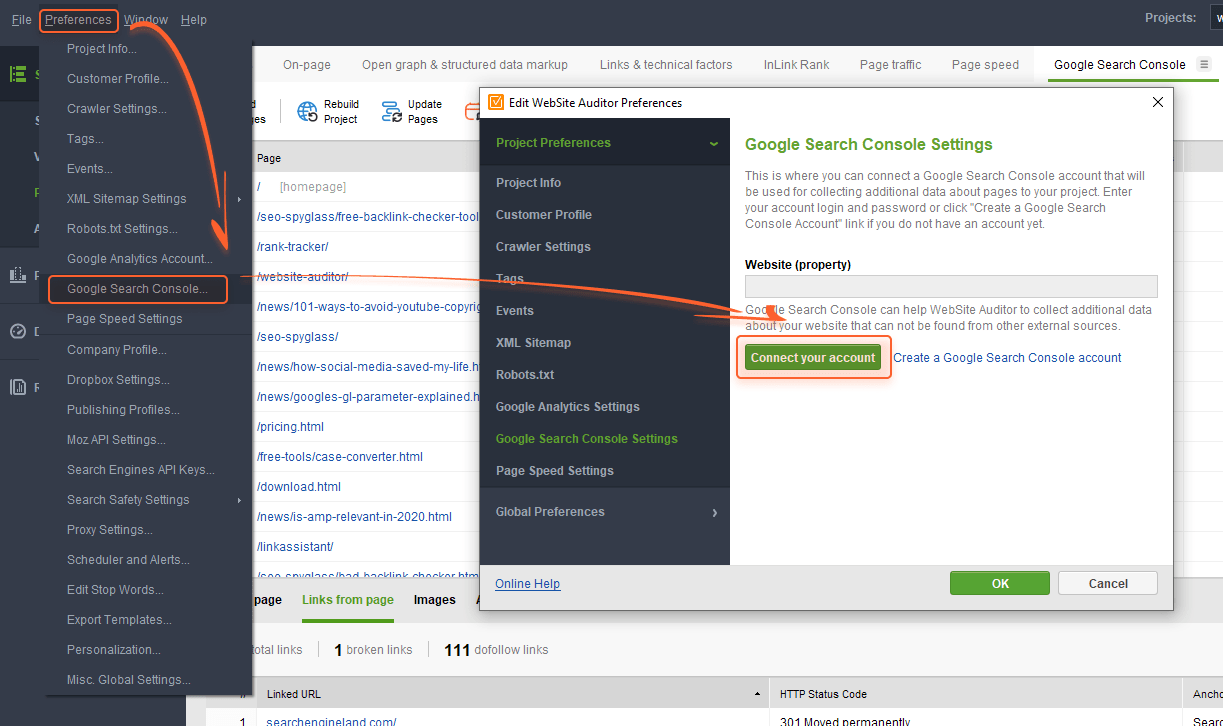
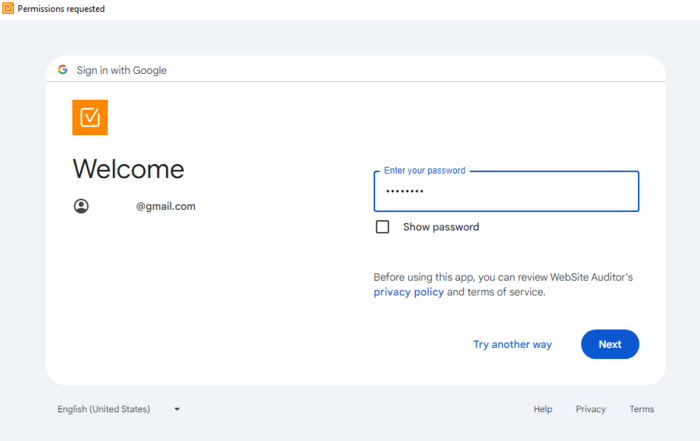
Allow WebSite Auditor to access your GSC account to collect organic performance data.


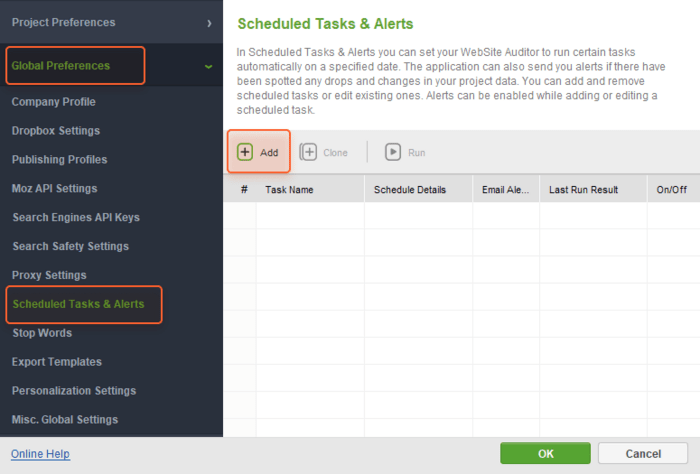
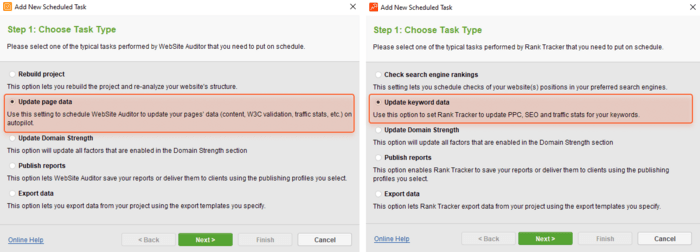
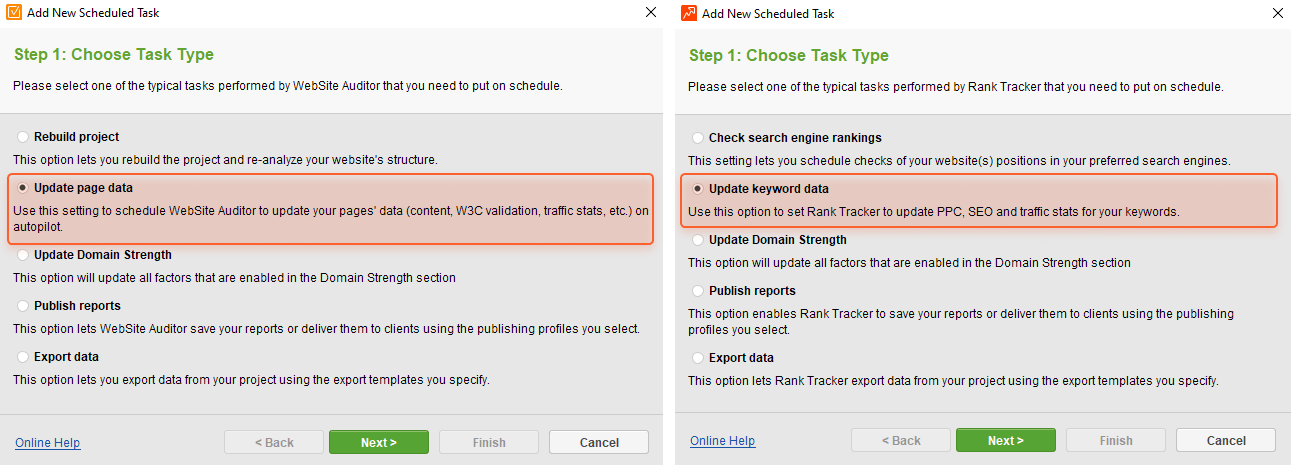
Automate GSC data refreshment just like you automate and schedule any other type of task in the SEO PowerSuite tools.
With the GSC task scheduler, you do not need to manually update Seach Console reports or waste time looking for new search performance stats (WebSite Auditor) and ranking data (Rank Tracker). Schedule the task, set up the frequency, and get fresh Google data in your SEO PowerSuite workspaces.
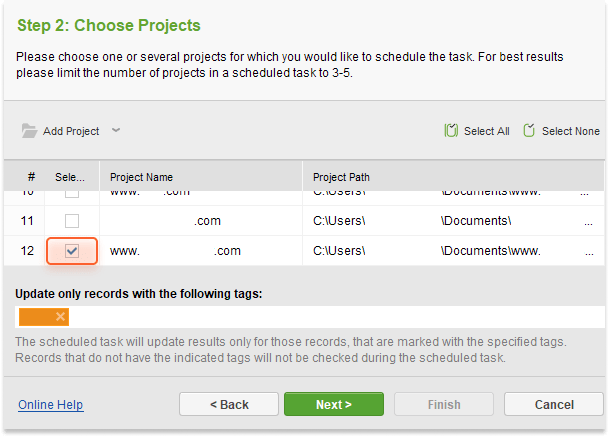
To schedule a task to automate GSC data refreshment, follow these steps:
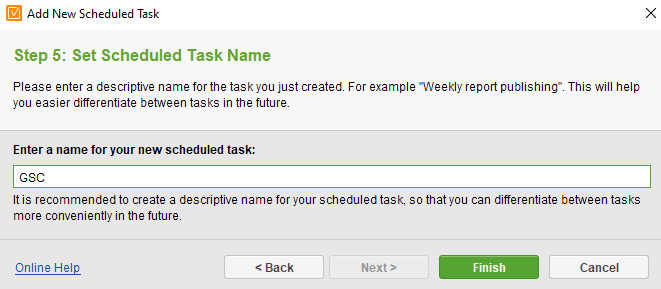
Voila! You’re all set.
You can now set up the required date range for Google Search Console data pulled to SEO PowerSuite’s Rank Tracker and WebSite Auditor.
This way, you can collect data for a week, 3 months, or any other custom period, only limited to GSC’s native 16-month maximum. Choose any time you want not to overload your workspace with the data you don’t need. For example, if you need to track the traffic changes after, say, the latest Google core update (yes that big scary one), you can specify the exact dates of the beginning and the end of the update rollout to see how your site was performing during those days.
You can adjust the GSC time settings whenever you need.
Here’s how to set this up. In WebSite Auditor or Rank Tracker, go to Preferences > Google Search Console. Connect your GSC account and select the date range from the drop-down menu. In my example, I’ll proceed with the custom range.


Click OK, and here you are.
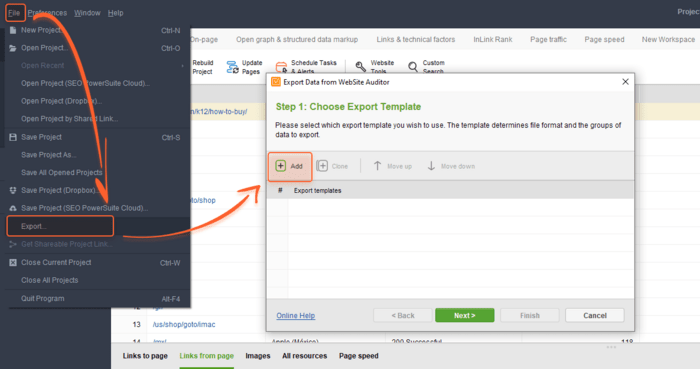
WebSite Auditor now lets you not only see Google Search Console data in-app but also export it in any available format to share with your clients or colleagues. You don’t need to bother manually compiling data from various sources into one single document — WebSite Auditor will get it covered.
Here’s how to find the exportable data from Google Search Console:

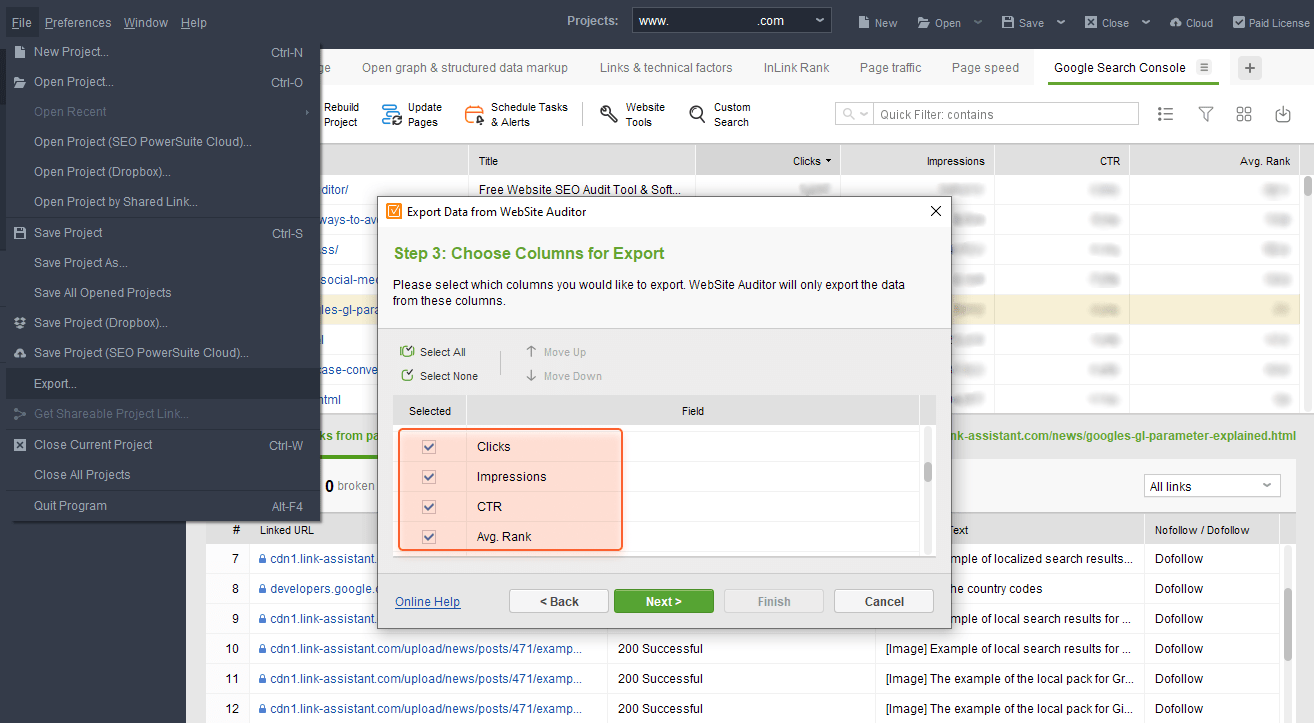
Combine data from these columns with any other information you need in your SEO documents.
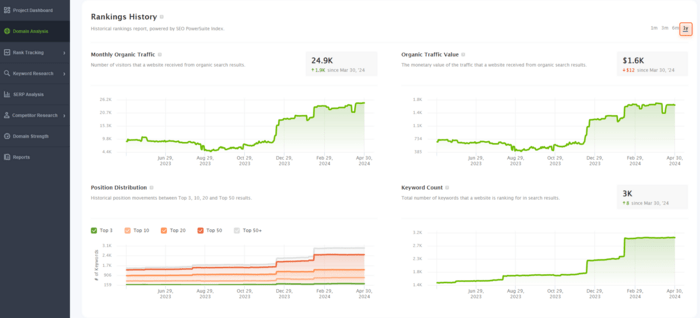
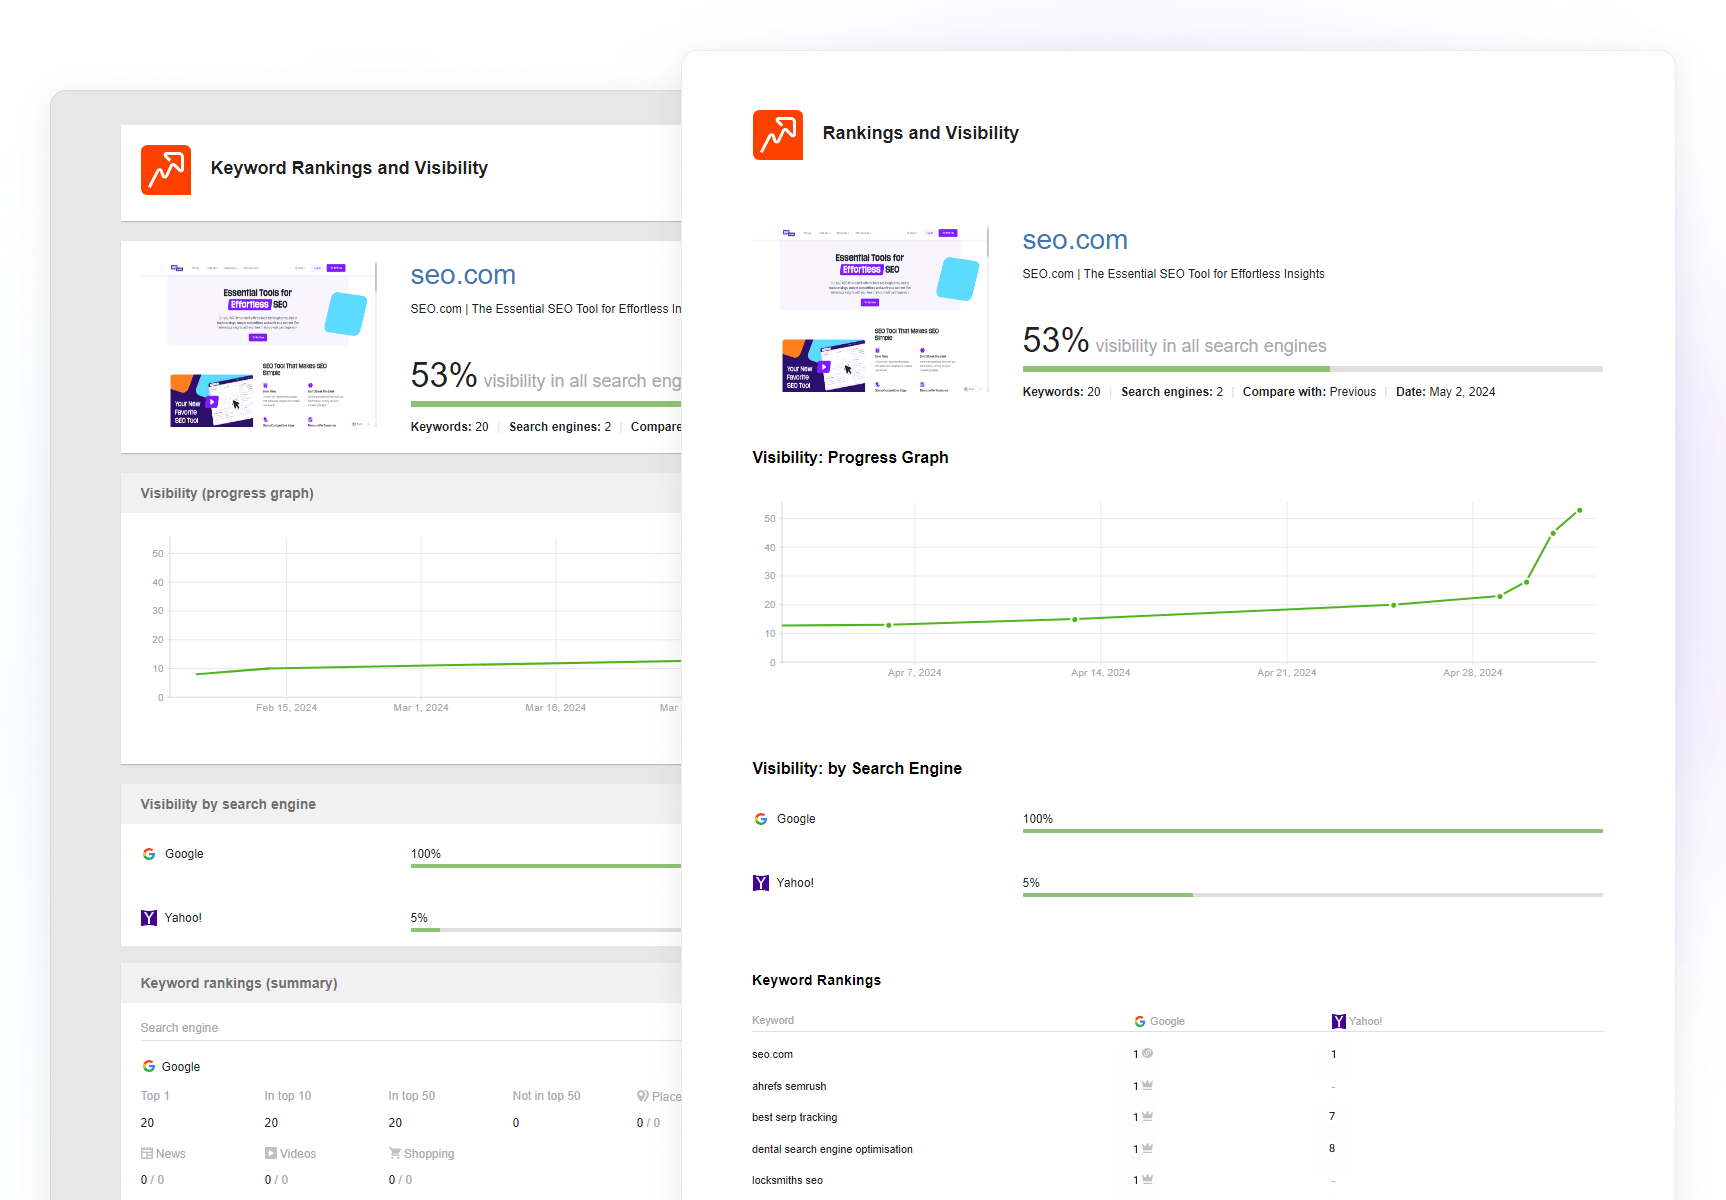
The more data, the better. Rank Tracker’s Project Dashboard and Domain Analysis modules now let you access the whole year of historical performance records for your site. And, sure thing, for your competitors.

New insights into ranking history, traffic distribution, and backlink data will help you get a better understanding of how search trends change over time or draw correlations between traffic fluctuations and Google updates. With this data at hand, you can improve your SEO strategy, envisage possible traffic shifts, and meet them arms blazing.
To see historical data for 1 year, go to Rank Tracker’s Project Dashboard or Domain Analysis module and find any historical report of interest. In my example, I’ll proceed with the Rankings History dashboard of the Domain Analysis module. Then, select the 1-year period above the graphs (highlighted in red on the screenshot), and enjoy your pack of new data.

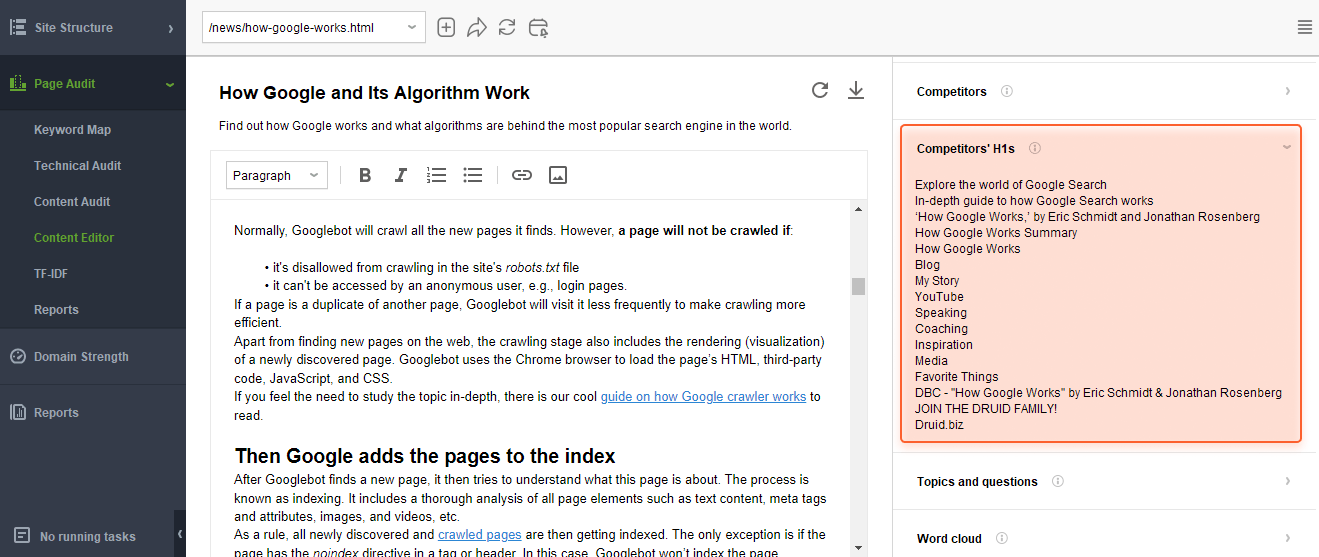
WebSite Auditor’s Content Editor now gives you even more insights into your SERP competitors’ content strategy — you can easily check their H1 tags.
Why’s this new feature useful? H1 is one of the essential HTML tags for SEO and has a significant impact on your positions in Google. Your competitors may serve as a good source of SEO inspiration. Especially when the topic of the content you’re going to create is pretty new for you and you’re not sure about the structure of the future page. In this case, competitors’ H1s may help you move in the topically right direction and make your content really helpful.
To discover your competitors’ H1 headings, go to Page Audit > Content Editor and take a look at the Competitors’ H1s section.

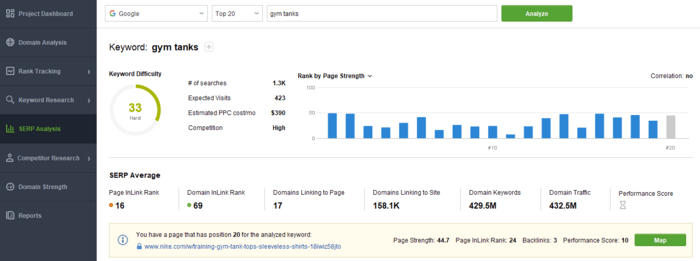
Rank Tracker’s SERP Analysis module now lets you change the number of competitors for analysis.
If you don’t need the default 50 positions, you can cut them up to the top 10 and get all the metrics and position correlations based on the selected number.
To change the number of competitors for finding SERP position correlations, go to Rank Tracker’s SERP Analysis module, specify the search engine and the keyword, and select the preferred number of competitors from the drop-down menu.
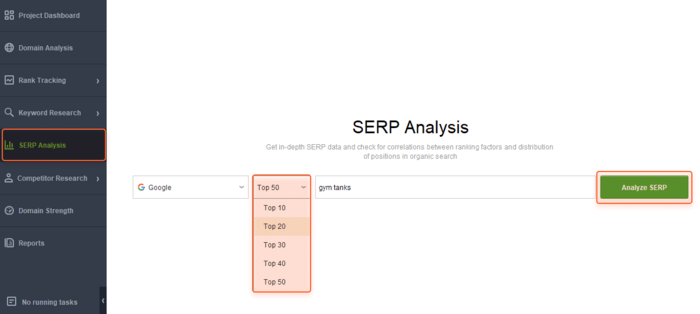

Then initiate the analysis by hitting Analyze SERP. The correlation graph will contain the number of competitors you’ve selected, as well as the metric calculation will be done based on this same number.

Want to quickly get into the SERP that seems occupied by only big players from the first sight? Here’s the solution — outrank the weakest SERP competitor, and the win is yours.
How to spot the weakest one? From now on, you can do that easily in Rank Tracker. The newly updated SERP Analysis module lets you highlight SERP competitors that are weaker than you within a click.
This “SERP losers’ highlighter” is a nice solution for the underdog SEO strategy. It is the strategy that lets relatively weak sites compete in highly competitive SERPs by outperforming those with the lowest domain authority among the SERP competitors.
So if a weaker site still outranks you, you need to investigate what gives this site an advantage — luckily, SERP Analysis easily handles this, too.
To see SERP competitors with lower domain authority (Domain Strength, Domain InLink Rank in SEO PowerSuite tools), go to Rank Tracker’s SERP Analysis, specify the search engine, the keyword, and the number of competitors, and initiate the search. Then, tick the Highlight weak pages option. Weaker SERP competitors will be highlighted in green.
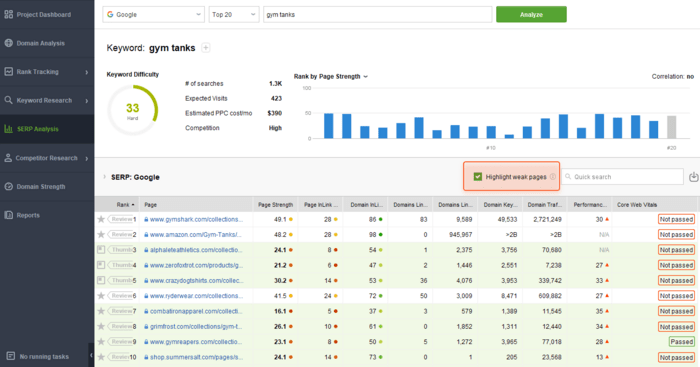

All you need now is to create high-quality helpful content with relevant keywords and publish it on your site. Highly likely you’ll move those weaker sites from the SERP and take their positions instead. Or even higher, who knows?
One more overhaul aimed to make your SEO life easier. SEO reports in the SEO PowerSuite tools now look much simpler and easier to understand. Sure thing, you can still assemble any custom report template and add as many sections as you need. But the default layout and design have become clearer than ever before.

With the new beautiful SEO reports, you will need less time to create a digestible set of data to present it to your clients or team— you have this covered by default and don’t need to bother with additional settings. Your clients will thank you twice: for the beautiful and clear report and for more time you devote to their SEO as a result.
WebSite Auditor now lets you find and fix broken images faster. All thanks to the <img> tag that is shown for every broken image in the Site Audit module.
With this feature, you will not only know the page that contains the broken image but also the exact HTML tag showing where to look for this image.
Having broken image tags highlighted will speed up their fixing process, as you can copy these exact instructions and pass them to your webmasters. This way, they will not need to crawl through the page’s code and look for the corrupted images on their own.
To see the tags for all the broken images on your page, in WebSite Auditor go to Site Structure > Site Audit, and scroll to the Images > Broken images section. Here you are.

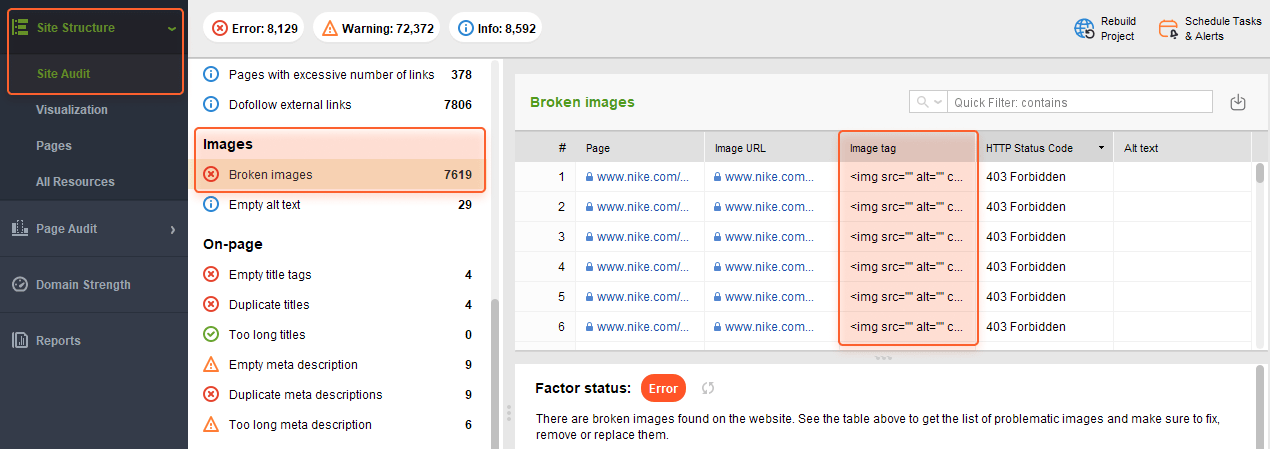
Click the Quick CSV Export icon in the upper right corner of the workspace to download the file with all the broken images and their tags.
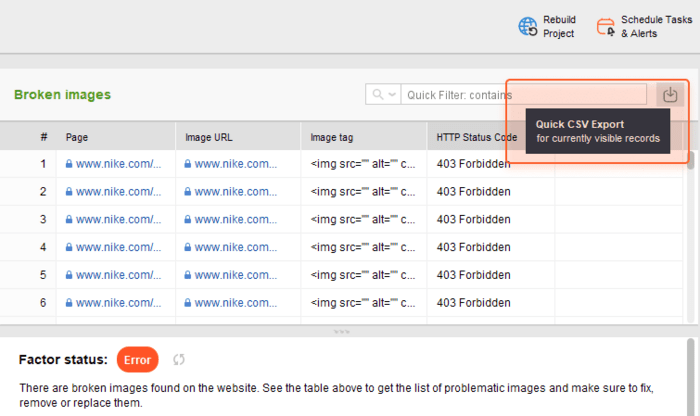

Voila — you have a detailed CSV file to pass to your web developers. Now it’s their turn to do the fixing.
Good news for everyone, especially for those who have a lot of keyword groups, due to big websites or (and) super detailed keyword clustering.
Rank Tracker now supports keyword groups’ management with the help of hotkeys. Ctrl + X (cut) and Ctrl + V (paste) combinations (cmd + X and cmd + V for macOS) let you move groups without time-consuming scrolling through long lists of keyword groups.

More time to plan your SEO keyword strategy and less time for manual settings. Sounds pretty nice.
Note: If the keyword group you want to move contains subgroups, they will be moved together with the main one.
To move a keyword group in Rank Tracker, select the group and press Ctrl + X (cmd + X). In the menu, you will see this option as Cut Group:
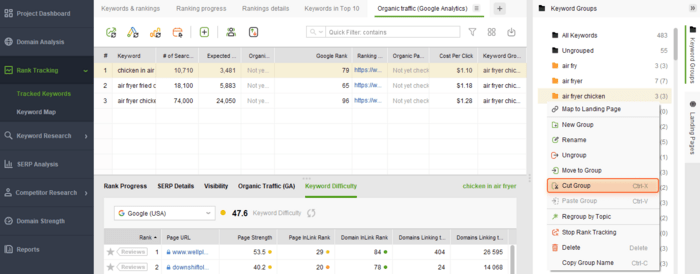

Then, click on the folder where you want to paste the selected group and press Ctrl + V (cmd + V). Magic.
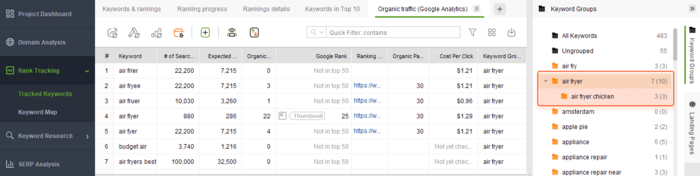

Or right-click the destination group and select Paste Group.
If you want to move the group to the root folder, then simply click the All Keywords folder and paste your group there.
At SEO PowerSuite, we work to make our software better for our users, and your feedback is a real value for us. Share your impression about the new features in our Facebook group, and don’t hesitate to upgrade your SEO PowerSuite packs to experience the whole SEO power of our software.


| Linking websites | N/A |
| Backlinks | N/A |
| InLink Rank | N/A |